苍穹外卖 苍穹外卖前端开发 Vue基础 基于脚手架创建前端工程 1.环境要求:
node.js:前端项目的运行环境。npm:JavaScript的包管理工具。Vue CLI:基于Vue进行快速开发的完整系统,实现交互式的项目脚手架。
2.使用Vue CLI创建前端工程:
方式一:vue create 项目名称
方式二:vue ui
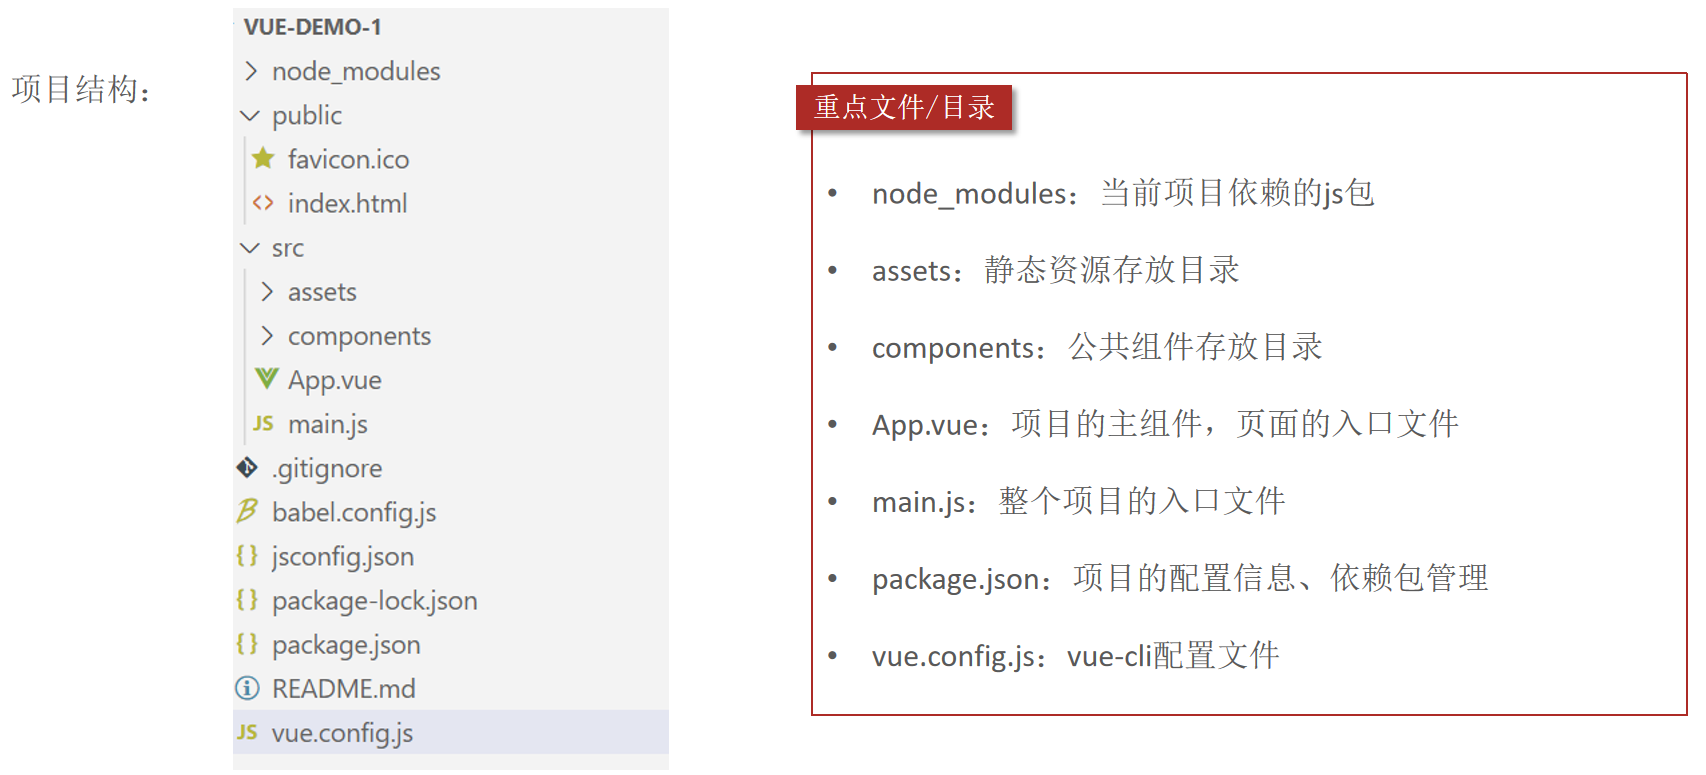
3.项目结构
4.启动前端项目:npm run serve。
5.前端项目启动后,服务端口默认为8080,很容易和后端tomcat端口号冲突。可以修改前端服务的端口号。
在vue.config.js中配置前端服务端口号:
1
2
3
4
5
6
7
const { defineConfig } = require ('@vue/cli-service' )module .exports = defineConfig ({transpileDependencies : true ,devServer : {port : 7070
Vue基本使用方式 Vue组件 Vue的组件文件以.vue结尾,每个组件由三部分组成:
结构<template>:只有一个根元素,由它生成HTML代码。
样式<style>:编写CSS,控制页面展示效果,全局样式,影响所有组件,局部样式,只作用于当前组件。
逻辑<script>:编写JS代码,控制模版的数据来源和行为。
文本插值 作用:用来绑定data方法返回的对象属性。
用法:{{}}。
1
2
3
4
5
6
7
8
9
10
11
12
13
<template>
属性绑定 作用:为标签的属性绑定data方法中返回的属性。
用法:v-bind:xxx,简写为 :xxx。
1
2
3
4
5
6
7
8
9
10
11
12
13
14
15
16
17
18
<template>
事件绑定 作用:为元素绑定对应的事件。
用法:v-on:xxx,简写为@xxx。
1
2
3
4
5
6
7
8
9
10
11
12
13
14
15
16
17
18
19
<template>
双向绑定 作用:表单输入项和 data 方法中的属性进行绑定,任意一方改变都会同步给另一方。
用法:v-model。
1
2
3
4
5
6
7
8
9
10
11
12
13
14
15
16
17
18
19
20
<template>
条件渲染 作用:根据表达式的值来动态渲染页面元素。
用法:v-if、v-else、v-else-if。
1
2
3
4
5
6
7
8
9
10
11
12
13
14
15
16
17
18
19
20
21
<template>
axios Axios是一个基于promise的网络请求库,作用于浏览器和node.js中。
安装命令:npm install axios。
导入命令:import axios from 'axios'。
axios的API列表:
参数说明:
url:请求路径。data:请求体数据,最常见的是JSON格式数据。config:配置对象,可以设置查询参数、请求头信息。
1
2
3
4
5
6
7
8
9
10
11
12
13
14
15
16
17
18
19
20
21
22
23
24
25
26
27
28
29
30
31
32
33
34
35
36
37
38
39
40
41
42
43
44
45
46
47
48
49
50
51
52
53
54
55
56
<template>
解决跨域问题 为了解决跨域问题,可以在vue.config.js文件中配置代理:
1
2
3
4
5
6
7
8
9
10
11
12
13
14
15
const { defineConfig } = require('@vue/cli-service'){ : true , : { : 7070 , : { : { : 'http: : { : ''} } } } } )
路由Vue-Router vue属于单页面 应用,所谓的路由,就是根据浏览器路径不同,用不同的视图组件替换这个页面内容。
vue实现路由:通过vue-router实现路由功能,需要安装js库(npm install vue-router)。
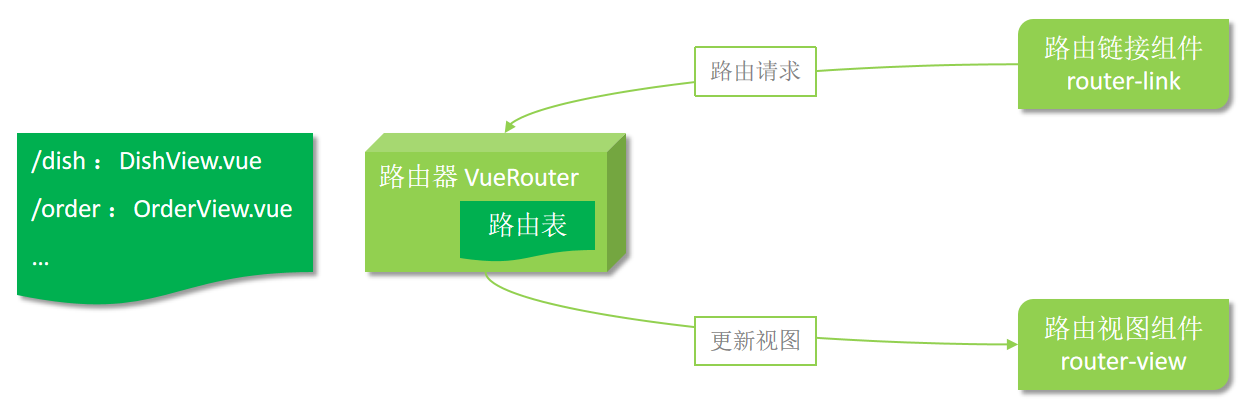
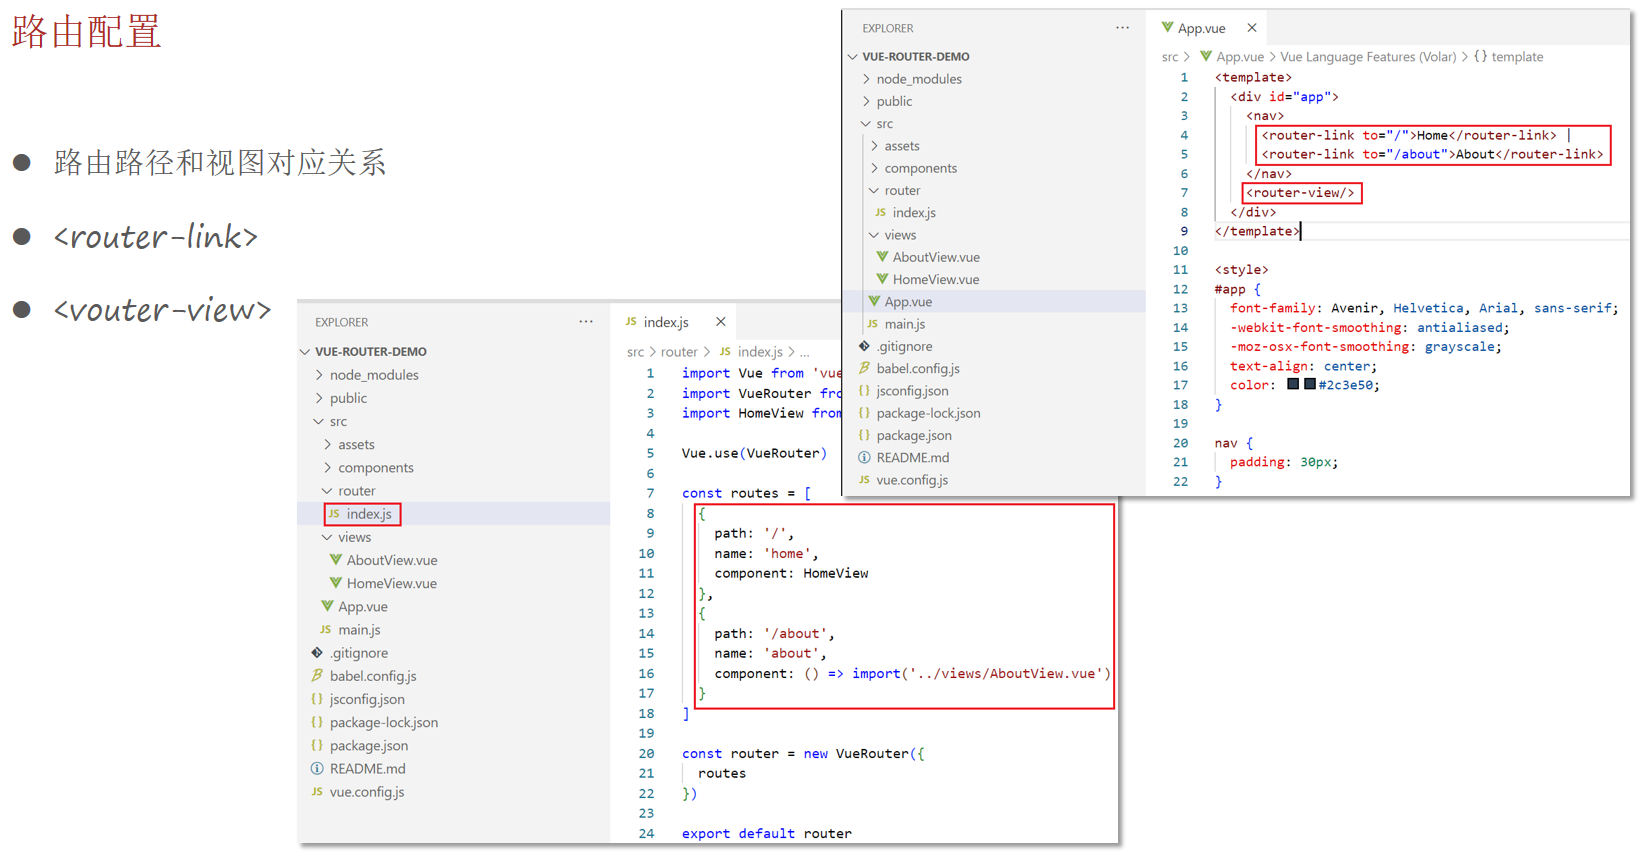
路由配置 路由组成:
VueRouter:路由器,根据路由请求在路由视图中动态渲染对应的视图组件。
<router-link>:路由链接组件,浏览器会解析成<a>。
<router-view>:路由视图组件,用来展示与路由路径匹配的视图组件。
路由跳转
标签式
1 <router-link to="/">Home</router-link>
编程式
1
2
3
4
5
6
7
8
9
10
11
12
13
14
15
16
17
18
19
20
21
22
23
<template>
404页面 1 2 3 4 5 6 7 8 9 10 11 12 13 14 15 16 17 18 19 20 21 22 23 24 25 const routes = [path : '/' ,name : 'home' ,component : HomeView path : '/about' ,name : 'about' ,component : () => import ( '../views/AboutView.vue' ) path : '/404' ,component : () => import ('../views/404View.vue' )path : '*' , redirect : '/404'
1 2 3 4 5 6 <!-- 404View.vue -->
嵌套路由 嵌套路由:组件内要切换内容,就需要用到嵌套路由(子路由)。
实现步骤:
1.安装并导入elementui :npm i element-ui -S,实现页面布局(Container布局容器):ContainerView.vue。
1 2 3 4 5 6 7 8 9 10 11 12 13 14 15 16 17 18 19 20 21 22 23 24 25 26 27 28 29 30 31 32 33 34 35 36 37 38 39 40 41 42 43 44 45 46 47 48 49 50 51 52 53 54 55 56 57 58 59 60 <template>
2.提供子视图组件,用于效果展示:P1View.vue、P2View.vue、P3View.vue。
1 2 3 4 5 <template>
3.在src/router/index.js中配置路由映射规则(嵌套路由配置)。
1 2 3 4 5 6 7 8 9 10 11 12 13 14 15 16 17 18 19 20 {path : '/c' ,component : () => import ('../views/container/ContainerView.vue' ),redirect : '/c/p1' ,children : [path : '/c/p1' ,component : () => import ('../views/container/P1View.vue' )path : '/c/p2' ,component : () => import ('../views/container/P2View.vue' )path : '/c/p3' ,component : () => import ('../views/container/P3View.vue' )
4.在布局容器视图中添加<router-view>,实现子视图组件展示。
5.在布局容器视图中添加<router-link>,实现路由请求。
注意:子路由变化,切换的是【ContainerView组件】中 <router-view></router-view> 部分的内容。
状态管理vuex 介绍 vuex是一个专为Vue.js应用程序开发的状态管理库。
vuex可以在多个组件之间共享数据,并且共享的数据是响应式的,即数据的变更能及时渲染到模板。
vuex采用集中式存储管理所有组件的状态。
安装vuex:npm install vuex@next --save。(可以创建带有vuex功能的脚手架工程来使用vuex)
核心概念:
state:状态对象,集中定义各个组件共享的数据。mutations:类似于一个事件,用于修改共享数据,要求必须是同步函数。actions:类似于mutation,可以包含异步操作,通过调用mutation来改变共享数据。
使用方式 在store对象的state属性中定义共享数据。
在store对象的mutations属性中定义修改共享数据的函数。
在store对象的actions属性中定义调用mutation的函数,可以进行异步操作。
mutations中的函数不能直接调用,只能通过store对象的commit方法调用。
actions中定义的函数不能直接调用,只能通过store对象的dispatch方法调用。
1 2 3 4 5 6 7 8 9 10 11 12 13 14 15 16 17 18 19 20 21 22 23 24 25 26 27 28 29 30 31 32 33 34 35 36 37 38 import Vue from 'vue' import Vuex from 'vuex' import axios from 'axios' Vue .use (Vuex ) export default new Vuex .Store ({state : { name : '未登录游客' getters : {},mutations : { setName (state, newName ){name = newNameactions : { setNameByAxios (context ){axios ({url : '/api/admin/employee/login' ,method : 'post' ,data : {username : 'admin' ,password : '123456' then ( res =>if (res.data .code == 1 ){commit ('setName' , res.data .data .name )modules : {}
1 2 3 4 5 6 7 8 9 10 11 12 13 14 15 16 17 18 19 20 21 22 23 24 25 26 27 28 29 30 31 32 33 34 35 36 37 38 39 40 41 42 43 44 <!-- App.vue -->
1 2 3 4 5 6 7 8 9 10 11 12 13 14 15 16 const { defineConfig } = require ('@vue/cli-service' )module .exports = defineConfig ({transpileDependencies : true ,devServer : {port : 7777 ,proxy : {'/api' : {target : 'http://localhost:8080' ,pathRewrite : {'^/api' : ''
TypeScript
TypeScript(简称:TS) 是微软推出的开源语言。TypeScript是JavaScript的超集(JS有的TS都有)。TypeScript = Type + JavaScript(在JS基础上增加了类型支持)。TypeScript文件扩展名为ts。TypeScript可编译成标准的JavaScript,并且在编译时进行类型检查。
在前端项目中使用TypeScript,需要进行安装,命令为:npm install -g typescript。
查看TypeScript版本:tsc -v。
入门 1.创建hello.ts文件。
1 2 3 4 5 6 7 function hello (msg :string console .log (msg)hello (123 )
2.使用tsc命令编译hello.ts文件。
1 2 3 4 5 6 7 8 PS E:\2_learn\Java-waimai\code\vue_project\ts-demo> tsc .\hello.ts
可以看到编译报错,提示参数类型不匹配。这说明在编译时TS会进行类型检查。需要注意的是在编译为JS文件后,类型会被擦除。
编译后:
1 2 3 4 5 6 function hello (msg ) {console .log (msg);hello ("hi" );
TypeScript和JavaScript的区别:
TS属于静态类型编程语言,JS属于动态类型编程语言。静态类型在编译期做类型检查,动态类型在执行期做类型检查。
对于JS来说,需要等到代码执行的时候才能发现错误(晚)。
对于TS来说,在代码编译的时候就可以发现错误(早)。
配合VSCode开发工具,TS可以提前到在编写代码的同时就发现代码中的错误,减少找Bug、改Bug的时间。
TypeScript 常用类型
类型 例 备注
字符串类型
string
数字类型
number
布尔类型
boolean
数组类型
number[],string[], boolean[] 依此类推
任意类型
any
相当于又回到了没有类型的时代
复杂类型
type 与 interface
函数类型
() => void
对函数的参数和返回值进行说明
字面量类型
“a”|”b”|”c”
限制变量或参数的取值
class 类
class Animal
基于TS进行前端开发时,类型标注的位置有如下3个:标注变量、标注参数、标注返回值。
1 2 3 4 5 6 let msg :string ='hello ts !' const m2 = (name : string ) : string =>return name.toLowerCase () + msg
字符串、数字、布尔类型 1 2 3 4 5 6 7 8 9 10 11 12 let username : string = 'itcast' let age : number = 20 let isTrue : boolean = true console .log (username)console .log (age)console .log (isTrue)
字面量类型 字面量类型用于限定数据的取值范围,类似于java中的枚举。
1 2 3 4 5 6 7 function printText (s : string , alignment : 'left' |'right' |'center' console .log (s,alignment)printText ('hello' ,'left' )
interface类型 interface类型是TS中的复杂类型,它让TypeScript具备了JavaScript所缺少的、描述较为复杂数据结构的能力。
可以通过在属性名后面加上?,表示当前属性为可选。
1 2 3 4 5 6 7 8 9 10 interface Cat {name : string ,number const c1 : Cat = {name : '小白' , age : 1 }const c2 : Cat = {name : '小白' }
class 类型 使用class关键字来定义类,类中可以包含属性、构造方法、普通方法等。
1 2 3 4 5 6 7 8 9 10 11 12 13 14 15 16 17 18 class User {name : string ; constructor (name : string this .name = namestudy (console .log (this .name + '正在学习' )const user = new User ('张三' )console .log (user.name )study ()
在定义类时,可以使用implments关键字实现接口。
1 2 3 4 5 6 7 8 9 10 11 12 13 14 15 16 17 18 19 20 21 interface Animal {name : string eat (): void class Bird implements Animal {name : string constructor (name : string this .name = nameeat (): void {console .log (this .name + 'eat' )const b1 = new Bird ('燕子' )console .log (b1.name )eat ()
在定义类时,可以使用extends关键字 继承其他类。
1 2 3 4 5 6 7 8 9 10 11 12 class Parrot extends Bird {say (console .log (this .name + ' say hello' )const myParrot = new Parrot ('Polly' )eat ()say ()console .log (myParrot.name )
前端环境搭建 代码导入 直接导入课程资料中提供的前端工程,在此基础上开发即可。
使用的node版本为12.22.0可以成功npm install所需的包。
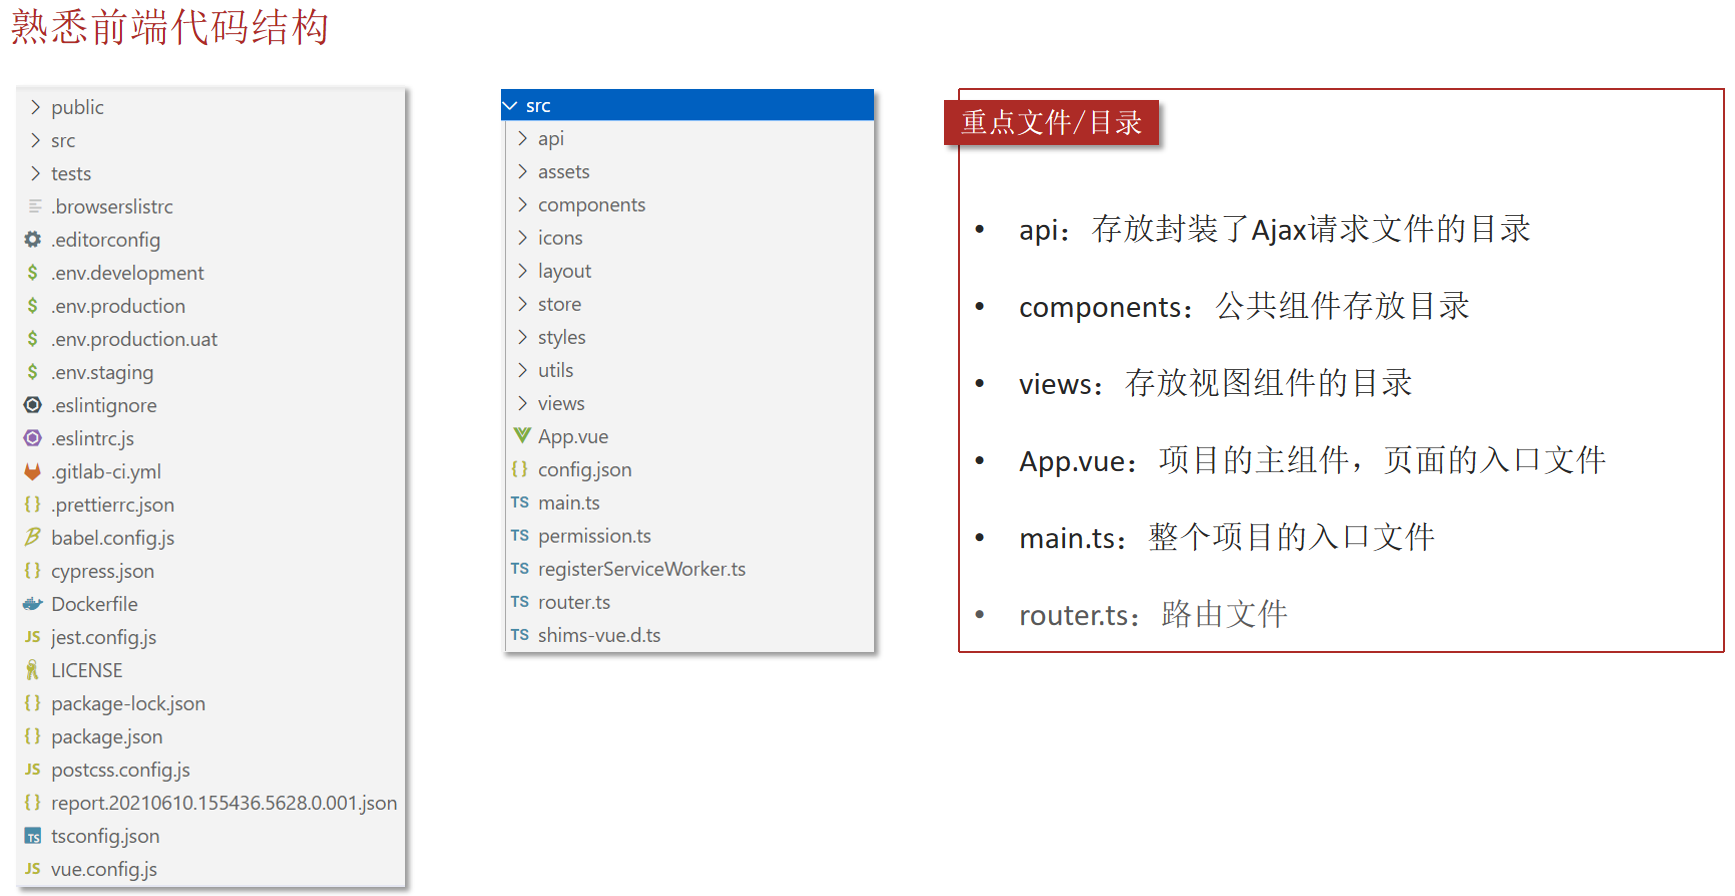
前端代码结构
api:存放封装了Ajax请求文件的目录。components:公共组件存放目录。views:存放视图组件的目录。App.vue:项目的主组件,页面的入口文件。main.ts:整个项目的入口文件。router.ts:路由文件。
员工管理 员工分页查询 1.从路由文件router.ts中找到员工管理页面(组件)。
1 2 3 4 5 6 7 8 {path : "employee" ,component : () => import ("@/views/employee/index.vue" ),meta : {title : "员工管理" ,icon : "icon-employee"
2.制作页面头部效果,为查询按钮绑定事件,发送Ajax请求获取分页数据。
输入框和按钮都是使用ElementUI提供的组件。
对于前端的组件只需要参考ElementUI提供的文档,进行修改即可。
1 2 3 4 5 6 7 8 <div class="tableBar">
3.在src/api/employee.ts中定义方法,发送Ajax请求获取分页数据。
1 2 3 4 5 6 7 export const getEmployeeList = (params : any request ({'url' : `/employee/page` ,'method' : 'GET' ,'params' : params
3.(1)定义pageQuery方法,发送Ajax请求获取分页数据。
先验证当前pageQuery方法能否正常执行。按照规范,真正发送Ajax请求的代码需要封装到api目录下的ts文件中(src/api/employee.ts)。pageQuery方法中调用getEmployeeList方法。
(2)在员工管理组件中导入employee.ts中定义的方法,并在data() 方法中定义分页相关的模型数据。
注意:需要将name属性和上面的输入框进行双向绑定。
(3)提供vue的初始化方法created(),在页面加载后就查询分页数据。
(4)使用ElementUI提供的表格组件展示分页数据。
(5)动态展示启用、禁用按钮:
如果当前员工的状态为启用,则展示为【禁用】按钮。
如果当前员工的状态为禁用,则展示为【启用】按钮。
(6)使用ElementUI提供的分页条组件,并绑定事件处理函数。
1 2 3 4 5 6 7 8 9 10 11 12 13 14 15 16 17 18 19 20 21 22 23 24 25 26 27 28 29 30 31 32 33 34 35 36 37 38 39 40 41 42 43 44 <script lang="ts" >import { getEmployeeList } from '@/api/employee' export default {data (return {name : '' , page : 1 , pageSize : 10 , total : 0 , records : [] created (this .pageQuery () methods : {pageQuery (const params = { name : this .name , page : this .page , pageSize : this .pageSize }getEmployeeList (params).then (res =>if (res.data .code == 1 ) {this .total = res.data .data .total this .records = res.data .data .records catch (err =>this .$message .error ("请求出错了:" + err.message )handleSizeChange (pageSize ){this .pageSize = pageSizethis .pageQuery ()handleCurrentChange (page ){this .page = pagethis .pageQuery ()
启用禁用员工账号 1.为启用、禁用按钮绑定单击事件handleStartOrStop。
1 2 3 4 5 6 7 8 <el-table-column label="操作">
2.编写handleStartOrStop`方法。
注意:如果是管理员账号则不允许更改账号状态。
1 2 3 4 5 6 7 8 9 10 11 12 13 14 15 16 17 18 19 20 21 22 23 24 25 handleStartOrStop (row ) {if (row.username === 'admin' ) {this .$message .error ('admin为系统的管理员账号,不能更改账号状态!' )return this .$confirm('确认要修改当前员工账号的状态吗?' , '提示' , {confirmButtonText : '确定' ,cancelButtonText : '取消' ,type : 'warning' then (() => {const p = {id : row.id ,status : !row.status ? 1 : 0 enableOrDisableEmployee (p).then (res =>if (res.data .code == 1 ) {this .$message .success ('员工的账号状态修改成功' )this .pageQuery ()
3.在employee.ts中封装启用禁用员工账号方法,发送Ajax请求。
1 2 3 4 5 6 7 export const enableOrDisableEmployee = (params : any request ({'url' : `/employee/status/${params.status} ` ,'method' : 'POST' ,'params' : {id : params.id }
新增员工 添加员工操作步骤:
点击“添加员工”按钮,跳转到新增页面。
在新增员工页面录入员工相关信息。
点击“保存”按钮完成新增操作。
1.为 “添加员工”按钮绑定单击事件。(index.vue)
1 <el-button type="primary" style="float: right;" @click="handleAddEmp()">+添加员工</el-button>
2.提供handleAddEmp方法,进行路由跳转。(index.vue)
1 2 3 4 5 handleAddEmp (this .$router .push ('/employee/add' )
注意:在路由文件中已经配置了如下路由规则。
1 2 3 4 5 6 7 8 {path : "/employee/add" ,component : () => import ("@/views/employee/addEmployee.vue" ),meta : {title : "添加/修改员工" ,hidden : true
3.根据产品原型,开发页面元素。(addEmployee.vue)
1 2 3 4 5 6 7 8 9 10 11 12 13 14 15 16 17 18 19 20 21 22 23 24 25 26 27 28 29 30 31 32 33 34 35 36 37 38 39 40 41 42 43 44 45 46 47 48 49 50 51 52 53 54 55 56 57 58 59 60 61 62 63 64 65 66 67 68 69 70 71 72 73 74 <template>
4.在employee.ts中封装新增员工方法,发送Ajax请求。
1 2 3 4 5 6 7 export const addEmployee = (params : any request ({'url' : `/employee` ,'method' : 'POST' ,'data' : params
5.定义模型数据和表单校验规则。在methods中定义提交表单的方法。(addEmployee.vue)
1 2 3 4 5 6 7 8 9 10 11 12 13 14 15 16 17 18 19 20 21 22 23 24 25 26 27 28 29 30 31 32 33 34 35 36 37 38 39 40 41 42 43 44 45 46 47 48 49 50 51 52 53 54 55 56 57 58 59 60 61 62 63 64 65 66 67 68 69 70 71 72 73 74 75 76 77 78 79 <script lang="ts" >import { addEmployee } from '@/api/employee' export default {data (return {optType : 'add' ,ruleForm : {name : '' ,username : '' ,sex : '1' ,phone : '' ,idNumber : '' rules : { name : [required : true , message : '请输入员工姓名' , trigger : 'blur' } username : [required : true , message : '请输入员工账号' , trigger : 'blur' }phone : [ required : true , trigger : 'blur' , validator : (rule, value, callback ) => {if (value === '' || (! /^1(3|4|5|6|7|8|9)\d{9}$/ .test (value))) {callback (new Error ('请输入正确的手机号!' ))else {callback ()idNumber : [ required : true , trigger : 'blur' , validator : (rule, value, callback ) => {if (value === '' || (! /(^\d{15}$)|(^\d{18}$)|^\d{17}(X|x)$/ .test (value))) {callback (new Error ('请输入正确的身份证号!' ))else {callback ()methods : {submitForm (fromName, isContinue ) {this .$refs [fromName].validate ((valid ) => {if (valid) {addEmployee (this .ruleForm ).then (res =>if (res.data .code === 1 ) {this .$message .success ('员工添加成功!' )if (isContinue) {this .ruleForm = {name : '' ,username : '' ,sex : '1' ,phone : '' ,idNumber : '' else {this .$router .push ('/employee' )else {this .$message .error (res.data .message )
修改员工 修改员工操作步骤:
点击 “修改”按钮,跳转到修改页面。
在修改员工页面录入员工相关信息。
点击“保存”按钮完成修改操作。
注意:
由于添加员工和修改员工的表单项非常类似,所以添加和修改操作可以共用同一个页面(addEmployee.vue)。
修改员工涉及到原始数据回显,所以需要传递员工id作为参数。
1.在员工管理页面index.vue中,为“修改”按钮绑定单击事件,用于跳转到修改页面。(index.vue)
1 <el-button type="text" @click="handleUpdateEmp(scope.row)">修改</el-button>
1 2 3 4 5 6 7 8 9 10 11 12 13 handleUpdateEmp (row ){if (row.username === 'admin' ){this .$message .error ("admin为系统的管理员账号,不能修改!" )return this .$router .push ({path : '/employee/add' ,query : {id : row.id }
2.由于addEmployee.vue为新增和修改共用页面,需要能够区分当前操作:
如果路由中传递了id参数,则当前操作为修改。
如果路由中没有传递id参数,则当前操作为新增。
1 2 3 4 5 6 7 8 <div class="subBox">
3.如果是修改操作,需要根据id查询员工原始信息用于页面回显,在employee.ts中创建如下方法。
1 2 3 4 5 6 export const queryEmployeeById = (id : number request ({'url' : `/employee/${id} ` ,'method' : 'GET'
4.在修改员工页面的created方法中查询员工原始信息用于页面数据回显。
1 2 3 4 5 6 7 8 9 10 11 12 created (this .optType = this .$route .query .id ? 'update' : 'add' if (this .optType === 'update' ) {queryEmployeeById (this .$route .query .id ).then (res =>if (res.data .code === 1 ) {this .ruleForm = res.data .data
5.如果是修改操作,“保存并继续添加员工”按钮则不需要显示。
1 2 3 4 5 6 7 8 <div class="subBox">
6.在employee.ts中创建方法,用于修改员工。
1 2 3 4 5 6 7 export const updateEmployee = (params : any request ({'url' : `/employee` ,'method' : 'PUT' ,'data' : params
7.修改submitForm方法,需要根据当前操作类型执行新增或者修改操作。
1 2 3 4 5 6 7 8 9 10 11 12 13 14 15 16 17 18 19 20 21 22 23 24 25 26 27 28 29 30 31 32 33 34 35 36 37 38 39 40 submitForm (fromName, isContinue ) {this .$refs [fromName].validate ((valid ) => {if (valid) {if (this .optType === 'add' ) {addEmployee (this .ruleForm ).then (res =>if (res.data .code === 1 ) {this .$message .success ('员工添加成功!' )if (isContinue) {this .ruleForm = {name : '' ,username : '' ,sex : '1' ,phone : '' ,idNumber : '' else {this .$router .push ('/employee' )else {this .$message .error (res.data .msg )else {updateEmployee (this .ruleForm ).then (res =>if (res.data .code === 1 ){this .$message .success ('员工信息修改成功' )this .$router .push ('/employee' )else {this .$message .error (res.data .msg )
套餐管理 套餐分页查询