测试
Junit单元测试框架
Junit是使用Java语言实现的单元测试框架,它是第三方公司开源出来的,很多开发工具已经集成了Junit框架,比如IDEA。
Junit框架完成单元测试:
- 将
Junit框架的jar包导入到项目中(注意:IDEA集成了Junit框架,不需要我们自己手工导入了)。
- 编写测试类、测试类方法(注意:测试方法必须是公共的,无参数,无返回值的非静态方法)。
- 必须在测试方法上使用
@Test注解(标注该方法是一个测试方法)。
- 在测试方法中,编写程序调用被测试的方法。
- 选中测试方法,右键选择运行,如果测试通过则是绿色;如果测试失败,则是红色。注意:如果无法执行测试方法,需要
Settings->Plugins->搜索下载JUnit4 Parallel Runner这个插件即可。
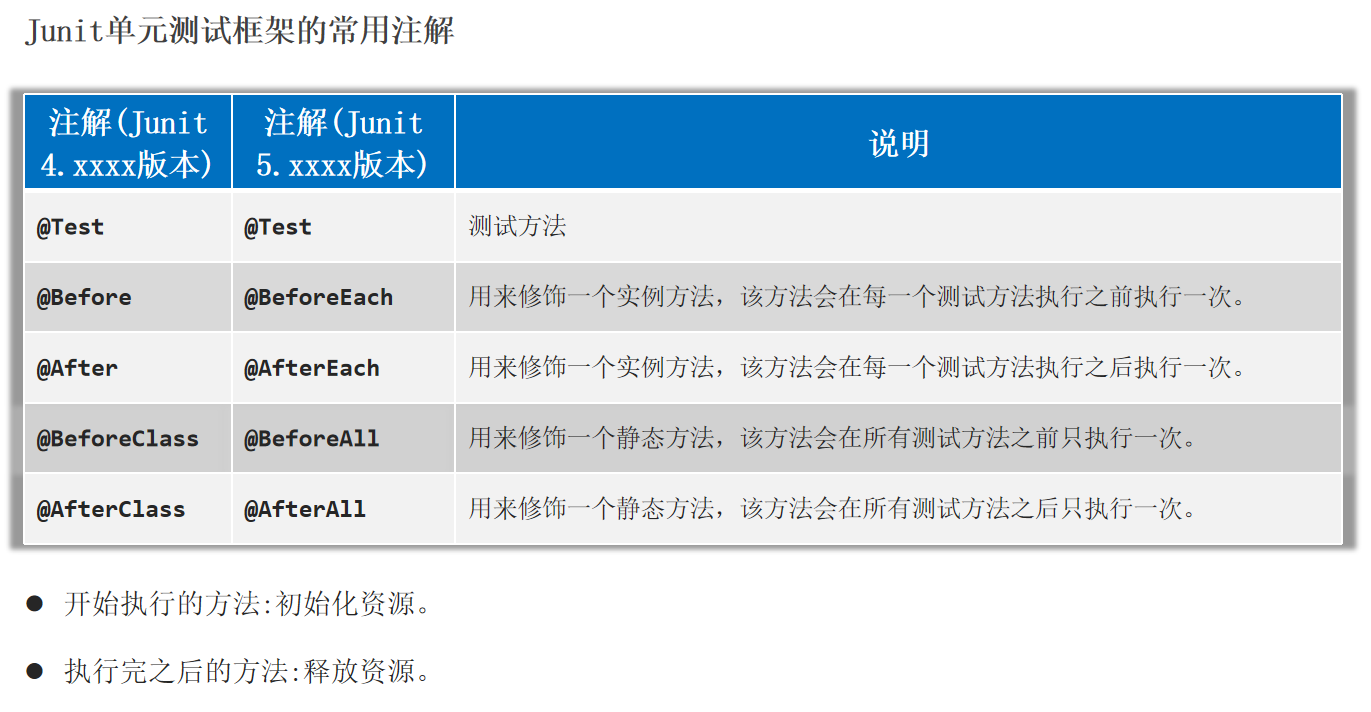
Junit单元测试框架的常用注解:
1
2
3
4
5
6
7
8
9
10
11
12
13
14
15
16
17
| public class StringUtil {
public static void printNumber(String name){
if(name == null){
System.out.println(0);
return;
}
System.out.println("名字长度是:" + name.length());
}
public static int getMaxIndex(String data) {
if (data == null) {
return -1;
}
return data.length() - 1;
}
}
|
1
2
3
4
5
6
7
8
9
10
11
12
13
14
15
16
17
18
19
20
21
22
23
24
25
26
27
28
29
30
31
32
33
34
35
36
37
38
39
40
|
public class StringUtilTest {
@Before
public void test1(){
System.out.println("---> test1 Before 执行了---------");
}
@BeforeClass
public static void test11(){
System.out.println("---> test11 BeforeClass 执行了---------");
}
@After
public void test2(){
System.out.println("---> test2 After 执行了---------");
}
@AfterClass
public static void test22(){
System.out.println("---> test22 AfterClass 执行了---------");
}
@Test
public void testPrintNumber(){
StringUtil.printNumber("admin");
StringUtil.printNumber(null);
}
@Test
public void testGetMaxIndex(){
int index1 = StringUtil.getMaxIndex(null);
System.out.println(index1);
int index2 = StringUtil.getMaxIndex("admin");
System.out.println(index2);
Assert.assertEquals("方法内部有bug!", 4, index2);
}
}
|
反射
反射指的是允许以编程方式访问已加载类的成分(成员变量、方法、构造器等)。
获取类:Class
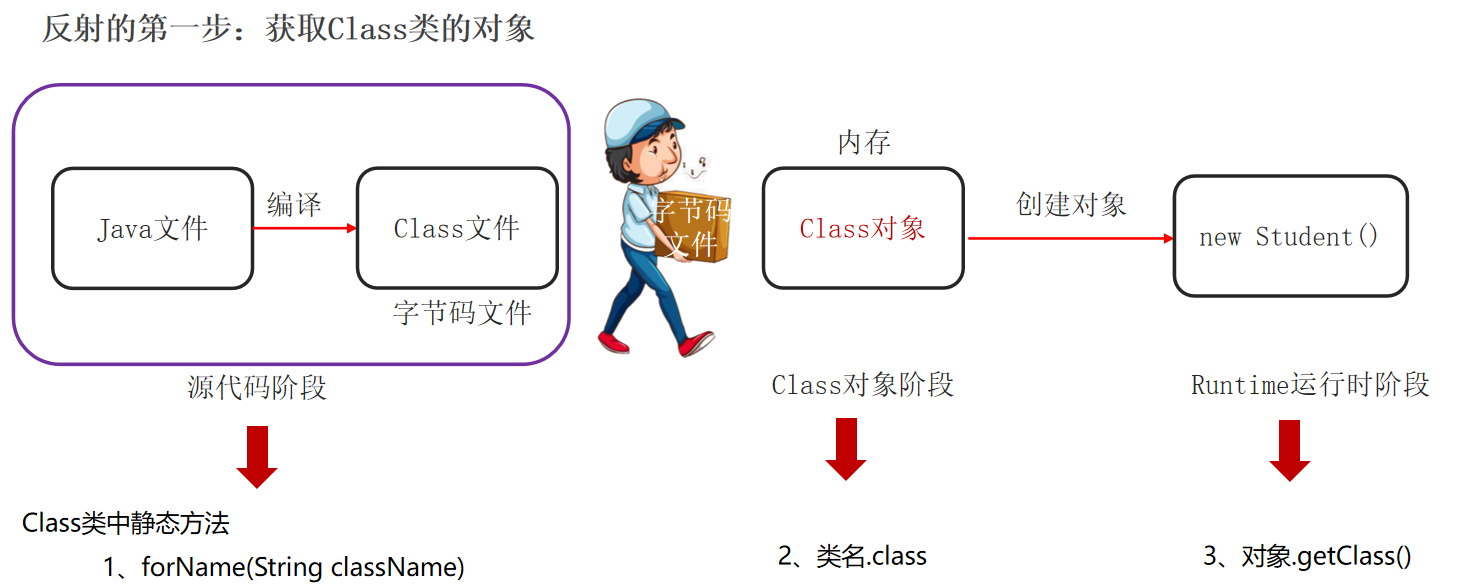
反射是在运行时获取类的字节码文件对象,然后可以解析类中的全部成分。
反射的核心思想和关键:得到编译以后的class文件对象。
获取Class类的对象的三种方式:
Class c1 = Class.forName(“全类名”);Class c2 = 类名.class;Class c3 = 对象.getClass();
1
2
3
4
5
6
7
8
9
10
11
12
13
14
15
16
17
18
19
20
21
22
23
24
25
26
27
28
29
30
31
32
33
34
35
36
37
38
|
public class Student {
private String name;
private int age;
public Student() {
System.out.println("执行无参数构造器");
}
private Student(String name, int age) {
this.name = name;
this.age = age;
}
@Override
public String toString() {
return "Student{" +
"name='" + name + '\'' +
", age=" + age +
'}';
}
public String getName() {
return name;
}
public int getAge() {
return age;
}
public void setName(String name) {
this.name = name;
}
public void setAge(int age) {
this.age = age;
}
}
|
1
2
3
4
5
6
7
8
9
10
11
12
| public static void main(String[] args) throws Exception {
Class c1 = Student.class;
System.out.println(c1.getName());
System.out.println(c1.getSimpleName());
Class c2 = Class.forName("com.itheima.Reflect_.Student");
System.out.println(c1 == c2);
Student s = new Student();
Class c3 = s.getClass();
System.out.println(c1 == c3);
}
|
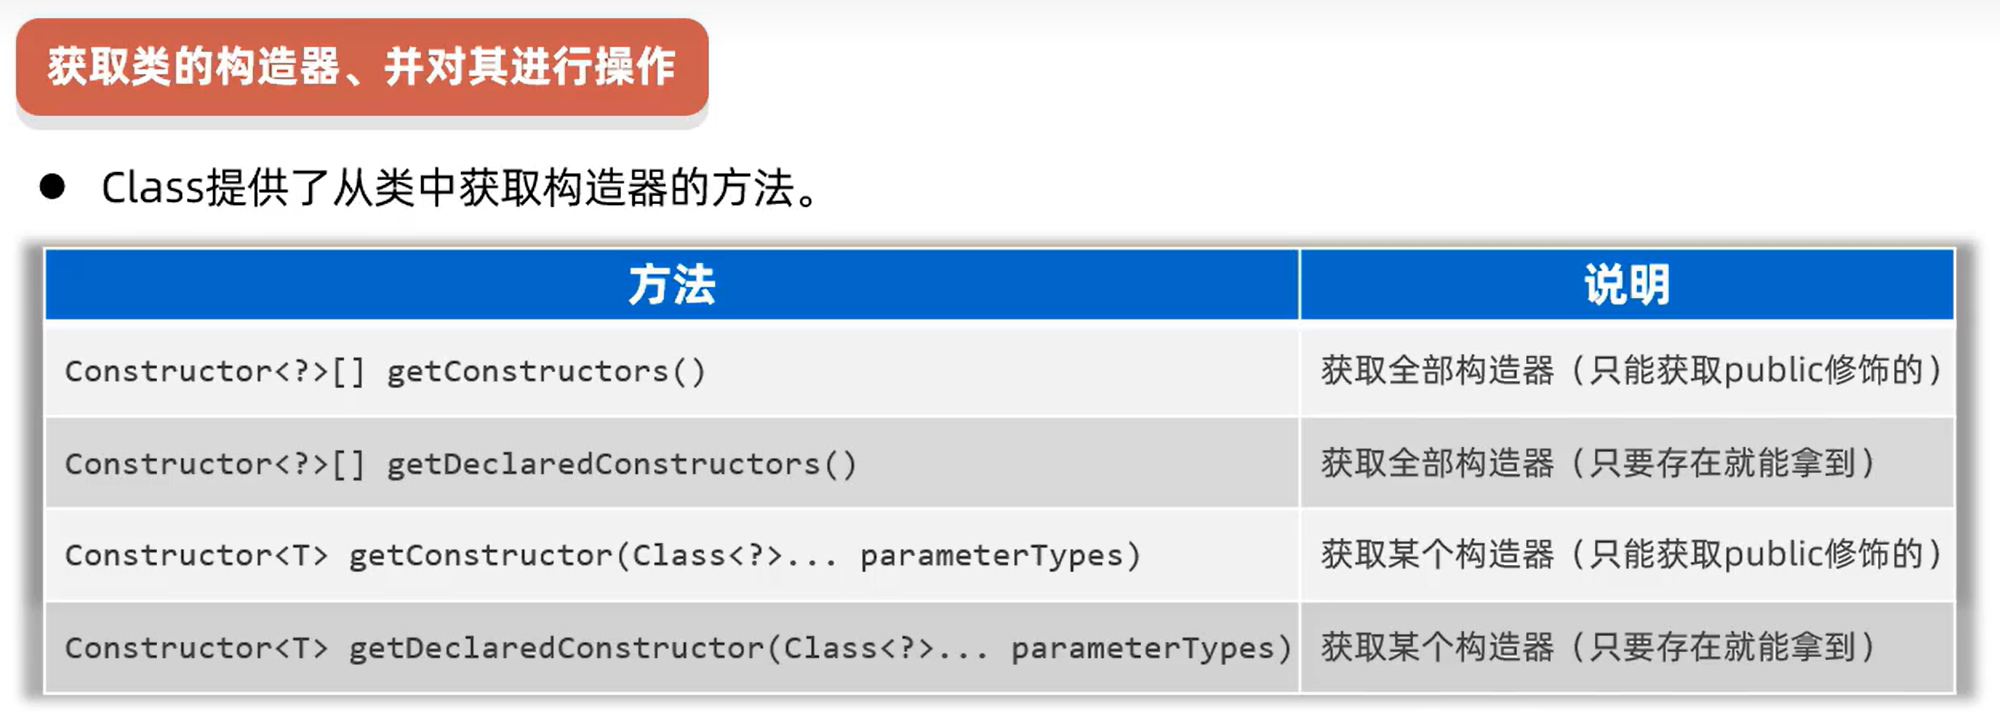
获取类的构造器:Constructor
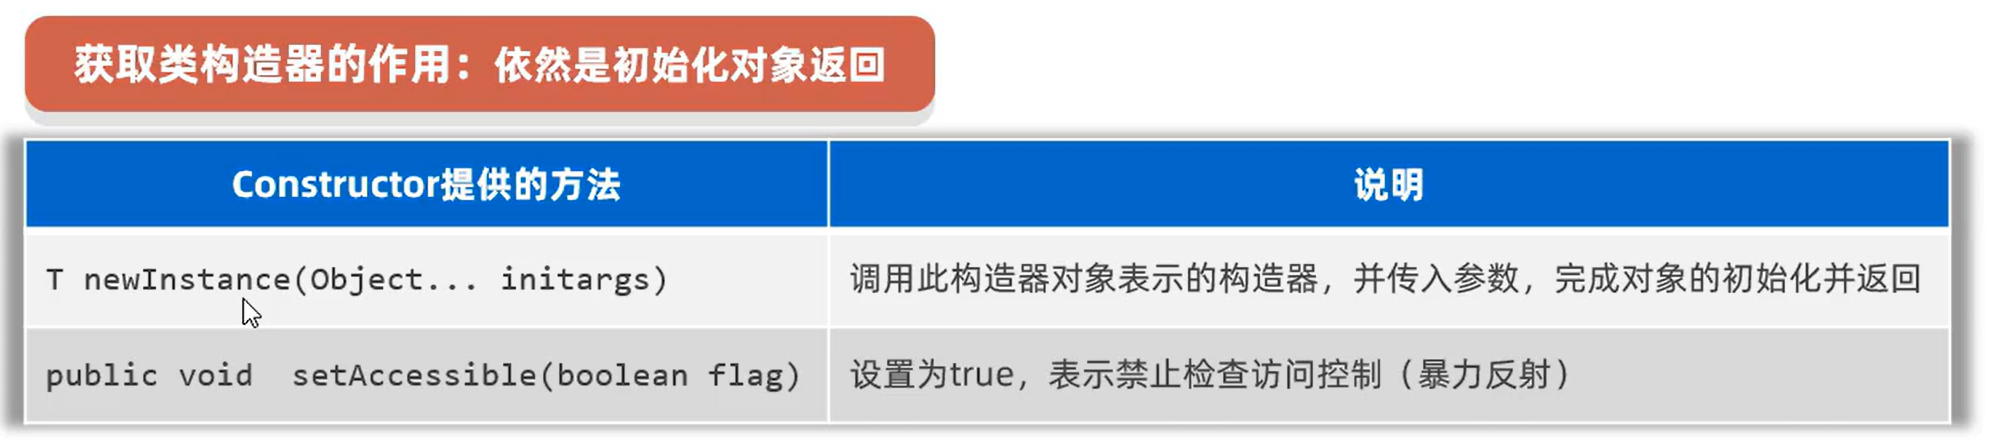
获取构造器的作用:初始化一个对象返回。
注意:如果是非public的构造器,需要打开权限(暴力反射):setAccessible(boolean),然后再创建对象。反射可以破坏封装性,私有的也可以执行了。
1
2
3
4
5
6
7
8
9
10
11
12
13
14
15
16
17
18
19
| Class c = Student.class;
Constructor[] cons = c.getDeclaredConstructors();
for (Constructor con : cons) {
System.out.println(con.getName() + " --> " + con.getParameterCount());
}
Constructor cons1 = c.getConstructor();
System.out.println(cons1.getName() + " --> " + cons1.getParameterCount());
Student s2 = (Student) cons1.newInstance();
System.out.println(s2);
Constructor cons2 = c.getDeclaredConstructor(String.class, int.class);
System.out.println(cons2.getName() + " --> " + cons2.getParameterCount());
cons2.setAccessible(true);
Student s3 = (Student) cons2.newInstance("surourou", 18);
System.out.println(s3);
|
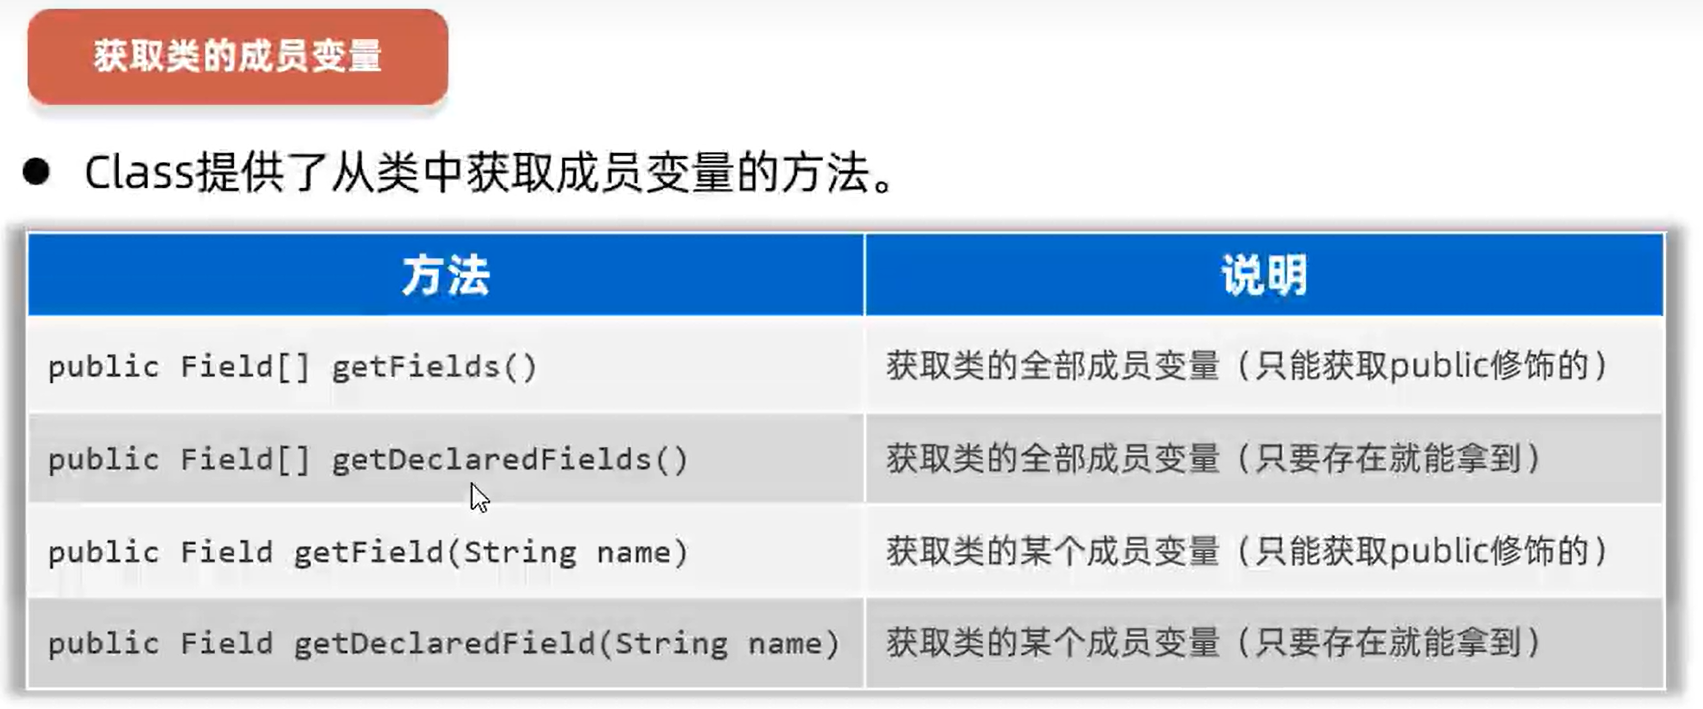
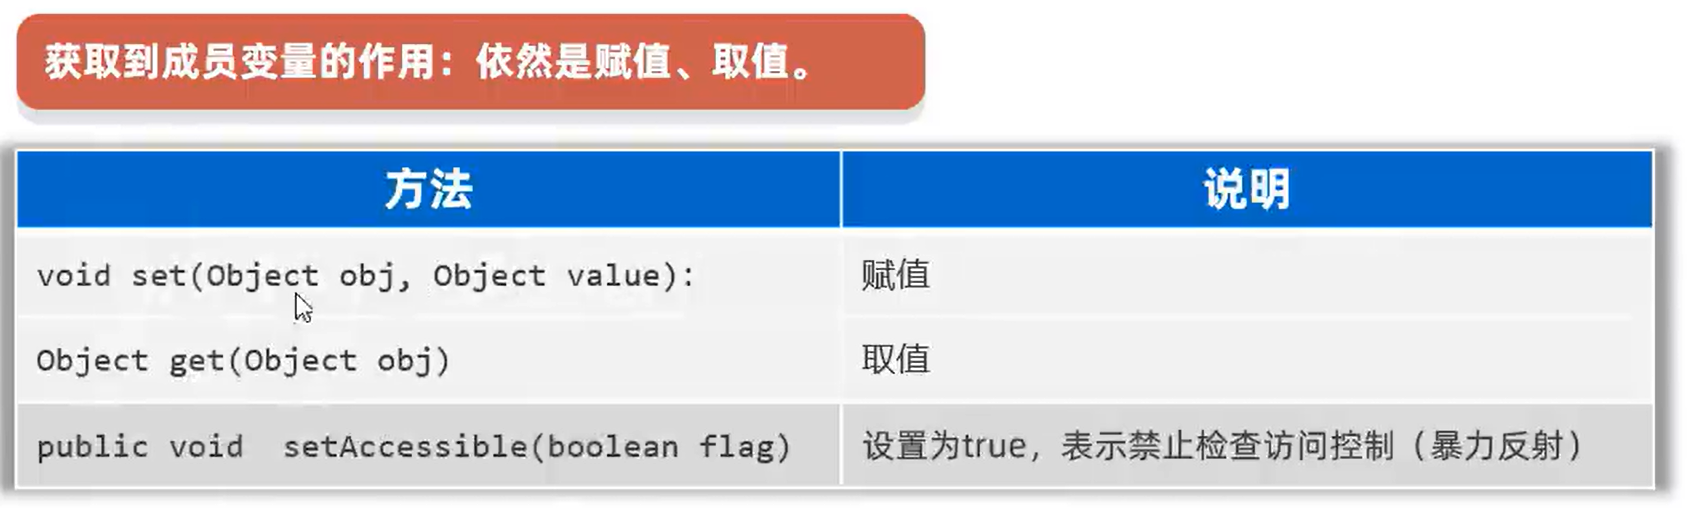
获取类的成员变量:Field
获取成员变量的作用:在某个对象中取值和赋值。
1
2
3
4
5
6
7
8
9
10
11
12
13
14
15
16
| Class c = Student.class;
Field[] fields = c.getDeclaredFields();
for (Field f : fields) {
System.out.println(f.getName() + " --> " + f.getType());
}
Field f = c.getDeclaredField("name");
System.out.println(f.getName() + " --> " + f.getType());
Student s = new Student();
f.setAccessible(true);
f.set(s, "surourou");
System.out.println(s);
String name = (String) f.get(s);
System.out.println(name);
|
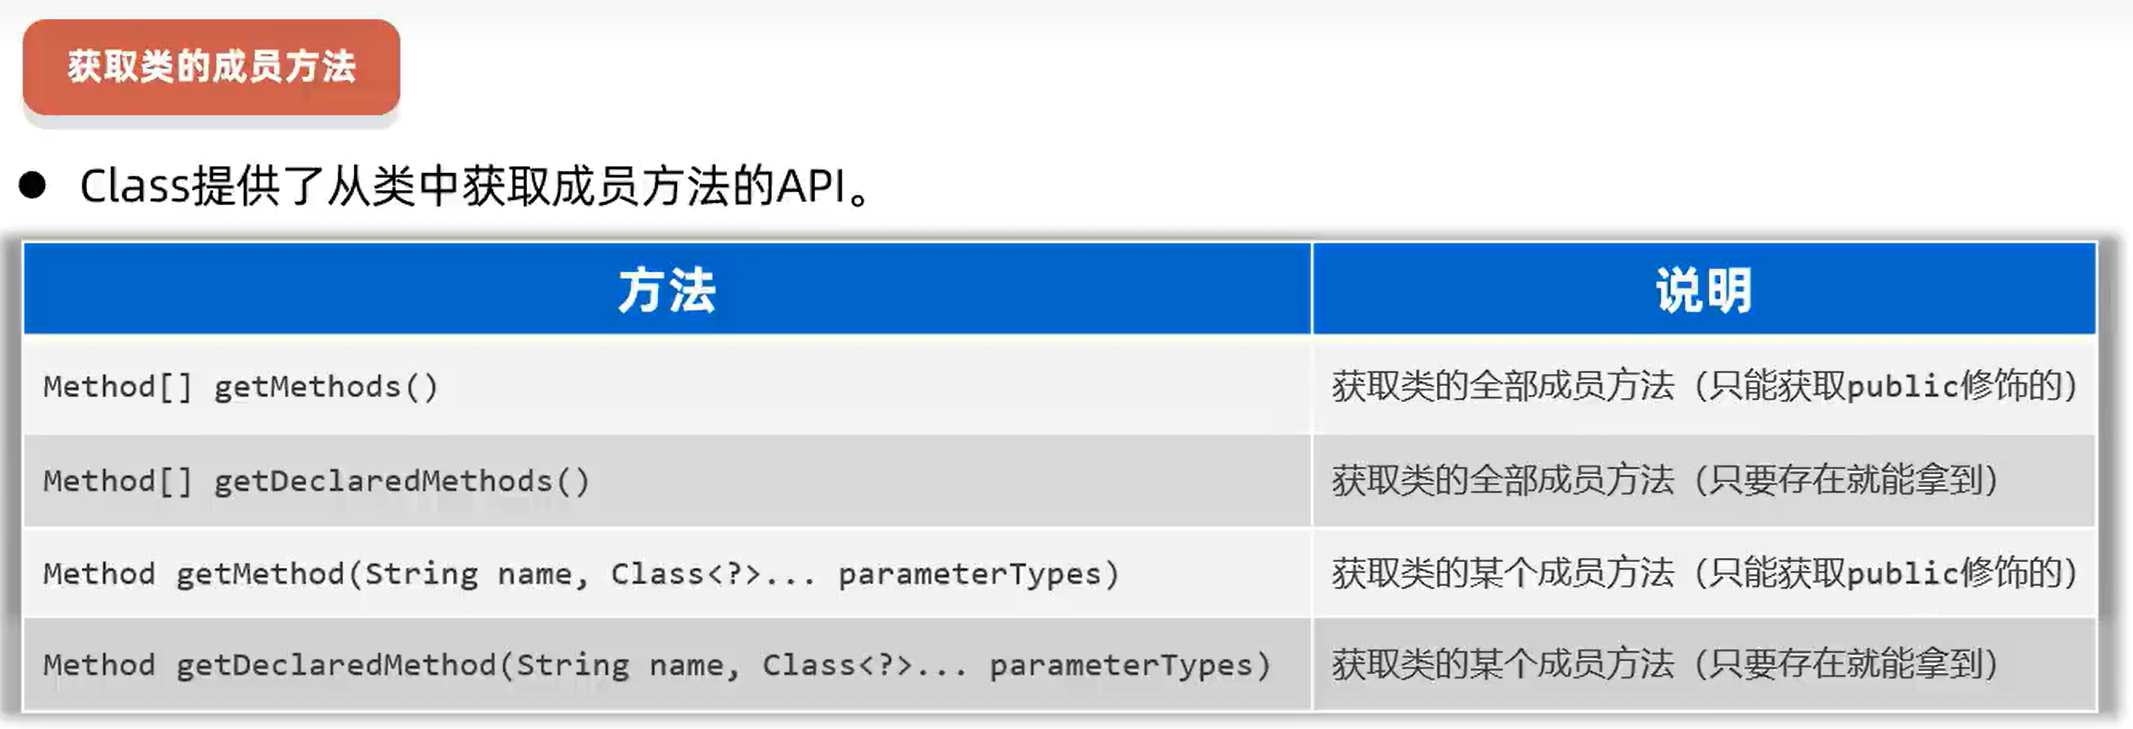
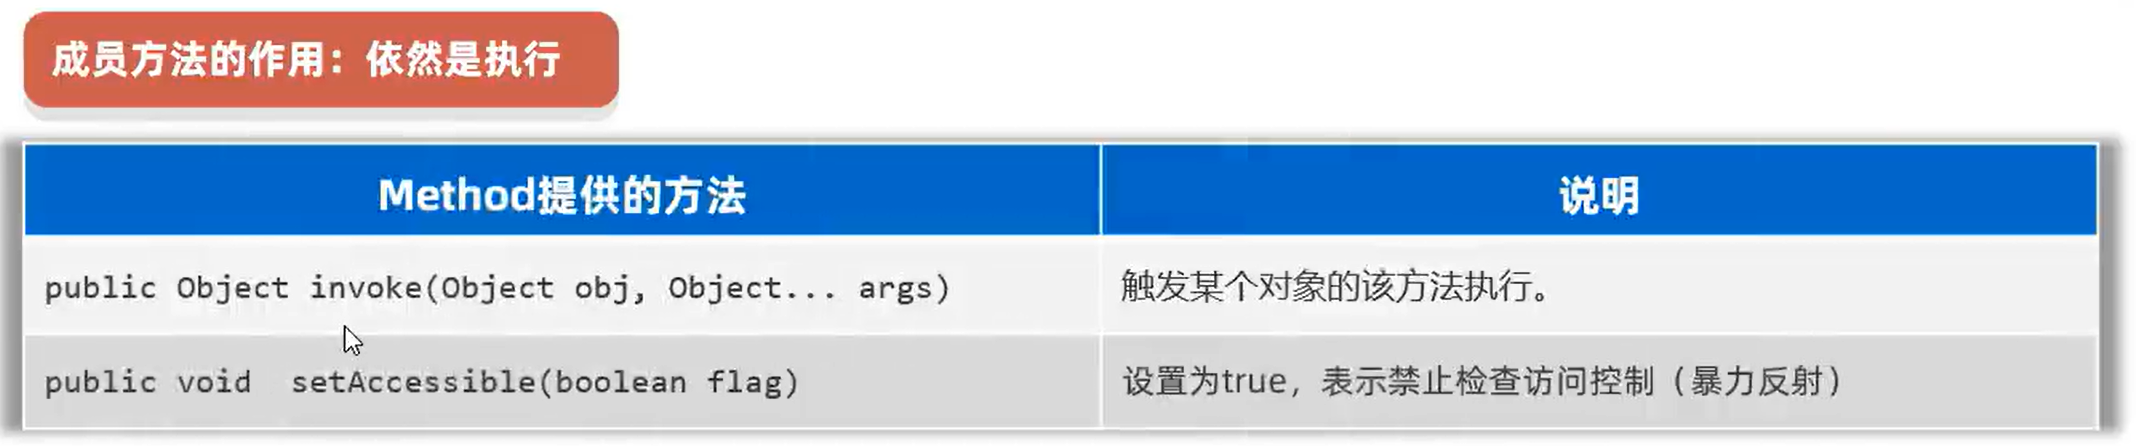
获取类的成员方法:Method
获取成员方法的作用:在某个对象中进行执行此方法。
1
2
3
4
5
6
7
8
9
10
11
12
| Class c = Student.class;
Method[] methods = c.getDeclaredMethods();
for (Method m : methods) {
System.out.println(m.getName() + " --> " + m.getParameterCount() + " --> " + m.getReturnType());
}
Method m = c.getDeclaredMethod("setName", String.class);
System.out.println(m.getName() + " --> " + m.getParameterCount() + " --> " + m.getReturnType());
Student s = new Student();
m.setAccessible(true);
Object rs = m.invoke(s, "surourou");
System.out.println(s + " --> " + rs);
|
反射的作用:绕过编译阶段为集合添加数据
反射是作用在运行时的技术,此时集合的泛型将不能产生约束了,此时是可以为集合存入其他任意类型的元素的。
泛型只是在编译阶段可以约束集合只能操作某种数据类型,在编译成Class文件进入运行阶段的时候,其真实类型都是ArrayList了,泛型相当于被擦除了。
1
2
3
4
5
6
7
8
9
10
11
12
13
14
15
16
17
18
19
20
21
22
23
24
|
ArrayList<Integer> list = new ArrayList();
ArrayList<String> list2 = new ArrayList();
System.out.println(list.getClass() == list2.getClass());
System.out.println("-----------------反射修改指定类型---------------");
ArrayList<Integer> list3 = new ArrayList();
list3.add(12);
list3.add(18);
Class c = list3.getClass();
Method add = c.getDeclaredMethod("add", Object.class);
boolean rs = (boolean) add.invoke(list3,"我修改你");
System.out.println(list3);
ArrayList list4 = list3;
list4.add("sada");
list4.add(true);
System.out.println(list3);
|
案例:使用反射做框架
对于任意一个对象,在不清楚对象字段的情况下,可以把对象的字段名称和对应值存储到文件中去。
1
2
3
4
5
6
7
8
9
10
11
|
public class Student {
private String name;
private int age;
public Student() {}
public Student(String name, int age) {
this.name = name;
this.age = age;
}
}
|
1
2
3
4
5
6
7
8
9
10
11
12
13
14
15
|
public class Teacher {
private String name;
private int age;
private String gender;
private String address;
public Teacher() {}
public Teacher(String name, int age, String gender, String address) {
this.name = name;
this.age = age;
this.gender = gender;
this.address = address;
}
}
|
1
2
3
4
5
6
7
8
9
10
11
12
13
14
15
16
17
18
| public class ObjectFrame {
public static void saveObject(Object obj) throws Exception {
PrintStream ps = new PrintStream(new FileOutputStream("src/Test.txt", true));
Class c = obj.getClass();
String classname = c.getSimpleName();
ps.println("------------" + classname + "------------");
Field[] fields = c.getDeclaredFields();
for (Field field : fields) {
String name = field.getName();
field.setAccessible(true);
String value = field.get(obj) + "";
ps.println(name + " = " + value);
}
}
}
|
1
2
3
4
5
6
7
8
|
@Test
public void save() throws Exception {
Student s = new Student("surourou", 18);
Teacher t = new Teacher("srr", 19, "female", "shenzhen");
ObjectFrame.saveObject(s);
ObjectFrame.saveObject(t);
}
|
注解
Java注解(Annotation)又称Java标注,是JDK5.0引入的一种注释机制。比如:@Override、@Test,作用是:让其他程序根据注解信息来决定怎么执行该程序。
Java 语言中的类、构造器、方法、成员变量、参数等都可以被注解进行标注。
自定义注解
格式:
1
2
3
| public @interface 注解名称 {
public 属性类型 属性名() default 默认值 ;
}
|
1
2
3
4
5
6
|
public @interface MyTest1 {
String aaa();
boolean bbb() default true;
String[] ccc();
}
|
特殊属性:value属性。如果只有一个value属性的情况下,使用value属性的时候可以省略value名称不写。但是如果有多个属性, 且多个属性没有默认值,那么value名称是不能省略的。
1
2
3
4
| public @interface MyTest2{
String value();
int age() default 10;
}
|
1
2
3
4
5
6
| @MyTest1(aaa="牛魔王", ccc={"Java", "C++"})
@MyTest2("孙悟空")
public class AnnotationTest1 {
@MyTest1(aaa="至尊宝", bbb = false, ccc = {"python"})
public void test1() {}
}
|
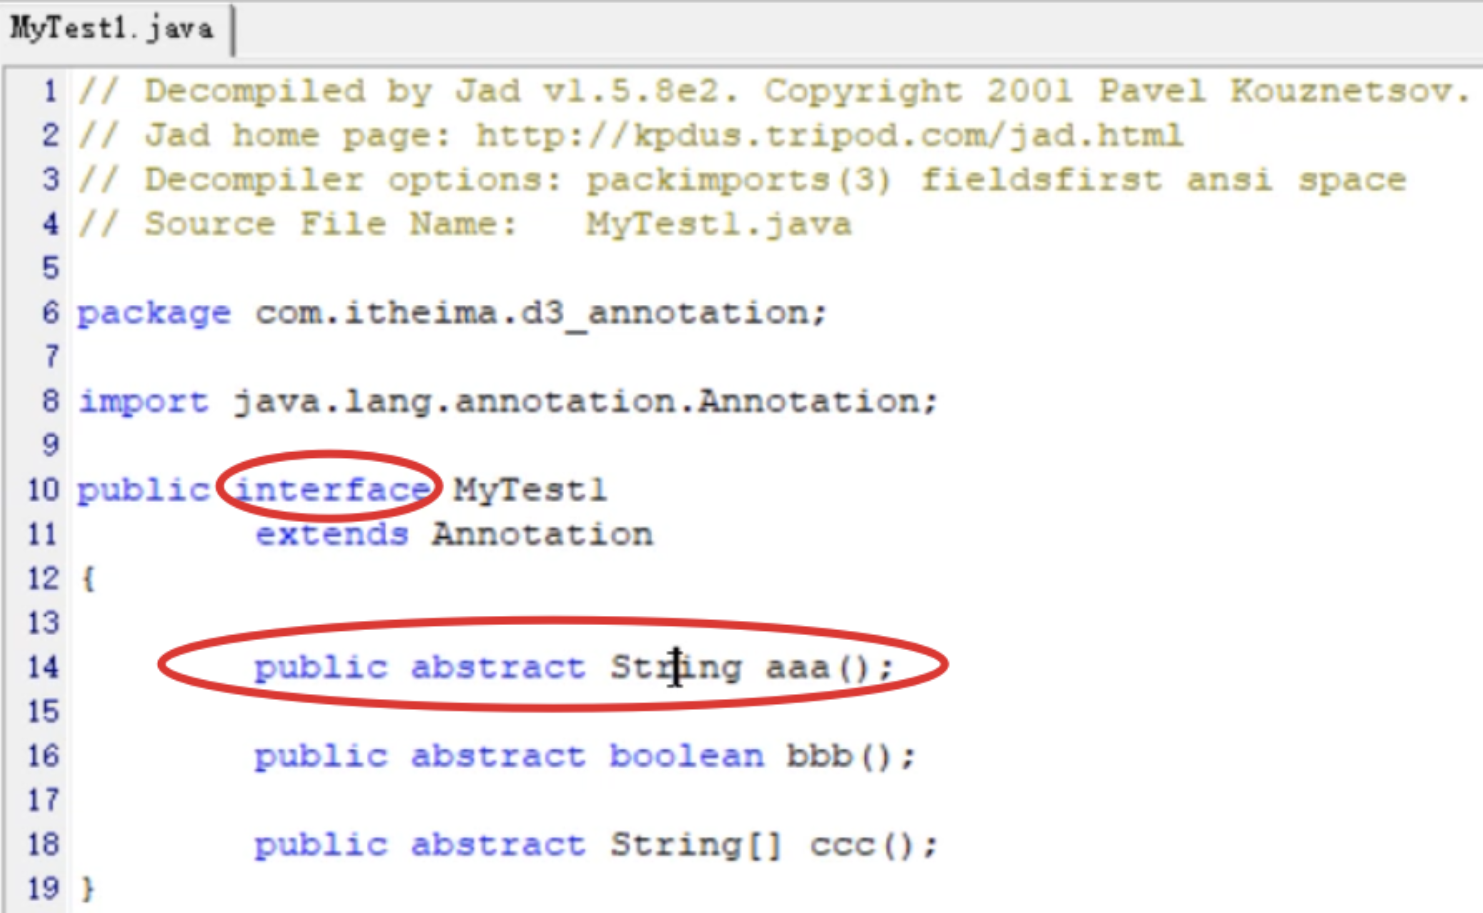
注解的本质
1.MyTest1注解本质上是接口,每一个注解接口都继承子Annotation接口。
2.MyTest1注解中的属性本质上是抽象方法。
3.@MyTest1实际上是作为MyTest接口的实现类对象。
4.@MyTest1(aaa="孙悟空",bbb=false,ccc={"Python","前端","Java"})里面的属性值,可以通过调用aaa()、bbb()、ccc()方法获取到。
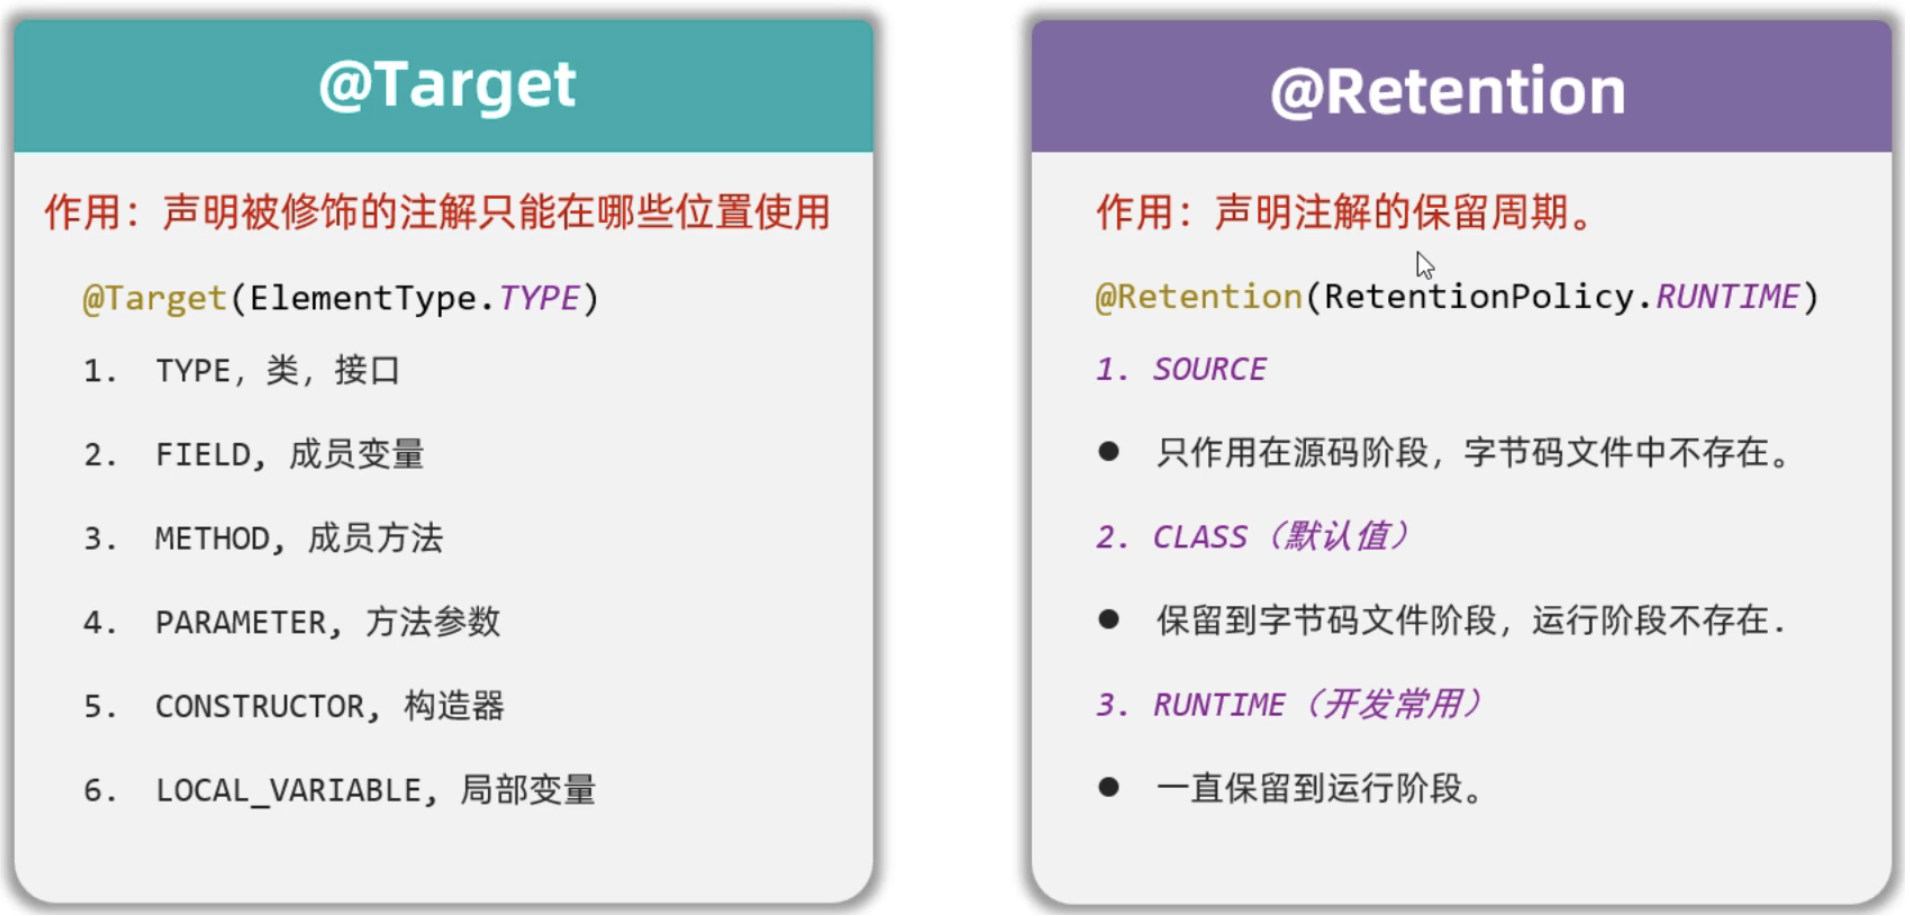
元注解
元注解:修饰注解的注解。
元注解有两个:
@Target是用来声明注解只能用在那些位置,比如:类上、方法上、成员变量上等。
@Retetion是用来声明注解保留周期,比如:源代码时期、字节码时期、运行时期。
1
2
3
4
5
6
7
|
@Target({ElementType.TYPE,ElementType.METHOD})
@Retention(RetentionPolicy.RUNTIME)
public @interface MyTest3{
}
|
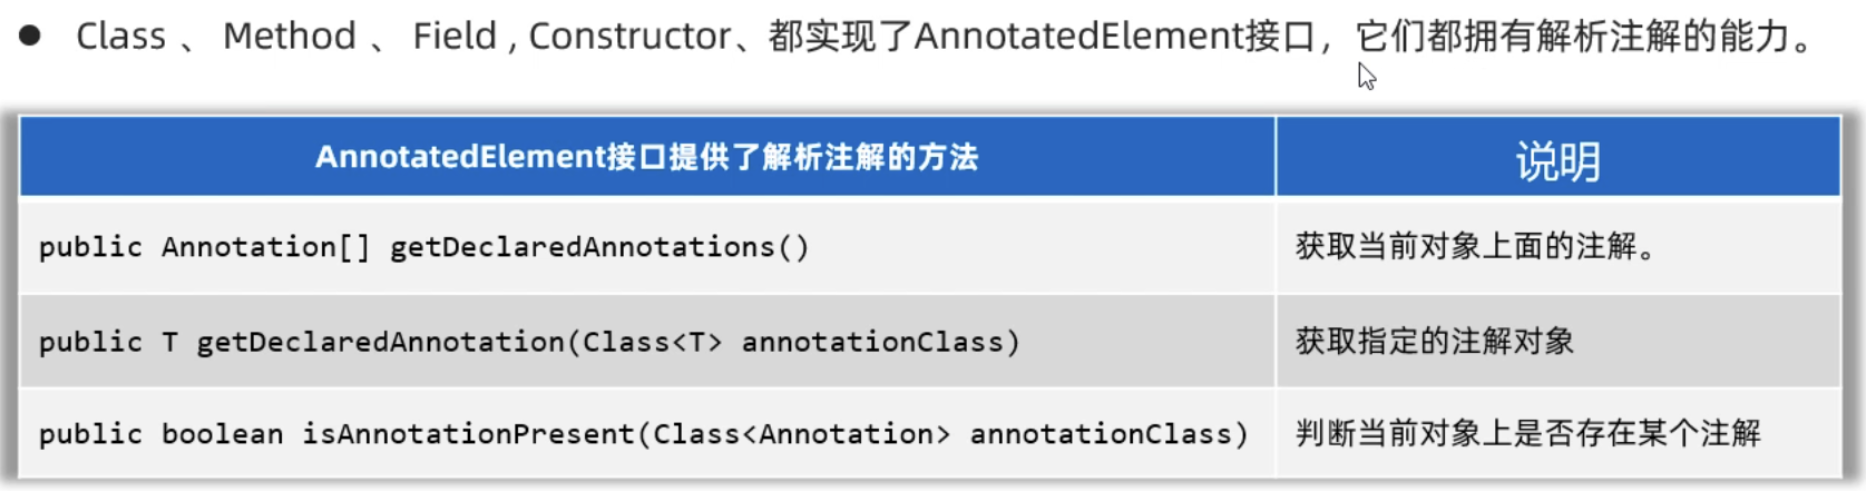
注解的解析
注解的解析:判断类上、方法上、成员变量上是否存在注解,并把注解里的内容解析出来。
1
2
3
4
| 1.如果注解在类上,先获取类的字节码对象,再获取类上的注解。
2.如果注解在方法上,先获取方法对象,再获取方法上的注解。
3.如果注解在成员变量上,先获取成员变量对象,再获取变量上的注解。
总之:注解在谁身上,就先获取谁,再用谁获取谁身上的注解
|
1
2
3
4
5
6
7
8
9
|
@Target({ElementType.TYPE,ElementType.METHOD})
@Retention(RetentionPolicy.RUNTIME)
public @interface MyTest4{
String value();
double aaa() default 100;
String[] bbb();
}
|
1
2
3
4
5
6
7
| @MyTest4(value="蜘蛛侠",aaa=99.9, bbb={"至尊宝","黑马"})
public class Demo{
@MyTest4(value="孙悟空",aaa=199.9, bbb={"紫霞","牛夫人"})
public void test1(){
}
}
|
1
2
3
4
5
6
7
8
9
10
11
12
13
14
15
16
17
18
19
20
21
22
23
24
25
26
27
28
29
30
31
32
33
34
35
|
public class AnnotationTest3{
@Test
public void parseClass(){
Class c = Demo.class;
if(c.isAnnotationPresent(MyTest4.class)){
MyTest4 myTest4 = (MyTest4)c.getDeclaredAnnotation(MyTest4.class);
System.out.println(myTest4.value());
System.out.println(myTest4.aaa());
System.out.println(myTest4.bbb());
}
}
@Test
public void parseMethods() throws Exception {
Class c = Demo.class;
Method m = c.getDeclaredMethod("test1");
if(m.isAnnotationPresent(MyTest4.class)){
MyTest4 myTest4 = (MyTest4)m.getDeclaredAnnotation(MyTest4.class);
System.out.println(myTest4.value());
System.out.println(myTest4.aaa());
System.out.println(myTest4.bbb());
}
}
}
|
案例:模拟Junit框架
需求:定义若干个方法,只要加了MyTest注解,就可以在启动时被触发执行。
1
2
3
4
5
| @Target(ElementType.METHOD)
@Retention(RetentionPolicy.RUNTIME)
public @interface MyTest{
}
|
1
2
3
4
5
6
7
8
9
10
11
12
13
14
15
16
17
18
19
20
21
22
23
24
25
26
27
28
29
30
31
| public class AnnotationTest4 {
@MyTest
public void test1(){
System.out.println("=====test1====");
}
@MyTest
public void test2(){
System.out.println("=====test2====");
}
public void test3(){
System.out.println("=====test3====");
}
public static void main(String[] args) throws Exception {
AnnotationTest4 a = new AnnotationTest4();
Class c = AnnotationTest4.class;
Method[] methods = c.getDeclaredMethods();
for(Method m: methods){
if(m.isAnnotationPresent(MyTest.class)){
m.invoke(a);
}
}
}
}
|
动态代理
代理思想:被代理者没有能力,或者不愿意去完成某件事情,需要找个人(代理)代替自己去完成这件事。
动态代理主要是对被代理对象的行为进行代理。
动态代理的开发步骤
1
2
3
4
5
| 1.必须定义接口,里面定义一些行为,用来约束被代理对象和代理对象都要完成的事情。
2.定义一个实现类实现接口,这个实现类的对象代表被代理的对象。
3.定义一个测试类,在里面创建被代理对象,然后为其创建一个代理对象返回。(重点)
4.代理对象中,需要模拟收首付款,真正触发被代理对象的行为,然后接收尾款操作。
5.通过返回的代理对象进行方法的调用,观察动态代理的执行流程。
|
1
2
3
4
5
|
public interface Star {
String sing(String name);
void dance();
}
|
1
2
3
4
5
6
7
8
9
10
11
12
13
14
15
16
17
|
public class BigStar implements Star {
private String name;
public BigStar(String name) {
this.name = name;
}
public String sing(String name) {
System.out.println(this.name + "正在唱歌:" + name);
return "谢谢!";
}
public void dance() {
System.out.println(this.name + "正在跳舞");
}
}
|
1
2
3
4
5
6
7
8
9
10
11
12
13
14
15
16
17
18
19
20
21
22
23
24
25
26
27
28
29
30
31
32
|
public class ProxyUtil {
public static Star createProxy(BigStar bigStar){
Star starProxy = (Star) Proxy.newProxyInstance(ProxyUtil.class.getClassLoader(),
new Class[]{Star.class},
new InvocationHandler() {
@Override
public Object invoke(Object proxy, Method method, Object[] args) throws Throwable {
if(method.getName().equals("sing")){
System.out.println("准备话筒,收钱20万");
}else if(method.getName().equals("dance")){
System.out.println("准备场地,收钱1000万");
}
return method.invoke(bigStar, args);
}
});
return starProxy;
}
}
|
1
2
3
4
5
6
7
8
9
10
11
12
|
public class Test {
public static void main(String[] args) {
BigStar s = new BigStar("surourou");
Star starProxy = ProxyUtil.createProxy(s);
String rs = starProxy.sing("倒数");
System.out.println(rs);
starProxy.dance();
}
}
|
案例
需求:模拟某企业用户管理业务,需包含用户登录,用户删除,用户查询功能,并要统计每个功能的耗时。
传统方法:
1
2
3
4
5
6
7
8
9
|
public interface UserService {
void login(String loginName,String passWord) throws Exception;
void deleteUsers() throws Exception;
String[] selectUsers() throws Exception;
}
|
1
2
3
4
5
6
7
8
9
10
11
12
13
14
15
16
17
18
19
20
21
22
23
24
25
26
27
28
29
30
31
32
33
34
35
|
public class UserServiceImpl implements UserService{
@Override
public void login(String loginName, String passWord) throws Exception {
long time1 = System.currentTimeMillis();
if("admin".equals(loginName) && "123456".equals(passWord)){
System.out.println("您登录成功,欢迎光临本系统~");
}else {
System.out.println("您登录失败,用户名或密码错误~");
}
Thread.sleep(1000);
long time2 = System.currentTimeMillis();
System.out.println("login方法耗时:"+(time2-time1));
}
@Override
public void deleteUsers() throws Exception{
long time1 = System.currentTimeMillis();
System.out.println("成功删除了1万个用户~");
Thread.sleep(1500);
long time2 = System.currentTimeMillis();
System.out.println("deleteUsers方法耗时:"+(time2-time1));
}
@Override
public String[] selectUsers() throws Exception{
long time1 = System.currentTimeMillis();
System.out.println("查询出了3个用户");
String[] names = {"张全蛋", "李二狗", "牛爱花"};
Thread.sleep(500);
long time2 = System.currentTimeMillis();
System.out.println("selectUsers方法耗时:"+(time2-time1));
return names;
}
}
|
存在问题:每一个方法中计算耗时的代码都是重复的,且这些重复的代码并不属于UserSerivce的主要业务代码。
解决办法:把计算每一个方法的耗时操作,交给代理对象来做。
先在UserService类中把计算耗时的代码删除:
1
2
3
4
5
6
7
8
9
10
11
12
13
14
15
16
17
18
19
20
21
22
23
24
25
26
27
28
|
public class UserServiceImpl implements UserService{
@Override
public void login(String loginName, String passWord) throws Exception {
if("admin".equals(loginName) && "123456".equals(passWord)){
System.out.println("您登录成功,欢迎光临本系统~");
}else {
System.out.println("您登录失败,用户名或密码错误~");
}
Thread.sleep(1000);
}
@Override
public void deleteUsers() throws Exception{
System.out.println("成功删除了1万个用户~");
Thread.sleep(1500);
}
@Override
public String[] selectUsers() throws Exception{
System.out.println("查询出了3个用户");
String[] names = {"张全蛋", "李二狗", "牛爱花"};
Thread.sleep(500);
return names;
}
}
|
然后为UserService生成一个动态代理对象,在动态代理中调用目标方法,在调用目标方法之前和之后记录毫秒值,并计算方法运行的时间。
1
2
3
4
5
6
7
8
9
10
11
12
13
14
15
16
17
18
19
20
21
22
23
24
25
26
27
28
| public class ProxyUtil2 {
public static UserService createProxy(UserService userService){
UserService userServiceProxy = (UserService) Proxy.newProxyInstance(
ProxyUtil.class.getClassLoader(),
new Class[]{UserService.class},
new InvocationHandler() {
@Override
public Object invoke(Object proxy, Method method, Object[] args) throws Throwable {
if(method.getName().equals("login") || method.getName().equals("deleteUsers")|| method.getName().equals("selectUsers")){
long startTime = System.currentTimeMillis();
Object rs = method.invoke(userService, args);
long endTime = System.currentTimeMillis();
System.out.println(method.getName() + "方法执行耗时:" + (endTime - startTime)/ 1000.0 + "s");
return rs;
}else {
Object rs = method.invoke(userService, args);
return rs;
}
}
});
return userServiceProxy;
}
}
|
在测试类中为UserService创建代理对象:
1
2
3
4
5
6
7
8
9
10
11
12
13
14
15
16
17
18
| public class Test1 {
public static void main(String[] args) throws Exception{
UserService userService = ProxyUtil2.createProxy(new UserServiceImpl());
userService.login("admin", "123456");
System.out.println("----------------------------------");
userService.deleteUsers();
System.out.println("----------------------------------");
String[] names = userService.selectUsers();
System.out.println("查询到的用户是:" + Arrays.toString(names));
System.out.println("----------------------------------");
}
}
|