File File是java.io.包下的类, File类的对象,用于代表当前操作系统的文件(可以是文件、或文件夹) 。
注意:File类只能对文件本身进行操作,不能读写文件里面存储的数据 。
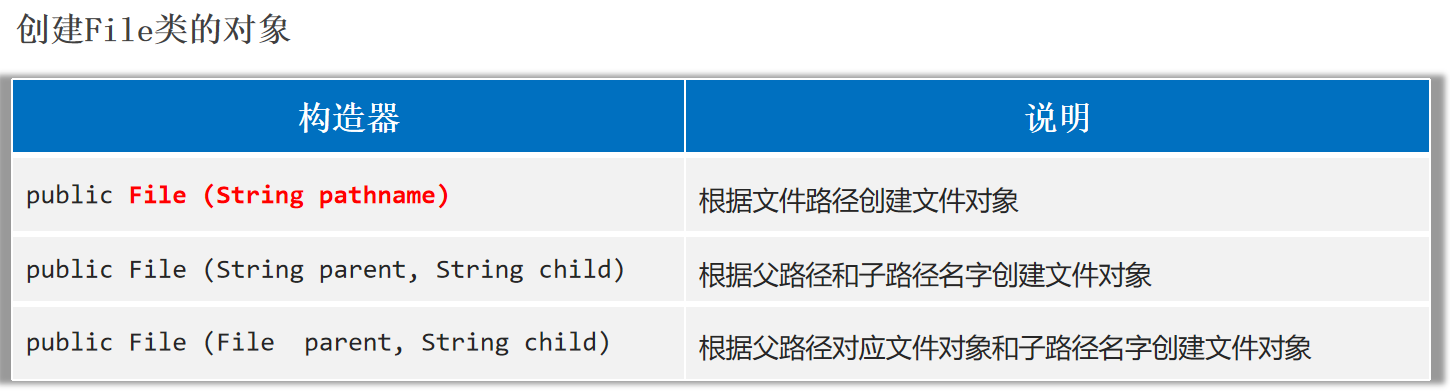
File类创建对象
注意:
1.File对象既可以代表文件、也可以代表文件夹。
2.File封装的对象仅仅是一个路径名,这个路径可以是存在的,也允许是不存在的。
1 2 3 4 5 6 7 8 9 File f1 = new File ("E:" + File.separator + "2_学习" + File.separator + "Java" + File.separator + "test.txt" );File f2 = new File ("E:/你好" );File f3 = new File ("helloworld-app/src/itheima.txt" );
绝对路径:从盘符开始。
相对路径:不带盘符,默认直接到当前工程下的目录寻找文件。
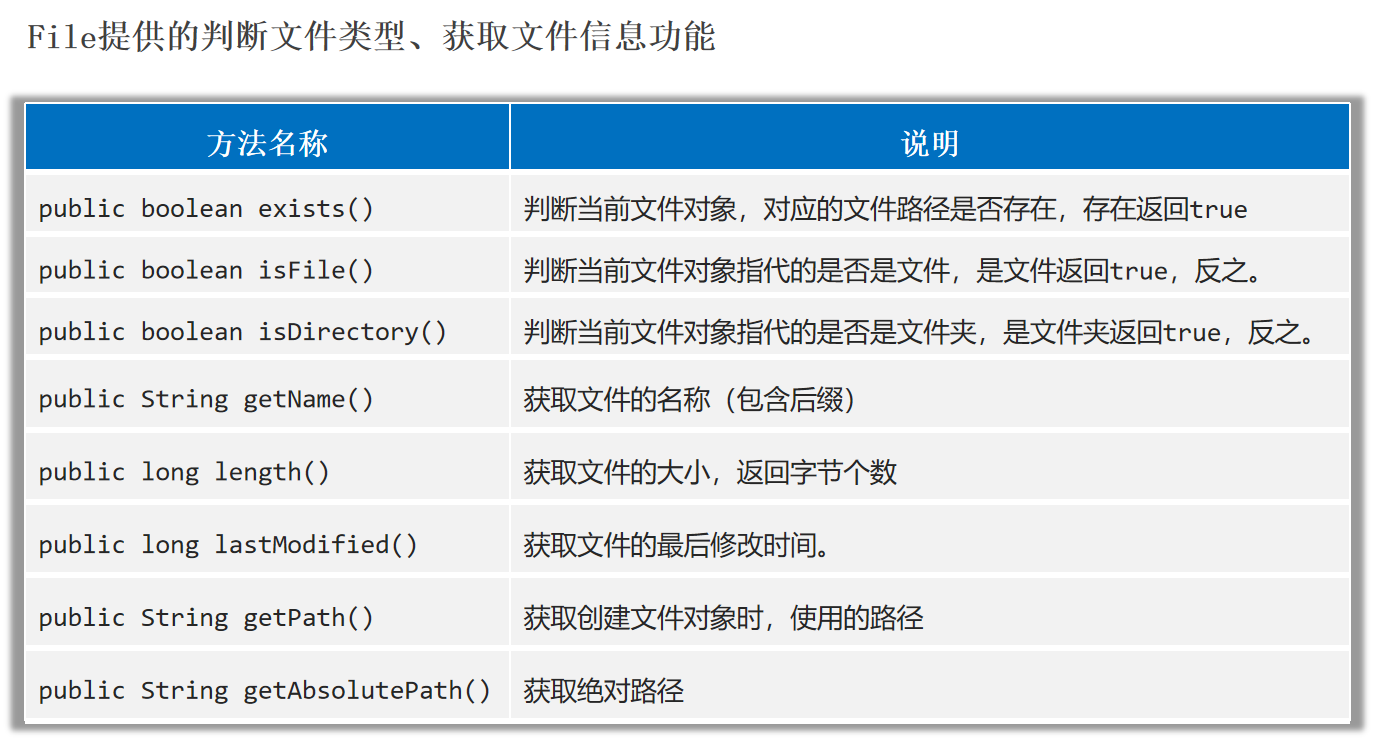
File类判断文件类型、获取文件信息
1
2
3
4
5
6
7
8
9
10
11
12
13
File f1 = new File ("E:" + File.separator + "2_学习" + File.separator + "Java" + File.separator + "test.txt" );long time = f1.lastModified();SimpleDateFormat sdf = new SimpleDateFormat ("yyyy-MM-dd HH:mm:ss" );File f3 = new File ("helloworld-app/src/itheima.txt" );
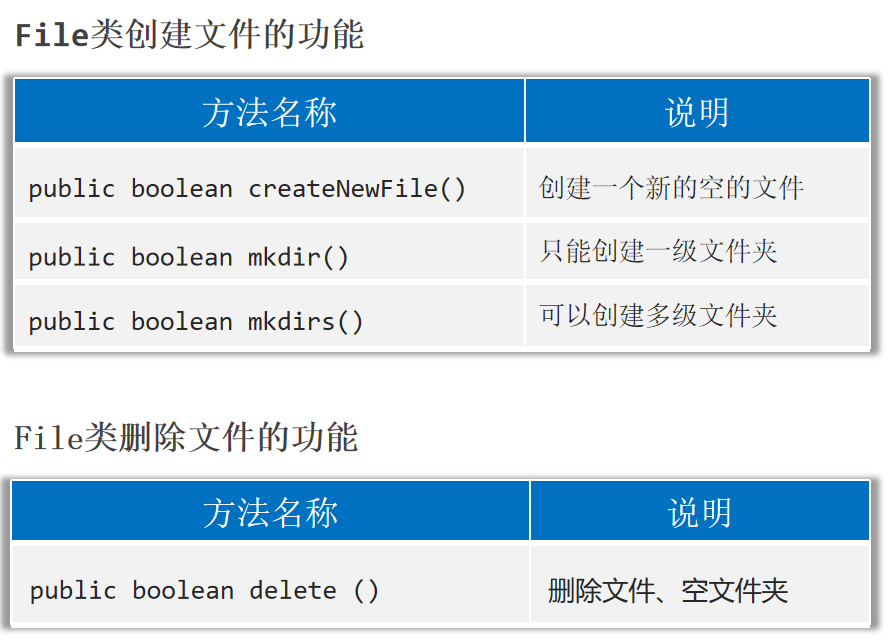
File类创建文件和删除文件
注意:delete方法默认只能删除文件和空文件夹 ,删除后的文件不会进入回收站 。delete方法不能删除非空文件夹 。
1
2
3
4
5
6
7
8
9
10
File fi1 = new File ("E:/hello.txt" );File fi2 = new File ("E:/aaa" );File fi3 = new File ("E:/aaa/bbb/ccc" );
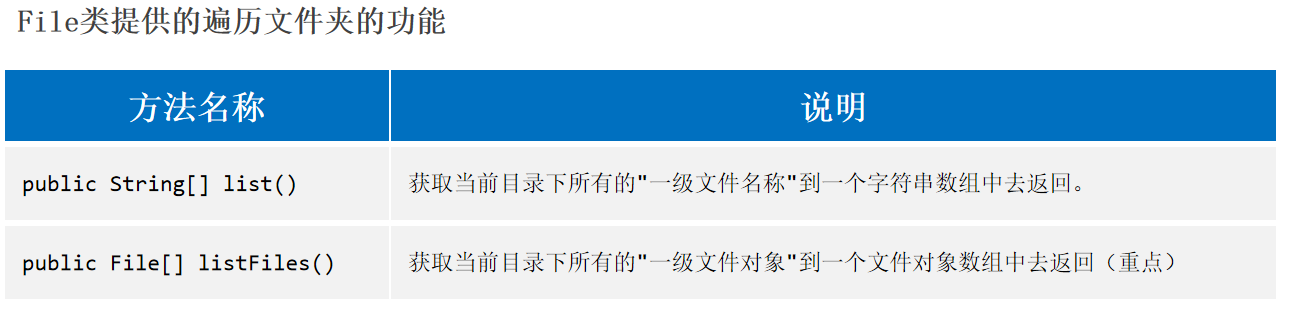
File类遍历文件夹
使用listFiles方法时的注意事项:
当主调是文件,或者路径不存在时,返回null。
当主调是空文件夹时,返回一个长度为0的数组。
当主调是一个有内容的文件夹时,将里面所有一级文件和文件夹的路径 放在File数组中返回。
当主调是一个文件夹,且里面有隐藏文件时,将里面所有文件和文件夹的路径放在File数组中返回,包含隐藏文件 。
当主调是一个文件夹,但是没有权限 访问该文件夹时,返回null。
1
2
3
4
5
6
7
8
9
10
11
File file1 = new File ("E:\\2_学习\\Java" );for (String name : names) {File file2 = new File ("E:\\2_学习\\Java" );for (File file : files) {
案例 猴子吃桃问题(递归) 1 2 3 4 5 6 7 8 9 10 11 12 13 14 15 16 17 18 19 20 21 public class eat {public static void main (String[] args) {1 ));public static int f (int i) {if ( i == 10 ) {return 1 ;else {return 2 * f(i+1 ) + 2 ;
文件搜索 1 2 3 4 5 6 7 8 9 10 11 12 13 14 15 16 17 18 19 20 21 22 23 24 25 26 27 28 29 30 31 32 33 34 35 public class Test {public static void main (String[] args) throws IOException {new File ("D:" ), "ToDesk.exe" );public static void searchFile (File dir, String fileName) throws IOException {if (dir == null || !dir.exists() || dir.isFile()){return ; if (files != null && files.length > 0 ){ for (File f : files) {if (f.isFile()){if (f.getName().contains(fileName)){"找到了:" + f.getAbsolutePath());Runtime runtime = Runtime.getRuntime();else {
删除非空文件夹 1 2 3 4 5 6 7 8 9 10 11 12 13 14 15 16 17 18 19 20 21 22 23 24 25 26 27 28 29 public class Test {public static void main (String[] args) throws IOException {new File ("E:\\aaa" ));private static void deteteDir (File dir) {if (dir==null || !dir.exists()) {return ;if (dir.isFile()) {return ;if (files == null ) {return ;for (File file : files) {if (file.isFile()){else {
啤酒问题 1 2 3 4 5 6 7 8 9 10 11 12 13 14 15 16 17 18 19 20 21 22 23 24 25 26 27 28 29 30 31 32 33 34 public class Test1 {public static int totalNumber;public static int lastBottleNumber;public static int lastCoverNumber;public static void main (String[] args) {10 );"总数:" + totalNumber);"剩余瓶子数:" + lastBottleNumber);"剩余盖子数:" + lastCoverNumber);public static void buy (int money) {int buyNumber = money / 2 ;int allBottleNumber = lastBottleNumber + buyNumber;int allCoverNumber = lastCoverNumber + buyNumber;int allMoney = 0 ;2 * 2 ;4 * 2 ;2 ;4 ;if (allMoney >= 2 ){
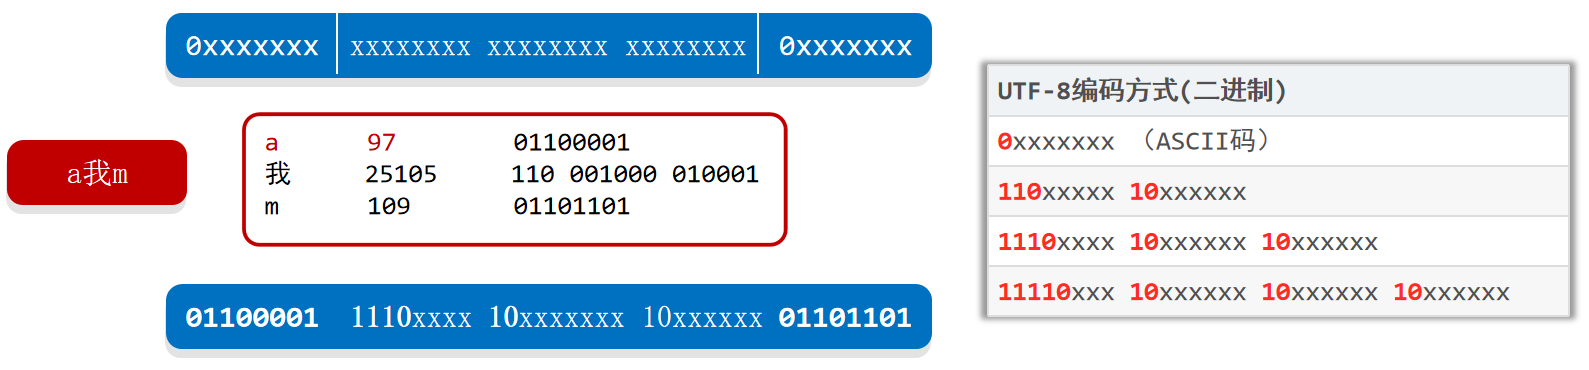
IO流 字符 标准ASCII字符集 ASCII(American Standard Code for Information Interchange): 美国信息交换标准代码,包括了英文、符号等。
标准ASCII使用1个字节存储一个字符 ,首位是0 ,总共可表示128个字符 ,对英语完全够用。
GBK(汉字内码扩展规范,国标) 汉字编码字符集,包含了2万多个汉字 等字符,GBK中一个中文字符编码成两个字节 的形式存储。
注意:
1.GBK兼容了ASCII字符集。在GBK中,ASCII字符同样用一个字节存储,首位是0。
2.GBK规定汉字的第一个字节的第一位必须是1 。
3.GBK通过首位是0或者1判断是中文字符还是ASCII字符。
Unicode字符集(统一码、万国码) Unicode是国际组织制定的,可以容纳世界上所有文字、符号的字符集。
Unicode提供了很多编码方案,其中UTF-32使用4个字节 表示一个字符。但是这占用存储空间,通信效率变低。
UTF-8 UTF-8是Unicode字符集的一种编码方案,采取可变长编码 方案,共分四个长度区 :1个字节,2个字节,3个字节,4个字节。
英文字符、数字等只占1个字节 (兼容标准ASCII编码),汉字字符占用3个字节 。
UTF-8编码方式(二进制)
0 xxxxxxx (ASCII码)
110 xxxxx 10 xxxxxx
1110 xxxx 10 xxxxxx 10 xxxxxx
11110 xxx 10 xxxxxx 10 xxxxxx 10 xxxxxx
总结:
ASCII字符集:只有英文、数字、符号等,占1个字节。GBK字符集:汉字占2个字节,英文、数字占1个字节。UTF-8字符集:汉字占3个字节,英文、数字占1个字节。
注意:
1.字符编码时使用的字符集,和解码时使用的字符集必须一致,否则会出现乱码。
2.英文,数字一般不会乱码,因为很多字符集都兼容了ASCII编码。
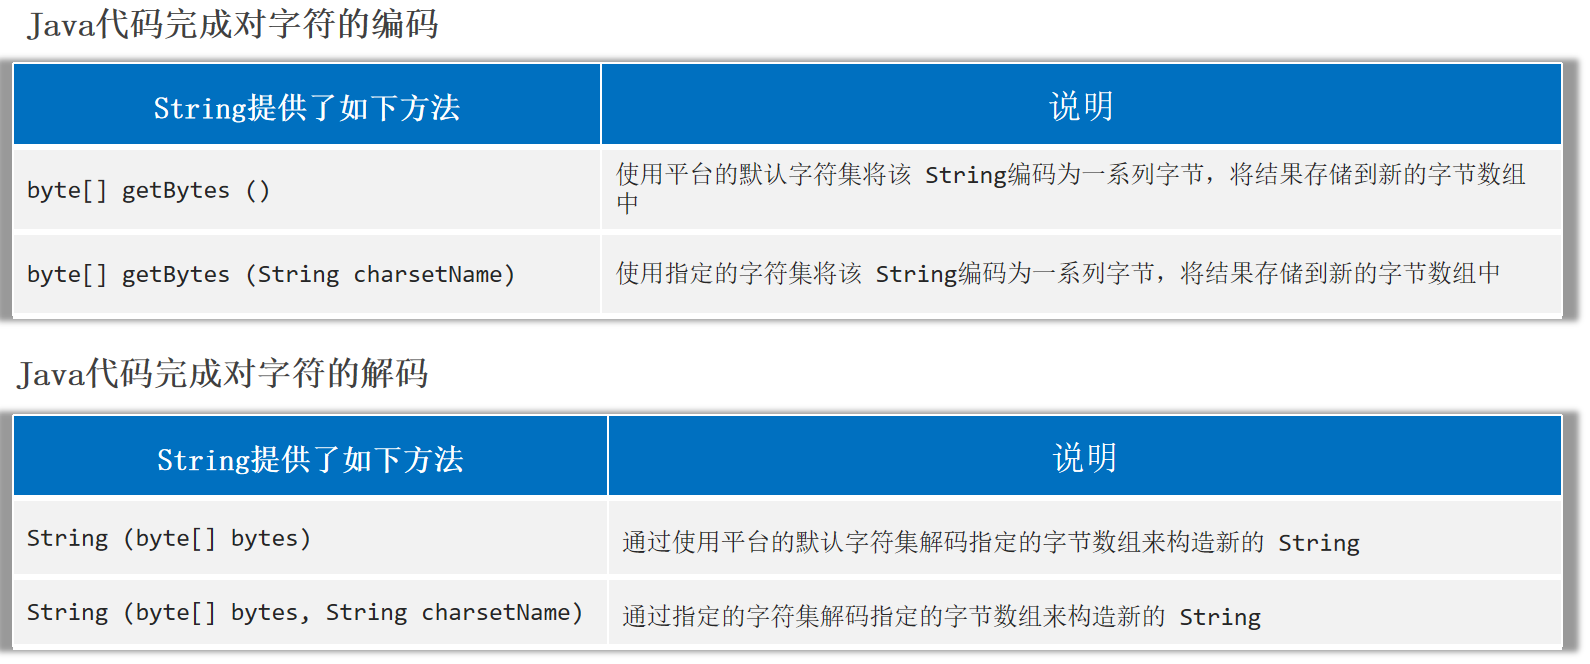
字符的编码和解码
1 2 3 4 5 6 7 8 9 10 11 12 13 14 15 String data = "a我b" ;byte [] byte1 = data.getBytes();byte [] byte2 = data.getBytes("GBK" );String s1 = new String (byte1);String s2 = new String (byte2, "GBK" );
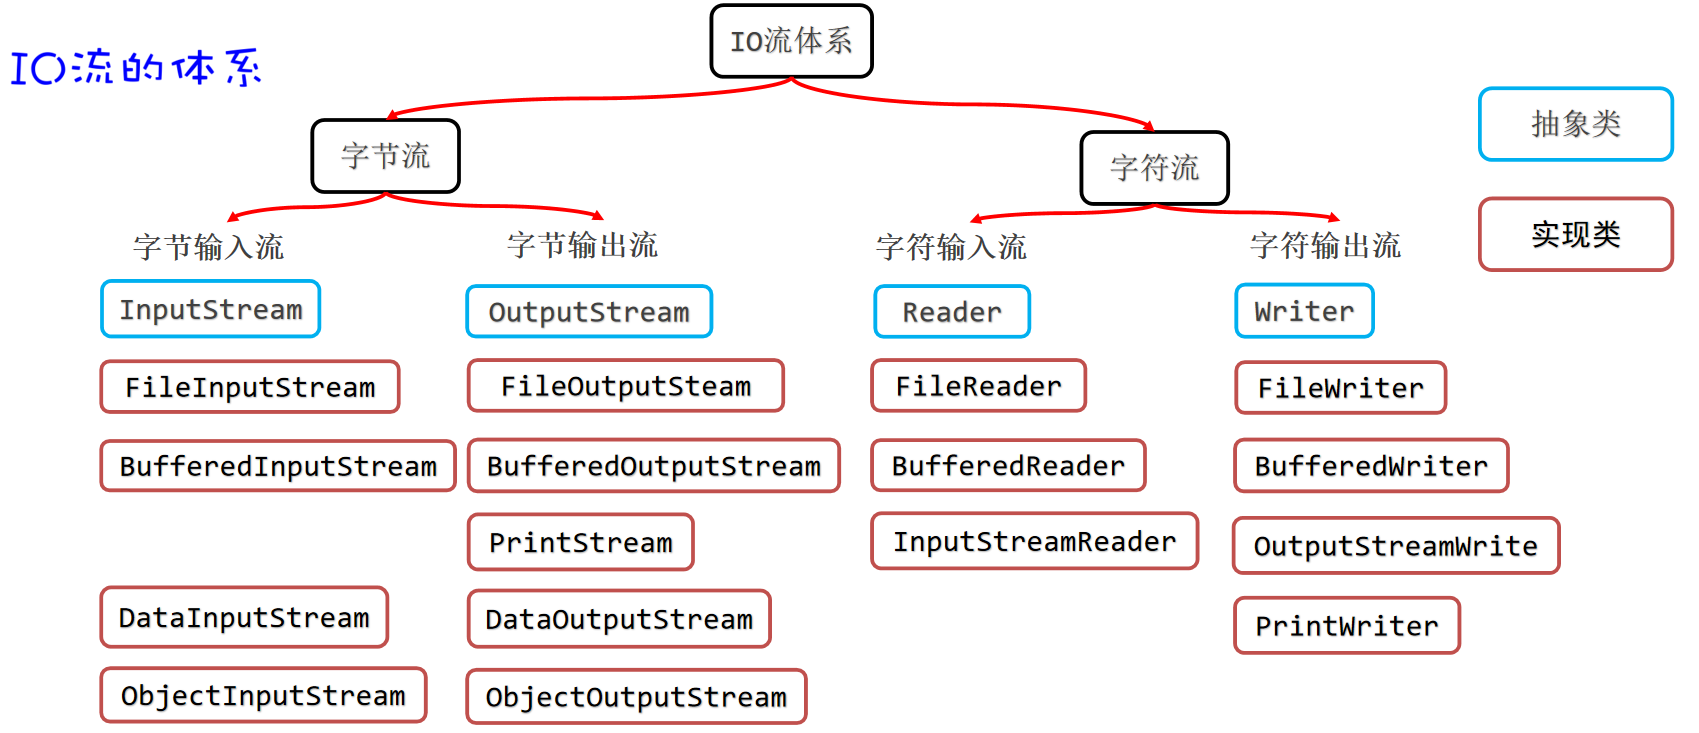
IO流的体系
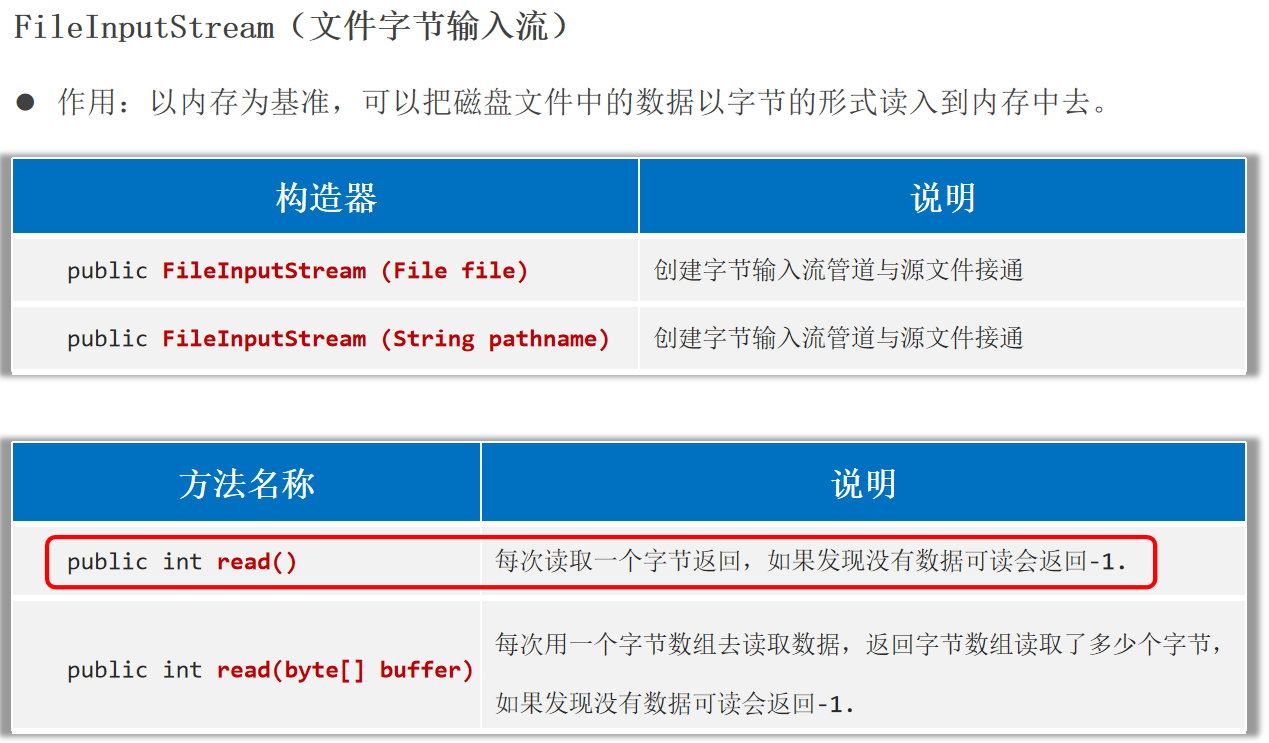
字节流 作用:以内存为基准,可以把磁盘文件中的数据以字节 的形式读入到内存 中去。
注意:
1.使用FileInputStream每次读取一个字节,读取性能较差,并且读取汉字输出会乱码。
1 2 3 4 5 6 7 8 InputStream is = new FileInputStream ("helloworld-app\\src\\itheima.txt" );int b;while ( ( b = is.read() ) != -1 ){char )b);
2.使用FileInputStream每次读取多个字节,读取性能得到了提升,但读取汉字输出还是会乱码。
1 2 3 4 5 6 7 8 9 10 11 12 13 14 15 16 17 18 19 20 InputStream is = new FileInputStream ("helloworld-app\\src\\itheima.txt" );byte [] buffer = new byte [3 ];int len;while ( (len = is.read(buffer)) != -1 ) {new String (buffer, 0 , len));
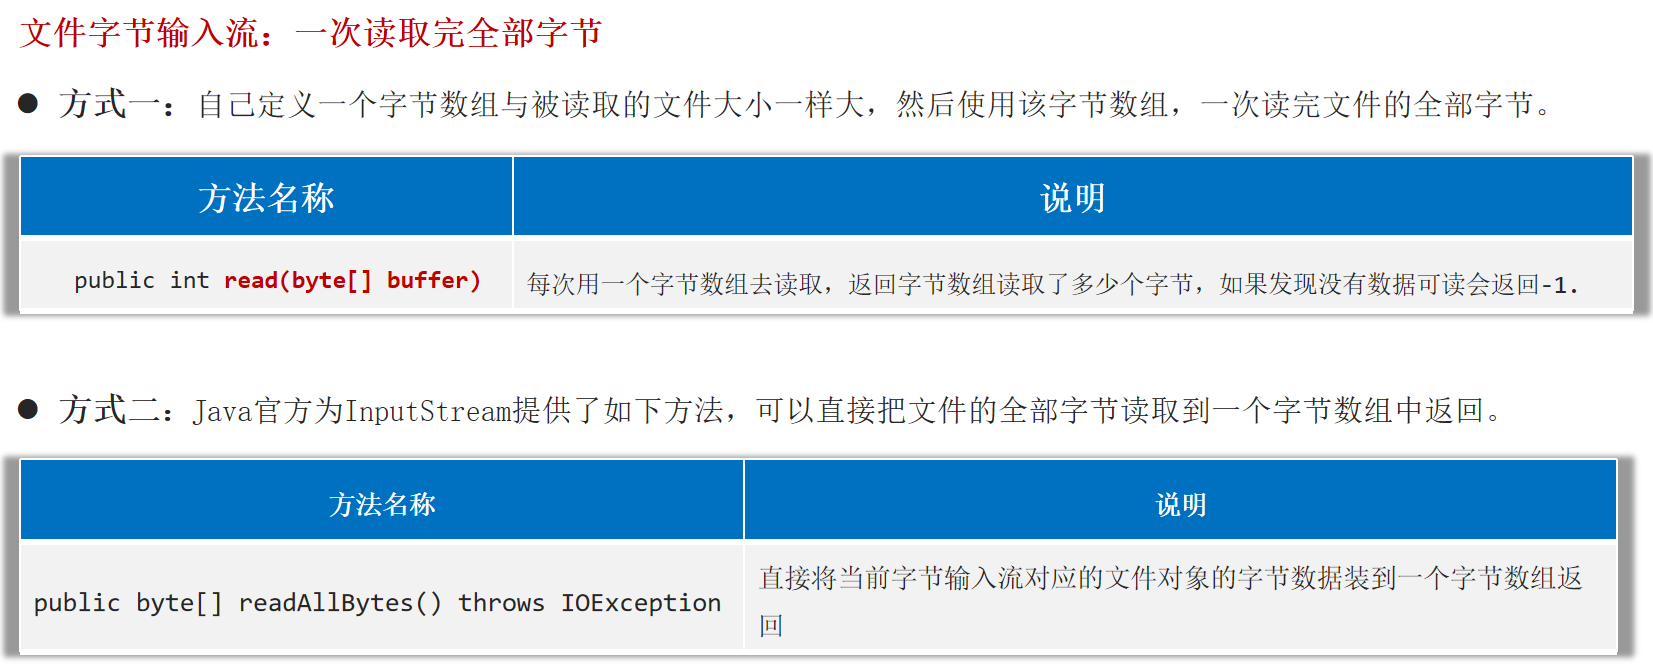
3.使用FileInputStream读取中文,保证输出不乱码:定义一个与文件一样大的字节数组,一次性读取完文件的全部字节。直接把文件数据全部读取到一个字节数组可以避免乱码,但是如果文件过大,创建的字节数组也会过大,可能引起内存溢出。
1 2 3 4 5 6 7 8 9 10 11 12 13 14 InputStream is = new FileInputStream ("helloworld-app\\src\\itheima.txt" );byte [] buffer = is.readAllBytes();new String (buffer));
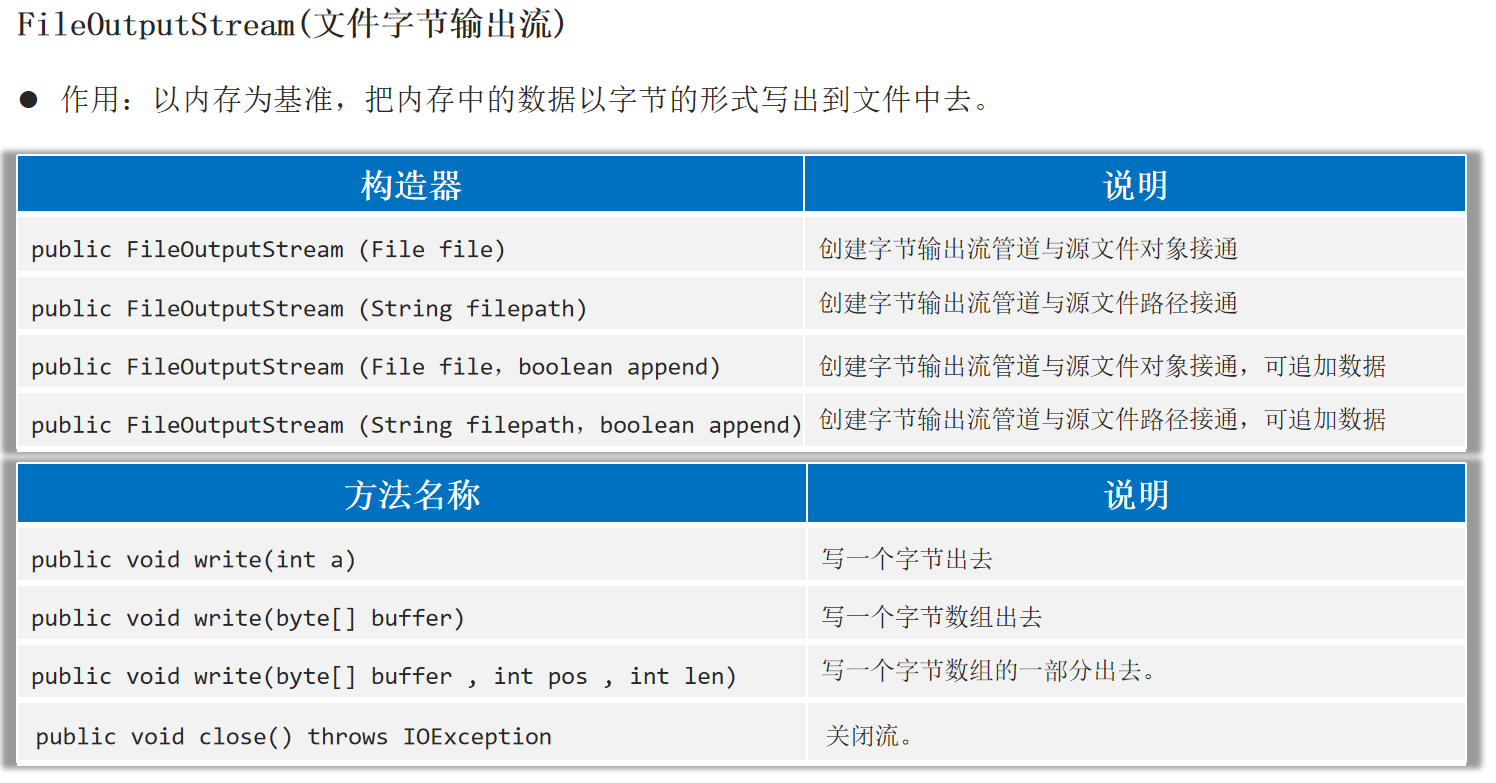
FileOutputStream(文件字节输出流) 作用:以内存为基准,把内存中的数据以字节 的形式写出到文件 中去。
1 2 3 4 5 6 7 8 9 10 11 12 13 14 OutputStream os = new FileOutputStream ("helloworld-app\\src\\itheima1.txt" , true );97 );'b' );'苏' );byte [] buffer = "我爱你中国888" .getBytes();0 , 15 );"\r\n" .getBytes());
文件复制 任何文件的底层都是字节,字节流做复制,是一字不漏的转移完全部字节,只要复制后的文件格式一致就没问题。
1 2 3 4 5 6 7 8 9 10 11 12 13 public class copy {public static void main (String[] args) throws Exception {InputStream is = new FileInputStream ("helloworld-app/src/com/itheima/IO_/Test.java" );OutputStream os = new FileOutputStream ("helloworld-app\\src\\Test.txt" );byte [] buffer = new byte [1024 ];int len;while ( (len = is.read(buffer)) > 0 ) {0 , len);
释放资源的方式 try-catch-finally finally代码区的特点:无论try中的程序是正常执行了,还是出现了异常,最后都一定会执行finally区,除非JVM终止。
作用:一般用于在程序执行完成后进行资源的释放操作(专业级做法)。
1 2 3 4 5 6 7 8 9 10 11 12 13 14 15 16 17 18 19 20 21 22 23 24 25 26 public class Test5 {public static void main (String[] args) {try {10 /2 );catch (Exception e) {finally {"finally" );10 , 2 ));public static int test (int a, int b) {try {return a / b;catch (Exception e) {return -1 ;finally {return 111 ;
1 2 3 4 5 6 7 8 9 10 11 12 13 14 15 16 17 18 19 20 21 22 23 24 25 26 27 28 29 30 public static void main (String[] args) throws Exception {InputStream is = null ;OutputStream os = null ;try {10 / 0 );new FileInputStream ("helloworld-app/src/com/itheima/IO_/Test.java" );new FileOutputStream ("helloworld-app\\src\\Test.txt" );10 / 0 );byte [] buffer = new byte [1024 ];int len;while ( (len = is.read(buffer)) > 0 ) {0 , len);catch (IOException e) {finally {try {if (os != null ) { os.close(); }catch (IOException e) {throw new RuntimeException (e);try {if (is != null ) { is.close(); }catch (IOException e) {throw new RuntimeException (e);
try-with-resource JDK7开始提供了更简单的资源释放方案:try-with-resource。
1 2 3 4 5 try (定义资源1 ;定义资源2 ;…){catch (异常类名 变量名){
资源一般指的是最终实现了AutoCloseable接口。
1 2 3 public abstract class InputStream implements Closeable { }public abstract class OutputStream implements Closeable , Flushable { }public interface Closeable extends AutoCloseable { }
1 2 3 4 5 6 public class MyConnection implements AutoCloseable {@Override public void close () throws Exception {"释放了与某个硬件的链接资源" );
1 2 3 4 5 6 7 8 9 10 11 12 13 14 15 16 17 18 19 20 21 public class Test6 {public static void main (String[] args) throws Exception {try (InputStream is = new FileInputStream ("helloworld-app/src/com/itheima/IO_/Test.java" );OutputStream os = new FileOutputStream ("helloworld-app\\src\\Test.txt" );MyConnection conn = new MyConnection ();byte [] buffer = new byte [1024 ];int len;while ( (len = is.read(buffer)) > 0 ) {0 , len);catch (IOException e) {throw new RuntimeException (e);
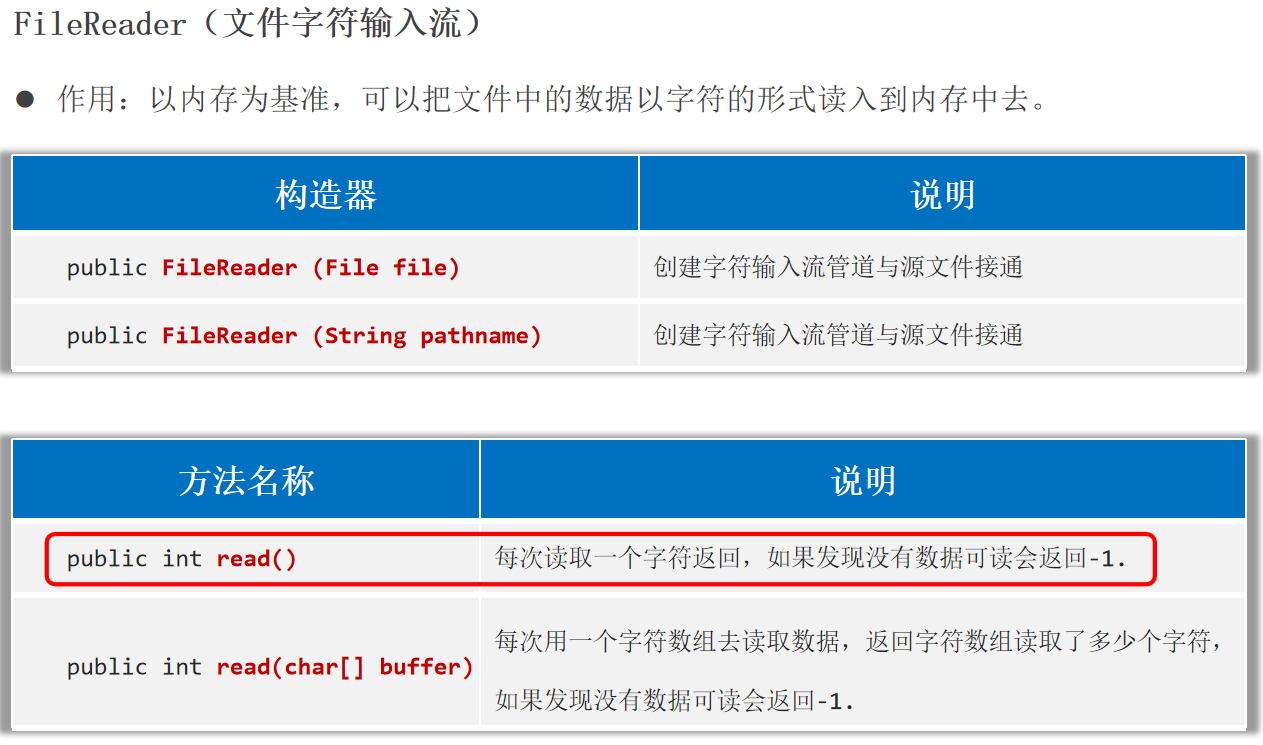
字符流 FileReader(文件字符输入流) 作用:以内存为基准,可以把文件中的数据以字符 的形式读入到内存 中去。
1 2 3 4 5 6 7 8 9 10 11 12 13 14 15 16 17 18 19 20 public static void main (String[] args) {try (Reader fr1 = new FileReader ("helloworld-app\\src\\itheima1.txt" );Reader fr2 = new FileReader ("helloworld-app\\src\\itheima1.txt" );int c;while ((c = fr1.read()) != -1 ){char )c );char [] buffer = new char [3 ];int len;while ((len = fr2.read(buffer)) != -1 ){new String (buffer, 0 , len));catch (Exception e) {
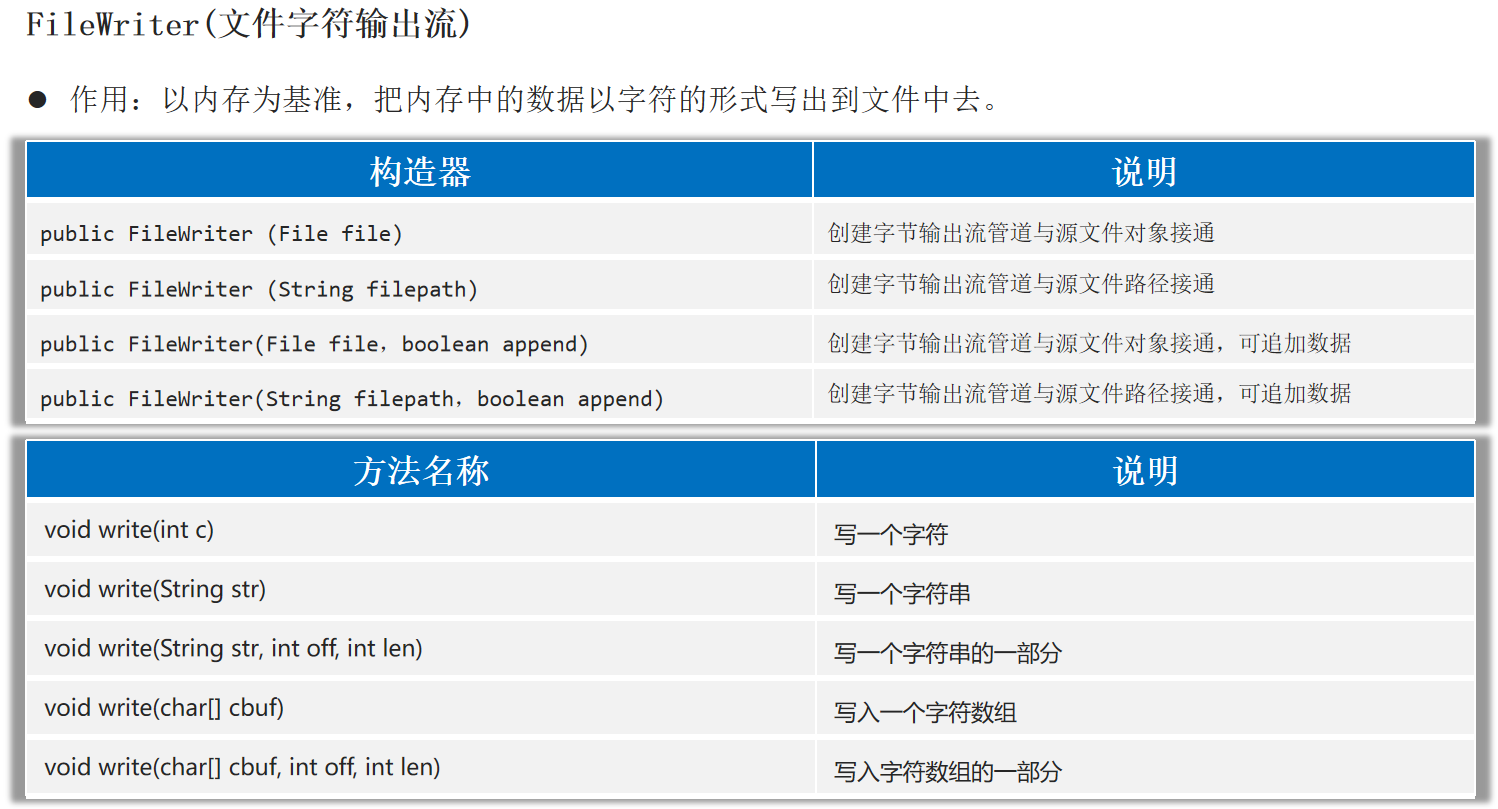
FileWriter(文件字符输出流) 作用:以内存为基准,把内存中的数据以字符 的形式写出到文件 中去。
1 2 3 4 5 6 7 8 9 10 11 12 13 14 15 16 17 public static void main (String[] args) {try (Writer fw = new FileWriter ("helloworld-app\\src\\Test1.txt" )'a' );98 );'苏' );"\r\n" );"我爱你中国abc" );"我爱你中国abc" , 0 ,5 );char [] buffer = {'我' , '喜' , '欢' , '学' , '习' };0 , 2 );catch (Exception e) {
注意:字符输出流写出数据后,必须刷新流 ,或者关闭流 ,写出去的数据才能生效。
1 2 public void flush () throws IOException public void close () throws IOException
1 2 3 4 5 6 7 8 9 10 11 12 13 14 15 16 17 18 public static void main (String[] args) throws Exception {Writer fw = new FileWriter ("helloworld-app\\src\\Test2.txt" );'a' );98 );'苏' );"\r\n" );"我爱你中国abc" );"我爱你中国abc" , 0 ,5 );char [] buffer = {'我' , '喜' , '欢' , '学' , '习' };0 , 2 );
字节流、字符流的使用场景小结:
字节流 适合做一切文件 数据的拷贝(音视频,文本);字节流不适合读取中文内容输出。
字符流 适合做文本文件 的操作(读,写)。
缓冲流 原理:字节缓冲输入流 自带了8KB缓冲池 ;字节缓冲输出流 也自带了8KB缓冲池 。提高字节流读写的性能。
1 2 3 4 5 6 7 8 9 10 11 12 13 14 15 16 public static void main (String[] args) {try (InputStream is = new FileInputStream ("helloworld-app/src/com/itheima/IO_/Test.java" );BufferedInputStream bis = new BufferedInputStream (is, 8192 *2 );OutputStream os = new FileOutputStream ("helloworld-app\\src\\Test.txt" );BufferedOutputStream bos = new BufferedOutputStream (os, 8192 );byte [] buffer = new byte [1024 ];int len;while ((len = bis.read(buffer)) > 0 ) {0 , len);catch (IOException e) {
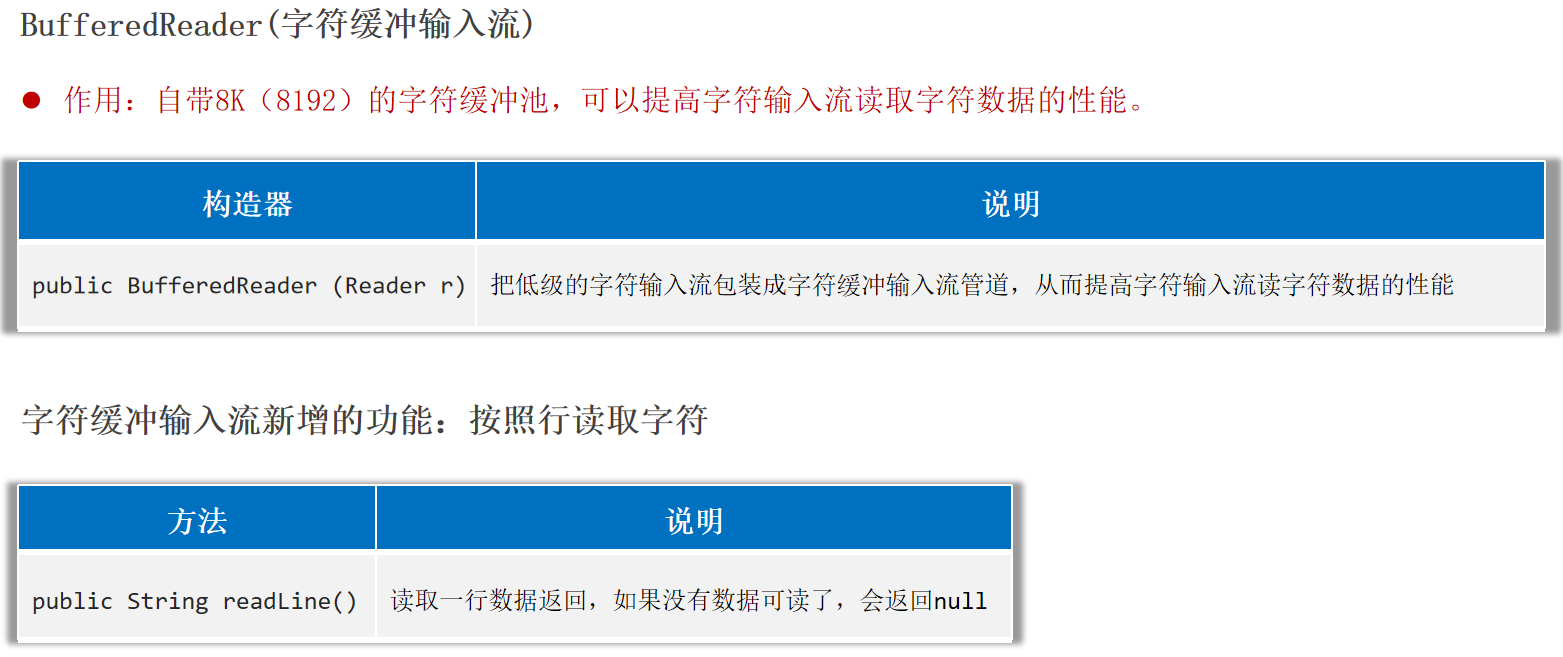
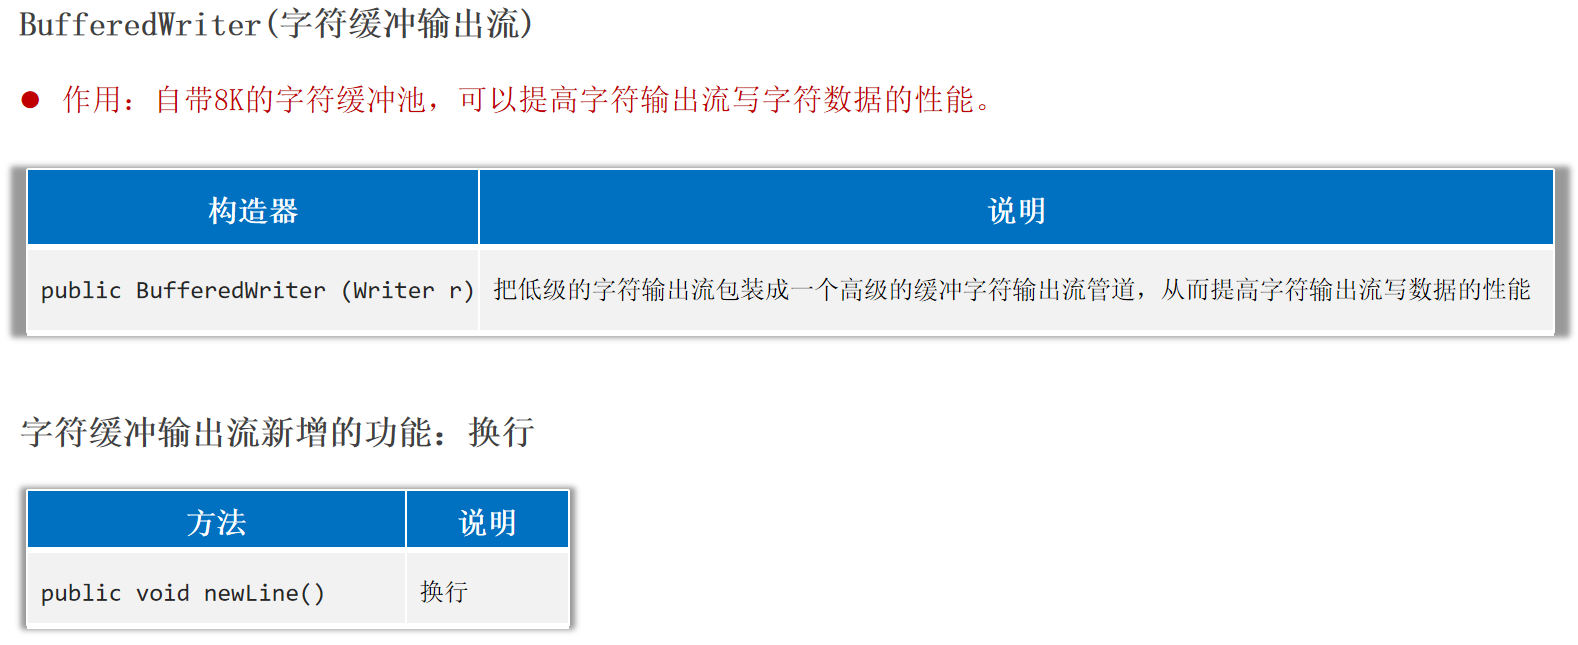
BufferedReader(字符缓冲输入流)、BufferedWriter(字符缓冲输出流) 作用:字符缓冲输入流和字符缓冲输出流都自带8K(8192)的字符缓冲池 ,可以提高字符流读写的性能。
1 2 3 4 5 6 7 8 9 10 11 12 13 14 public static void main (String[] args) {try (Reader fr = new FileReader ("helloworld-app\\src\\itheima1.txt" );BufferedReader br = new BufferedReader (fr);while ((line = br.readLine()) != null ) {catch (Exception e) {
1 2 3 4 5 6 7 8 9 10 11 12 13 14 public static void main (String[] args) {try (Writer fw = new FileWriter ("helloworld-app\\src\\Test1.txt" );BufferedWriter bw = new BufferedWriter (fw);'a' );98 );'苏' );"我爱你中国abc" );catch (Exception e) {
提高字节流读写数据的性能:建议使用字节缓冲输入流 、字节缓冲输出流 ,结合字节数组 的方式,目前来看是性能最优的组合。
转换流 注意:
如果代码编码和被读取的文本文件的编码是一致 的,使用字符流读取文本文件时不会出现乱码 。
如果代码编码和被读取的文本文件的编码是不一致 的,使用字符流读取文本文件时就会出现乱码 。
InputStreamReader解决不同编码时,字符流读取文本内容乱码的问题。
解决思路:先获取文件的原始字节流 ,再将其按真实的字符集编码转成字符输入流 ,这样字符输入流中的字符就不乱码了。
1 2 3 4 5 6 7 8 9 10 11 12 13 14 15 16 try (InputStream is = new FileInputStream ("helloworld-app/src/file_GBK.txt" );Reader isr = new InputStreamReader (is, "GBK" );BufferedReader br = new BufferedReader (isr);while ((line = br.readLine()) != null ) {catch (Exception e) {
OutputStreamWriter(字符输出转换流) 控制写出的字符使用指定的字符集编码:
1.调用String提供的getBytes方法:
1 2 String data = "我爱你中国abc" ;byte [] bytes = data.getBytes("GBK" );
2.OutputStreamWriter可以控制写出去的字符使用什么字符集编码。
解决思路:获取字节输出流,再按照指定的字符集编码将其转换成字符输出流,以后写出去的字符就会用该字符集编码了。
1 2 3 4 5 6 7 8 9 10 11 12 13 14 try (OutputStream os = new FileOutputStream ("helloworld-app/src/file_GBK_w.txt" );Writer osw = new OutputStreamWriter (os, "GBK" );BufferedWriter bw = new BufferedWriter (osw);"我是中国人srr" );"我爱你中国999" );catch (Exception e) {
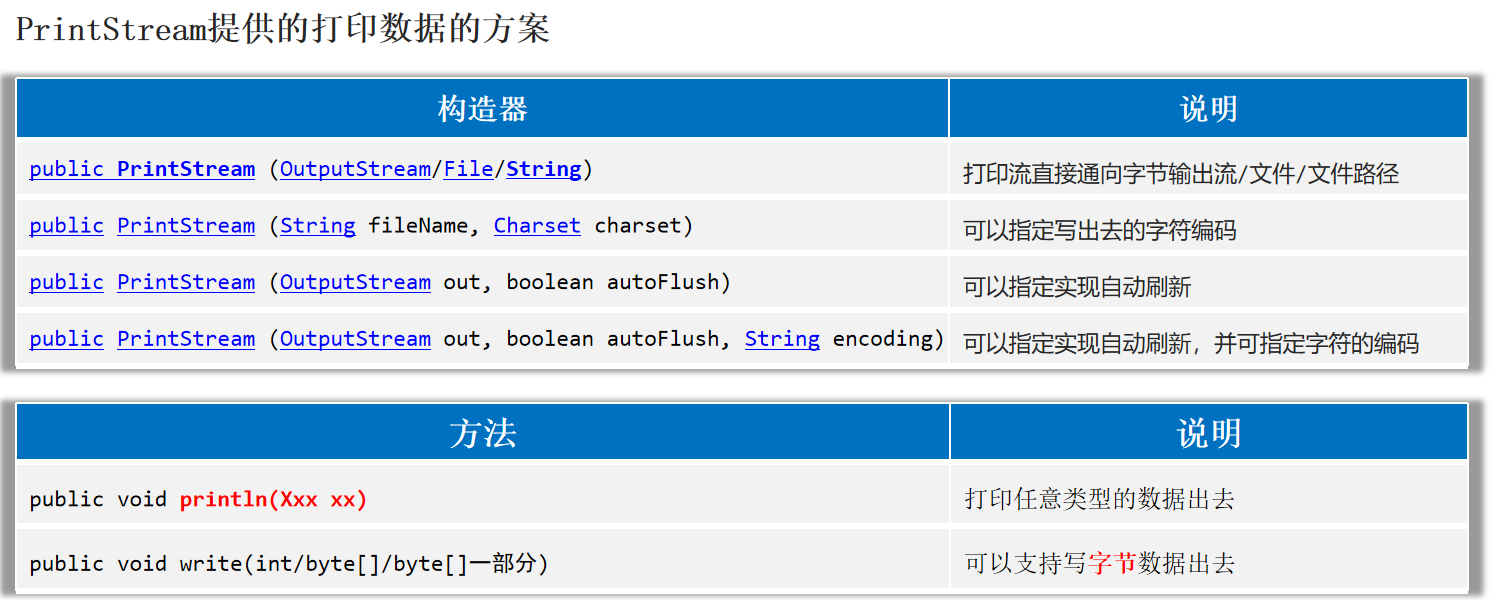
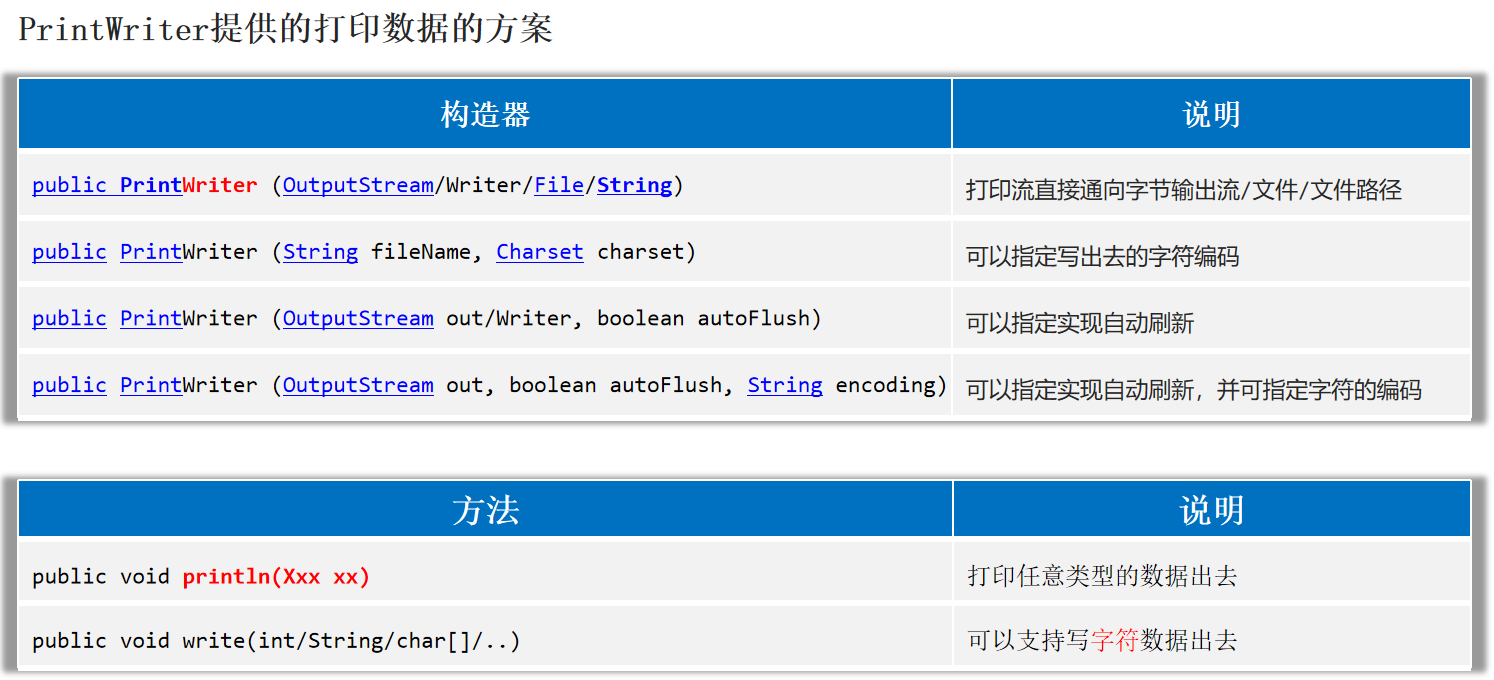
打印流 PrintStream和PrintWriter都是打印流,打印流可以实现更方便、更高效的打印数据出去,能实现打印啥出去就是啥出去 。
PrintStream
1 2 3 4 5 6 7 8 9 10 11 12 13 14 15 try (PrintStream ps = new PrintStream ("helloworld-app/src/PrintStream.txt" , Charset.forName("GBK" ));'a' );"我爱你中国" );true );99.8 );97 );97 );catch (Exception e) {
PrintWriter
1 2 3 4 5 6 7 8 9 10 11 12 13 14 15 16 try (PrintWriter pw = new PrintWriter (new FileOutputStream ("helloworld-app/src/PrintWriter.txt" , true ));'a' );"我爱你中国" );true );99.8 );97 );97 );catch (Exception e) {
PrintStream和PrintWriter的区别 1.打印数据的功能上是一模一样的:都是使用方便,性能高效(核心优势)。
2.PrintStream继承自字节输出流OutputStream,因此支持写字节数据 的方法。
3.PrintWriter继承自字符输出流Writer,因此支持写字符数据 出去。
打印流的应用:输出语句的重定向 打印流可以把输出语句的打印位置改到某个文件中去。
1 2 3 4 5 6 7 8 9 10 "第一行" );"第二行" );try (PrintStream printStream = new PrintStream ("helloworld-app/src/PrintStream2.txt" );){"第三行" );"第四行" );catch (FileNotFoundException e) {
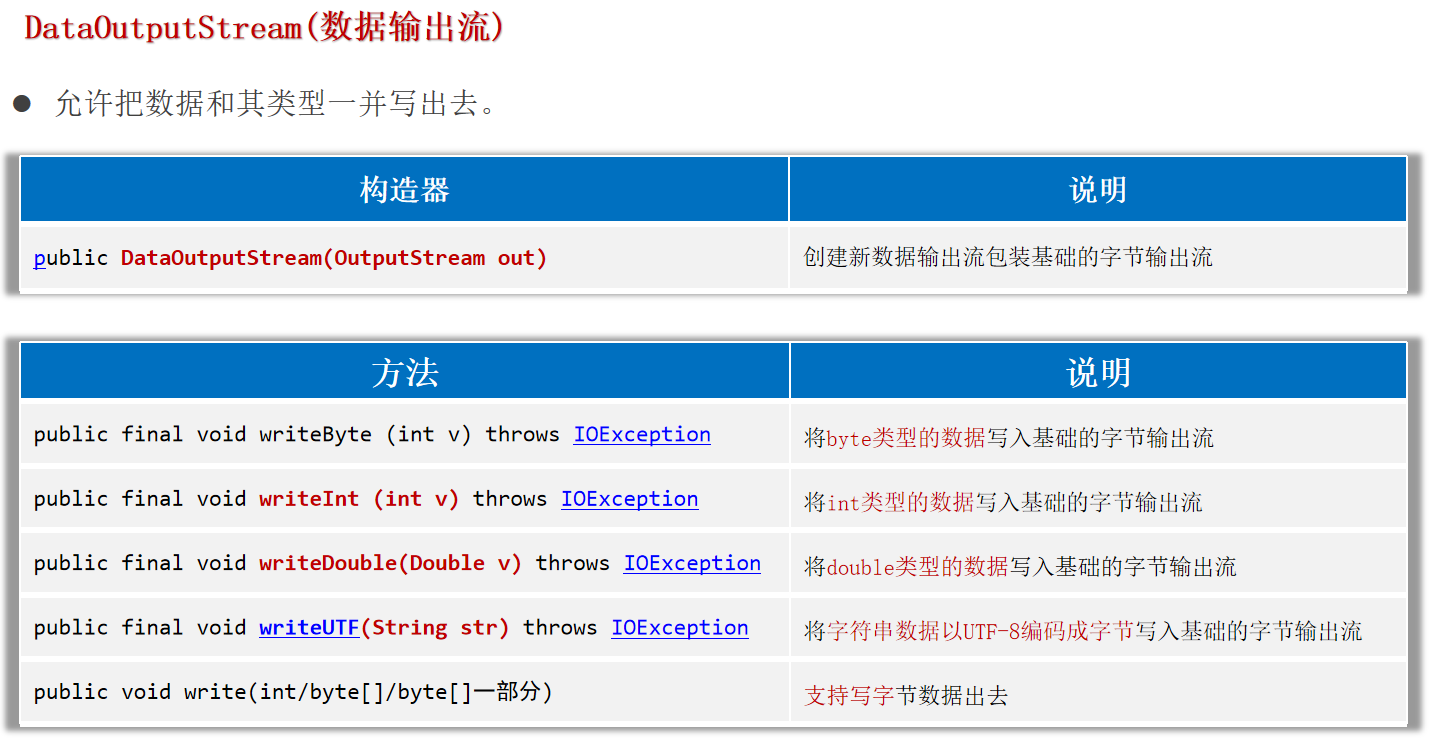
数据流 DataOutputStream(数据输出流) 允许把数据和其类型一并写出去。
1 2 3 4 5 6 7 8 9 10 11 12 try ( DataOutputStream dos = new DataOutputStream (new FileOutputStream ("helloworld-app/src/DataOutputStream.txt" ));){97 );'R' );888.888 );true );"你好我是中国人" );catch (Exception e) {
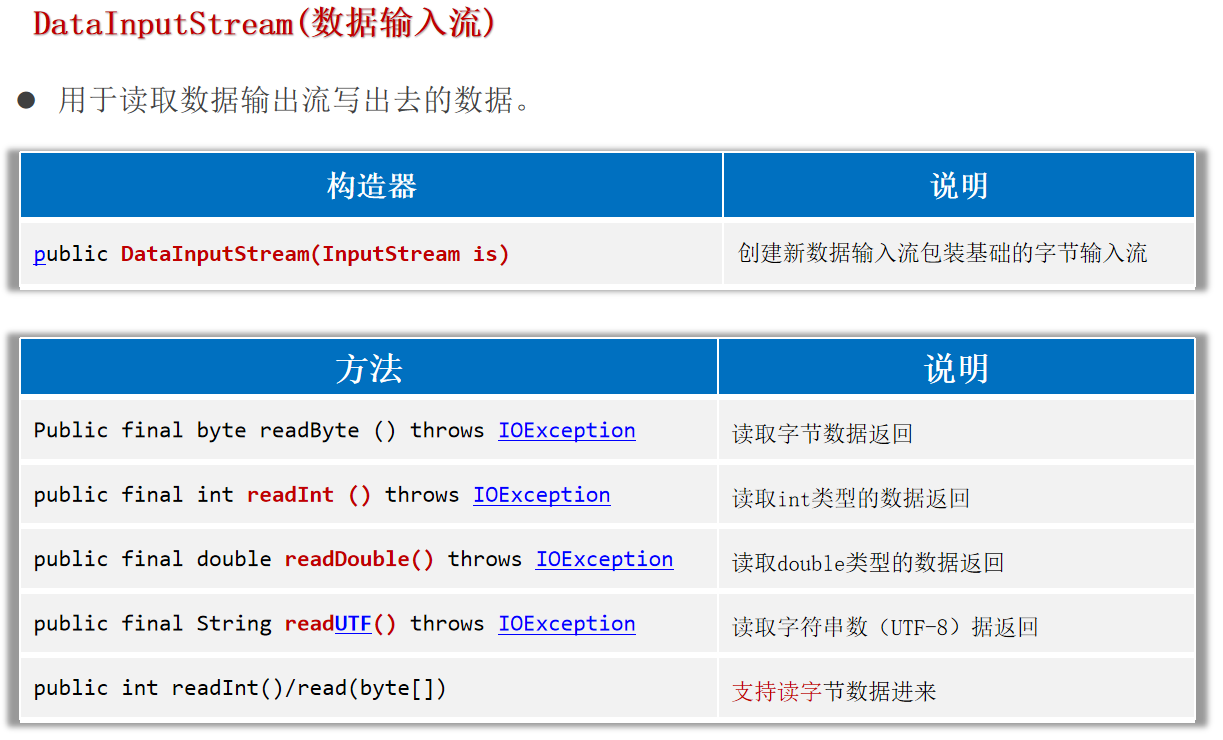
用于读取数据输出流写出去的数据。
1 2 3 4 5 6 7 8 9 10 11 12 13 14 try (DataInputStream dis = new DataInputStream (new FileInputStream ("helloworld-app/src/DataOutputStream.txt" ));catch (Exception e) {
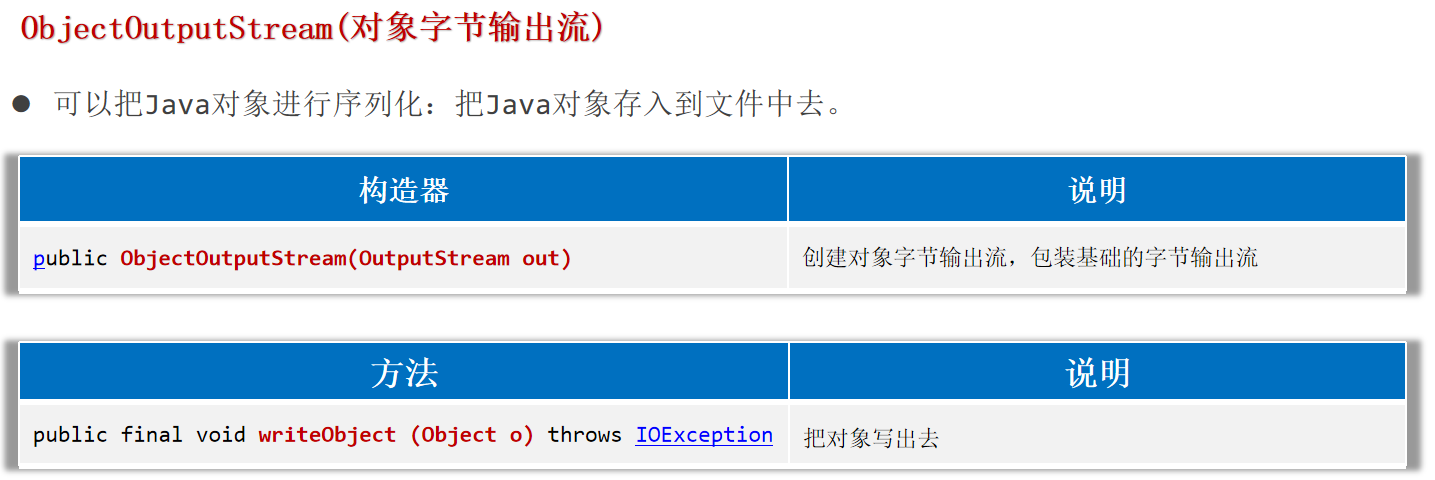
序列号流 ObjectOutputStream(对象字节输出流) 可以把Java对象进行序列化:把Java对象存入到文件中去。
注意:
1.对象如果要参与序列化,必须实现序列化接口java.io.Serializable。使用transient修饰成员变量,表示这个成员变量不参与序列化 。
2.ArrayList集合已经实现了序列化接口。若一次性序列化多个对象,用一个ArrayList集合存储多个对象,然后直接对集合进行序列化即可。
1 2 3 4 5 6 7 8 9 10 11 12 13 14 15 16 17 18 19 20 21 22 public class User implements Serializable {private String name;private int age;private transient String password;public User () {}public User (String name, int age, String password) {this .name = name;this .age = age;this .password = password;@Override public String toString () {return "User{" +"name='" + name + '\'' +", age=" + age +", password='" + password + '\'' +'}' ;
1 2 3 4 5 6 7 8 9 10 try ( ObjectOutputStream oos = new ObjectOutputStream (new FileOutputStream ("helloworld-app/src/ObjectOutputStream.txt" ));User u = new User ("admin" , 18 , "888888" );catch (Exception e) {
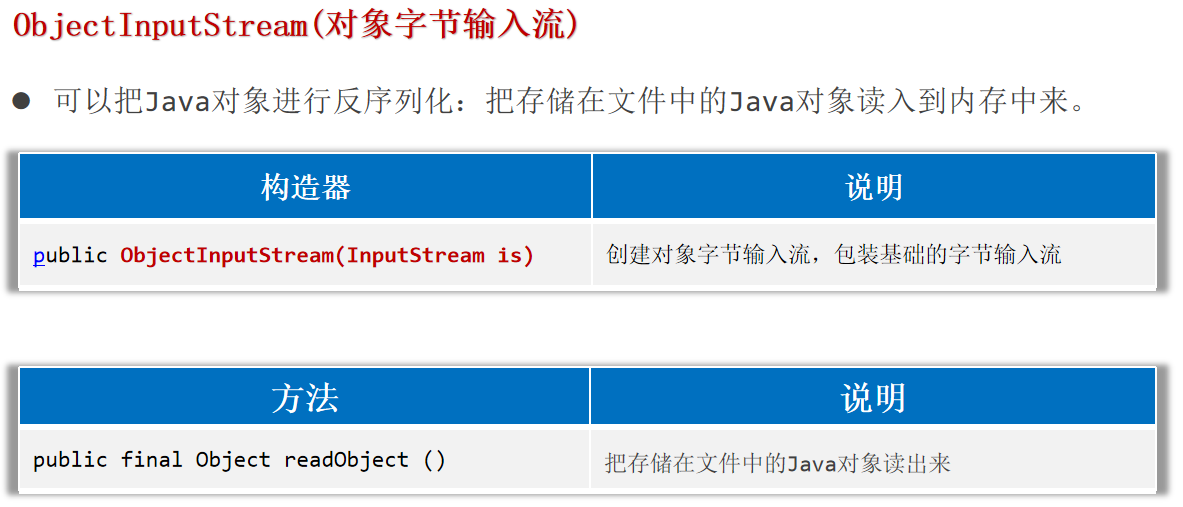
可以把Java对象进行反序列化:把存储在文件中的Java对象读入到内存中来。
1 2 3 4 5 6 7 8 9 10 11 12 try ( ObjectInputStream ois = new ObjectInputStream (new FileInputStream ("helloworld-app/src/ObjectOutputStream.txt" ));User u = (User) ois.readObject();catch (Exception e) {
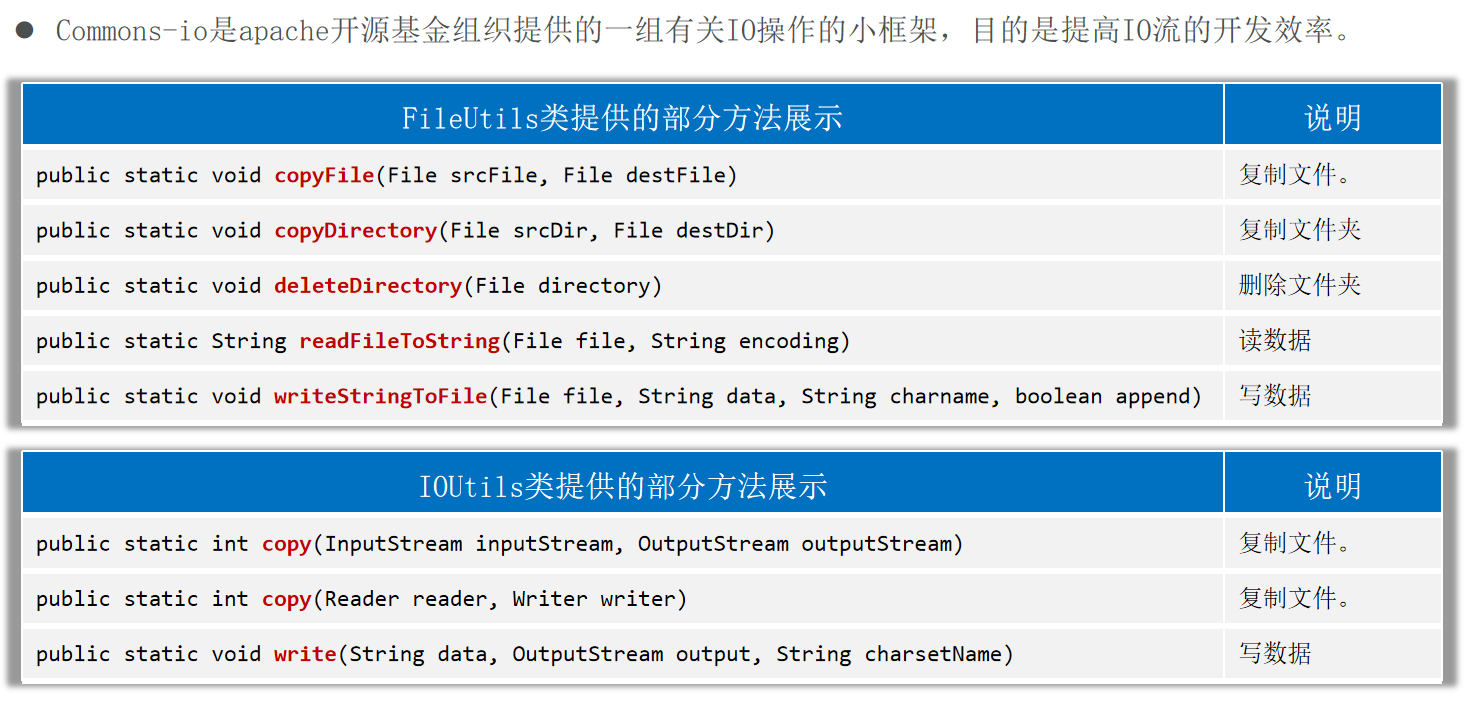
IO框架 框架:解决某类问题,编写的一套类、接口等,可以理解成一个半成品,大多框架都是第三方研发的。
好处:在框架的基础上开发,可以得到优秀的软件架构,并能提高开发效率。
框架的形式:一般是把类、接口等编译成class形式,再压缩成一个.jar结尾的文件发行出去。
IO框架:封装了Java提供的对文件、数据进行操作的代码,对外提供了更简单的方式来对文件进行操作,对数据进行读写等。
导入commons-io-2.11.0.jar框架到项目中去:
官网:Commons IO – Download Apache Commons IO ,下载Apache Commons IO 2.17.0 (requires Java 8)->Binaries->commons-io-2.17.0-bin.zip。
在项目中创建一个文件夹:lib。
将commons-io-2.6.jar文件复制到lib文件夹。
在jar文件上点右键,选择 Add as Library ->点击OK。
在类中导包使用。
1 2 3 4 5 6 7 8 9 10 public static void main (String[] args) throws Exception{new File ("helloworld-app/src/Test.txt" ), new File ("helloworld-app/src/a.txt" ));new File ("helloworld-app/src" ), new File ("helloworld-app/src2" ));new File ("helloworld-app/src2" ));"helloworld-app/src/Test2.txt" ), Path.of("helloworld-app/src/b.txt" ));"helloworld-app/src/Test.txt" )));
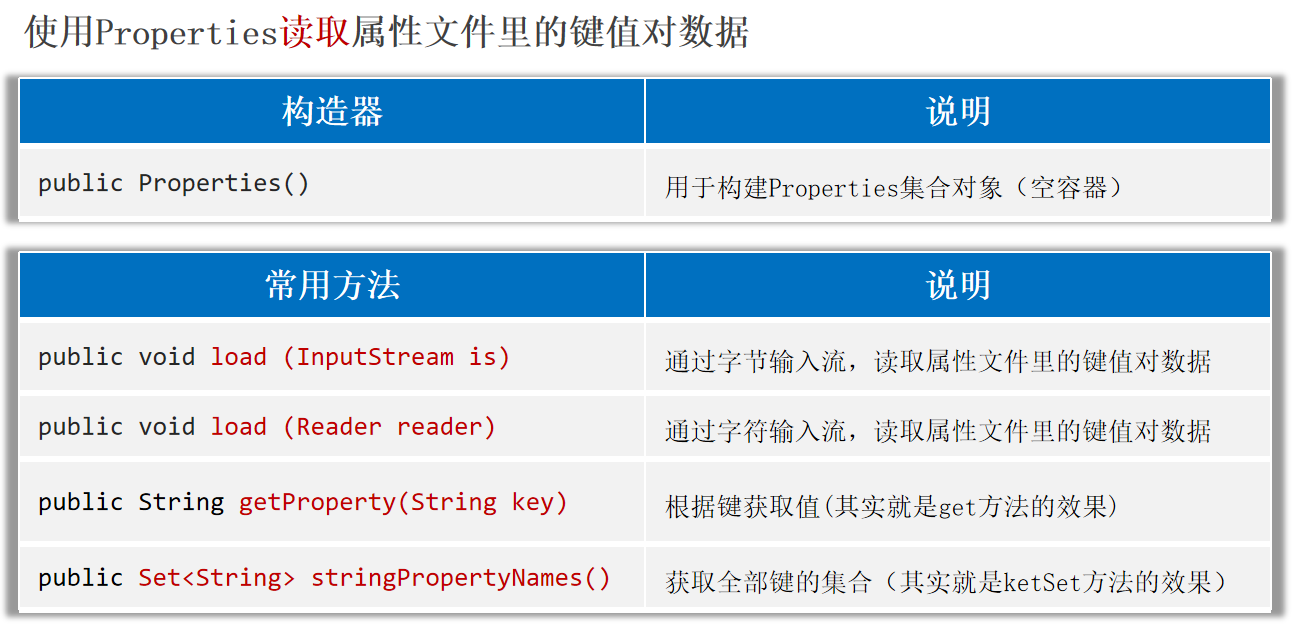
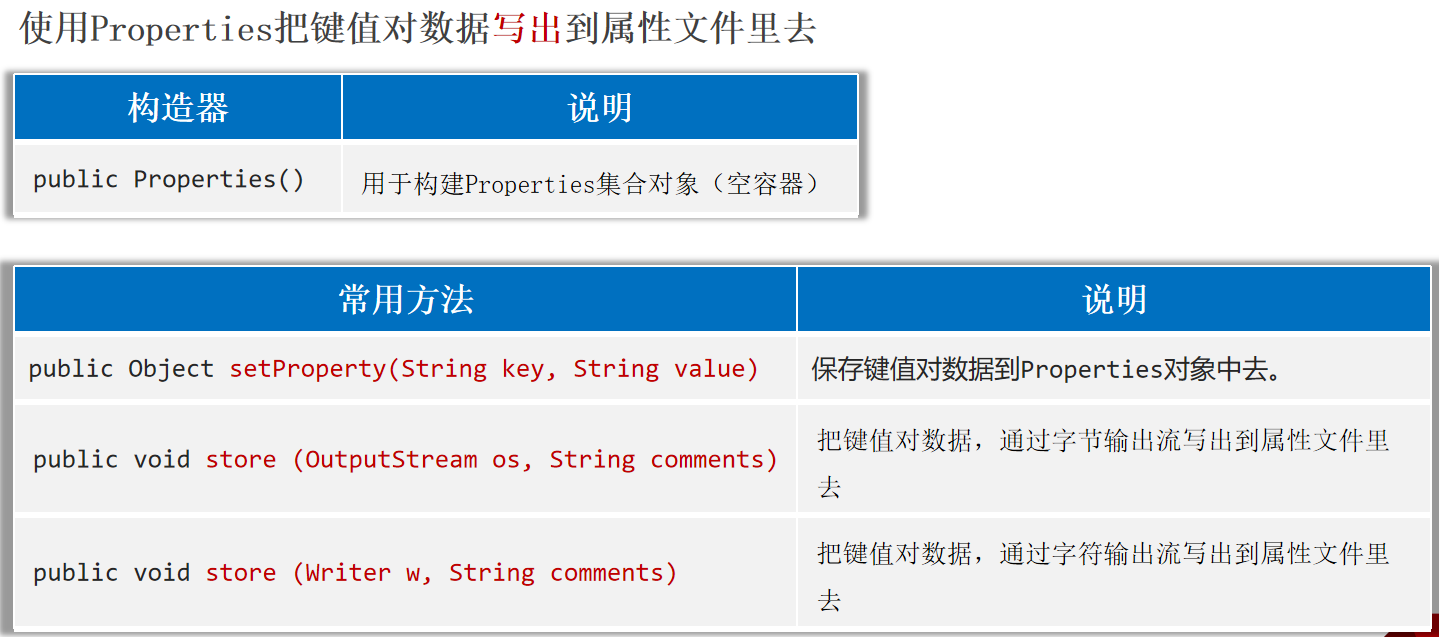
特殊文件 Properties属性文件 Properties是一个Map集合(键值对集合),但是一般不会当集合使用。
核心作用:Properties是用来代表属性文件的,通过Properties可以读写属性文件里的内容。
1 2 3 4 5 6 admin =123456 张无忌 =minmin 周芷若 =wuji 赵敏 =wuji
1 2 3 4 5 6 7 8 9 10 11 12 13 14 15 16 17 18 19 20 21 22 23 public static void main (String[] args) throws Exception {Properties properties = new Properties ();new FileReader ("helloworld-app/src/users.properties" ));"赵敏" ));"张无忌" ));for (String key : keys) {String value = properties.getProperty(key);"---->" + value);"---->" + v);
1 2 3 4 5 6 7 8 9 10 11 public static void main (String[] args) throws Exception {Properties properties = new Properties ();"张无忌" , "minmin" );"殷素素" , "cuishan" );"张翠山" , "susu" );new FileWriter ("helloworld-app/src/users2.properties" )"i saved many users!" );
XML文件 XML( 全称EXtensible Markup Language, 可扩展标记语言 )。本质是一种数据的格式,可以用来存储复杂的数据结构,和数据关系。
应用场景:经常用来做为系统的配置文件;或者作为一种特殊的数据结构,在网络中进行传输。
XML的特点:
XML中的<标签名> 称为一个标签或一个元素,一般是成对出现的。XML中的标签名可以自己定义(可扩展),但必须要正确的嵌套。XML中只能有一个根标签 。XML中的标签可以有属性。如果一个文件中放置的是XML格式的数据,这个文件就是XML文件,后缀一般要写成.xml。
XML的语法规则:
1.XML文件的后缀名为:xml,文档声明必须是第一行。
1 2 3 <?xml version="1.0" encoding="UTF-8" ?>
2.XML中可以定义注释信息:
3.XML中书写”<”、“&”等,可能会出现冲突,导致报错,此时可以用如下特殊字符替代。
1 2 3 4 5 < < 小于> > 大于& & 和号' ' 单引号" " 引号
4.XML中可以写一个叫CDATA的数据区:<![CDATA[ …内容… ]]>,里面的内容可以随便写。
1 2 3 4 5 6 7 8 9 10 11 12 13 14 15 16 17 18 19 20 21 22 23 24 25 26 27 28 29 30 <?xml version="1.0" encoding="UTF-8" ?> <users > <user id ="1" desc ="第一个用户" > <name > 张无忌</name > <sex > 男</sex > <地址 > 光明顶</地址 > <password > minmin</password > <data > 3 < 2 & & 5 > 4 </data > <data1 > </data1 > </user > <people > 很多人</people > <user id ="2" > <name > 敏敏</name > <sex > 女</sex > <地址 > 光明顶</地址 > <password > wuji</password > <data > 3 < 2 & & 5 > 4 </data > <data1 > </data1 > </user > </users >
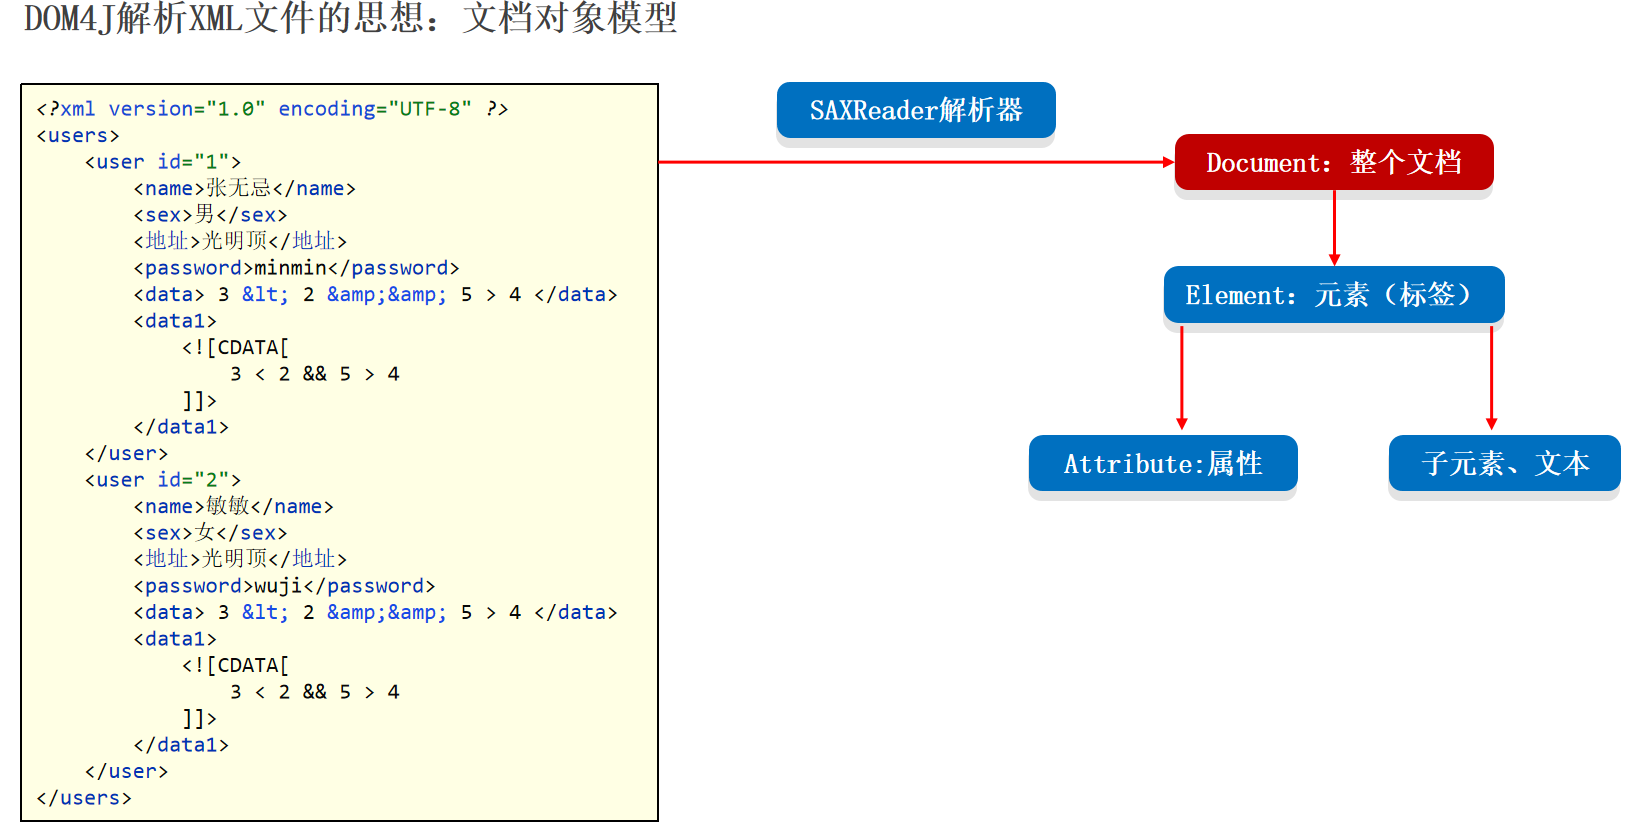
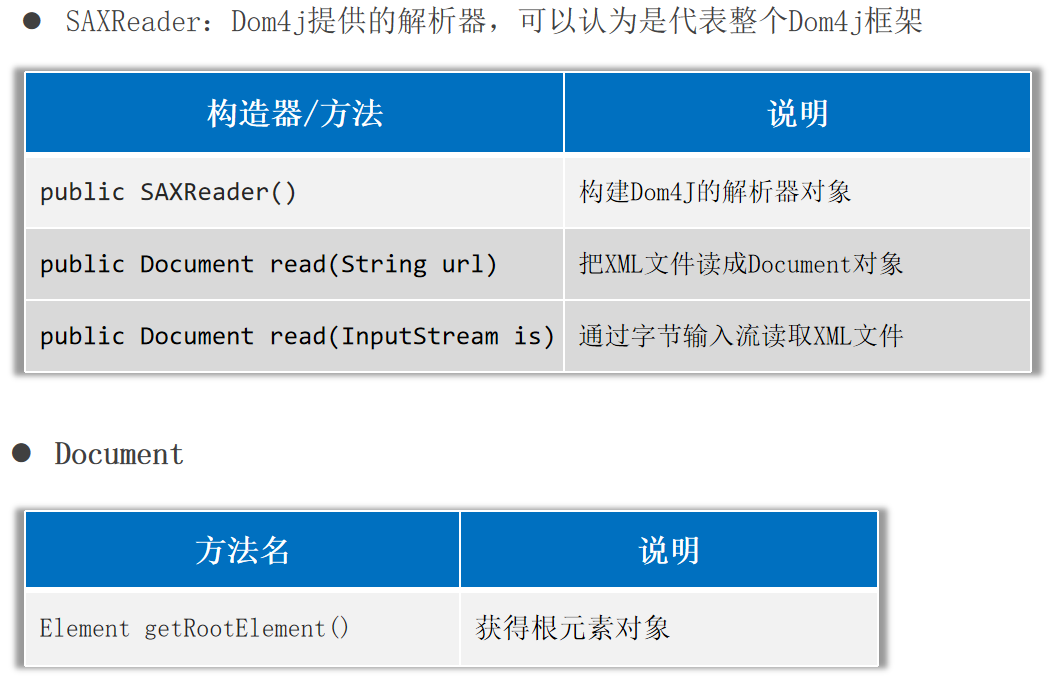
使用Dom4J解析XML文件 DOM4J解析XML文件的思想:文档对象模型 。
Dom4j解析XML得到Document对象。
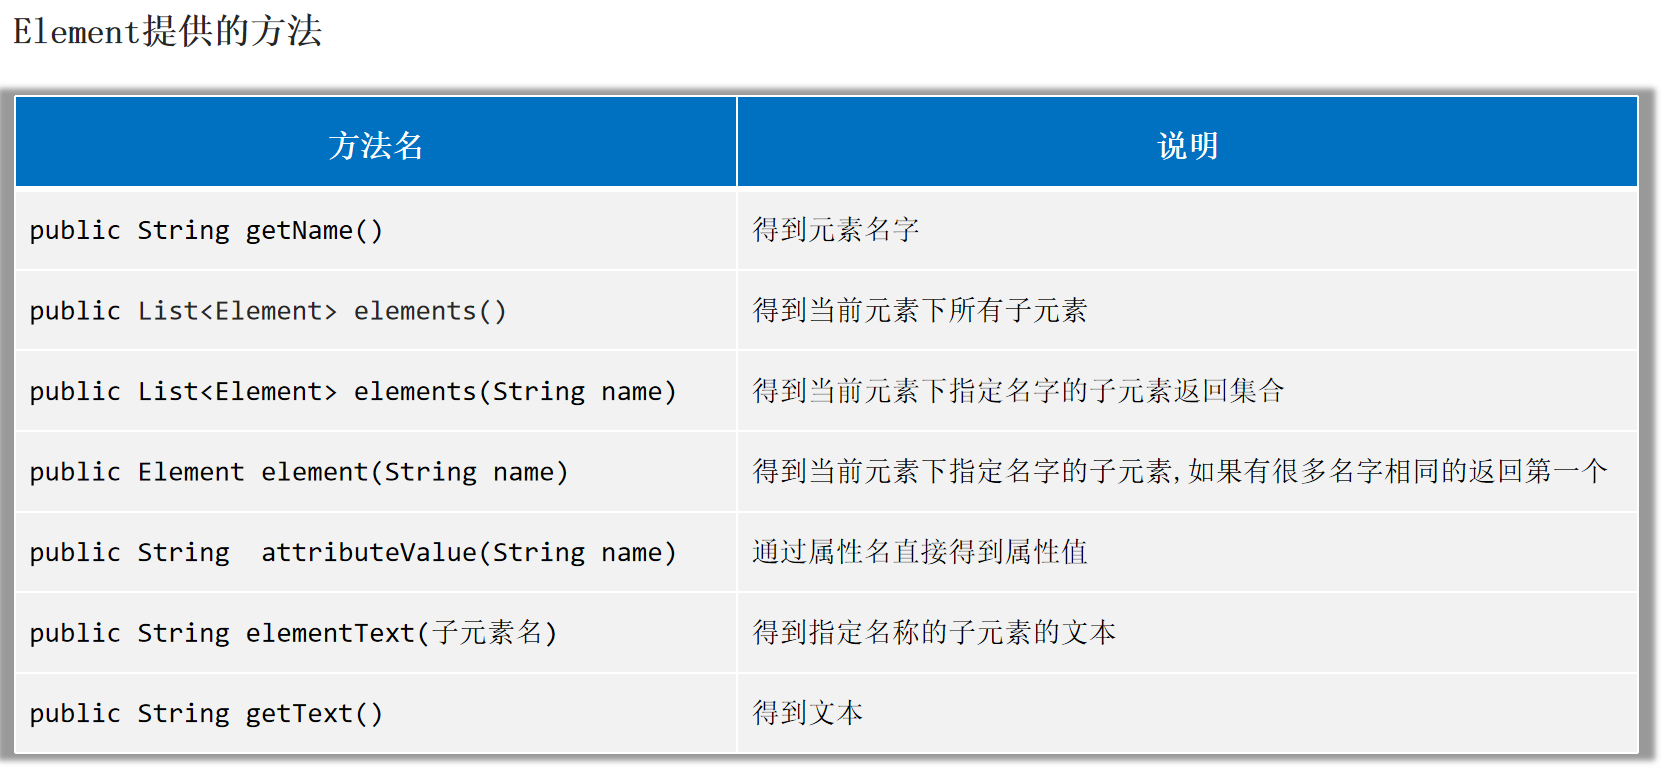
1 2 3 4 5 6 7 8 9 10 11 12 13 14 15 16 17 18 19 20 21 22 23 24 25 26 27 28 29 30 31 32 33 34 35 36 37 38 39 40 41 42 43 44 45 46 47 48 public static void main (String[] args) throws Exception {SAXReader saxReader = new SAXReader ();Document document = "helloworld-app/src/helloworld.xml" );Element root = document.getRootElement();"user" );for (Element element : elements) {Element people = root.element("people" );Element user = root.element("user" );"name" ));"id" ));Attribute id = user.attribute("id" );for (Attribute attribute : attributes) {"=" + attribute.getValue());"name" ));"地址" ));"地址" )); "password" ));Element data = user.element("data" );
把数据写出到XML文件:不建议用Dom4J做,直接把数据拼写成XML格式,然后用IO流写出去。
1 2 3 4 5 6 7 8 9 10 11 12 13 14 15 16 17 public static void main (String[] args) {StringBuilder sb = new StringBuilder ();"<?xml version=\"1.0\" encoding=\"UTF-8\" ?>\r\n" );"<book>\r\n" );"\t<name>" ).append("从入门到跑路" ).append("</name>\r\n" );"\t<author>" ).append("dlei" ).append("</author>\r\n" );"\t<price>" ).append(999.99 ).append("</price>\r\n" );"</book>" );try (BufferedWriter bw = new BufferedWriter (new FileWriter ("helloworld-app/src/book.xml" ));catch (Exception e) {
约束XML文件的书写 约束文档:专门用来限制xml书写格式的文档,比如:限制标签、属性应该怎么写。
约束文档的分类:
1.DTD文档
DTD约束文档,后缀必须是.dtd。在需要编写的XML文件中导入该DTD约束文档。
然后XML文件,就必须按照DTD约束文档指定的格式进行编写,否则报错。
DTD可以约束XML文件的编写,但是不能约束具体的数据类型 。
1 2 3 4 5 6 7 8 9 10 11 <!ELEMENT 书架 (书+)>
1 2 3 4 5 6 7 8 9 10 11 12 13 14 15 16 17 18 19 <?xml version="1.0" encoding="UTF-8" ?> <!DOCTYPE 书架 SYSTEM "data.dtd" > <书架 > <书 > <书名 > 从入门到删库</书名 > <作者 > 小猫</作者 > <售价 > 很便宜</售价 > </书 > <书 > <书名 > 从入门到删库</书名 > <作者 > 小猫</作者 > <售价 > 9.9</售价 > </书 > <书 > <书名 > 从入门到删库</书名 > <作者 > 小猫</作者 > <售价 > 9.9</售价 > </书 > </书架 >
2.Schema文档
编写schema约束文档,后缀必须是.xsd。
在需要编写的XML文件中导入该schema约束文档。
按照约束内容编写XML文件的标签。
1 2 3 4 5 6 7 8 9 10 11 12 13 14 15 16 17 18 19 20 21 22 23 24 <?xml version="1.0" encoding="UTF-8" ?> <schema xmlns ="http://www.w3.org/2001/XMLSchema" targetNamespace ="http://www.itcast.cn" elementFormDefault ="qualified" > <element name ='书架' > <complexType > <sequence maxOccurs ='unbounded' > <element name ='书' > <complexType > <sequence > <element name ='书名' type ='string' /> <element name ='作者' type ='string' /> <element name ='售价' type ='double' /> </sequence > </complexType > </element > </sequence > </complexType > </element > </schema >
1 2 3 4 5 6 7 8 9 10 11 12 13 14 15 16 17 <?xml version="1.0" encoding="UTF-8" ?> <书架 xmlns ="http://www.itcast.cn" xmlns:xsi ="http://www.w3.org/2001/XMLSchema-instance" xsi:schemaLocation ="http://www.itcast.cn data.xsd" > <书 > <书名 > 从入门到删除</书名 > <作者 > dlei</作者 > <售价 > 9.9</售价 > </书 > <书 > <书名 > 从入门到删除</书名 > <作者 > dlei</作者 > <售价 > 0.9</售价 > </书 > </书架 >
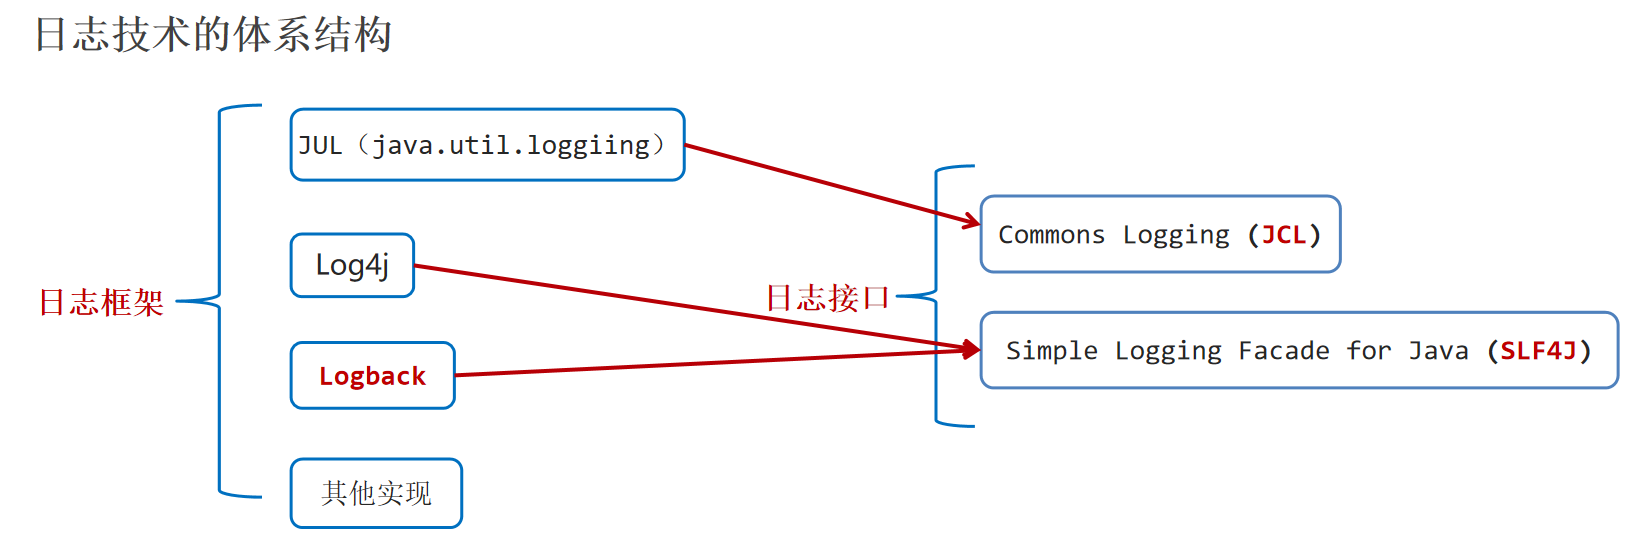
日志技术 日志技术可以将系统执行的信息,方便的记录到指定的位置(控制台、文件中、数据库中)。
日志技术可以随时以开关的形式控制日志的启停,无需侵入到源代码中去进行修改。
日志框架:牛人或者第三方公司已经做好的实现代码,后来者直接可以拿去使用。
日志接口:设计日志框架的一套标准,日志框架需要实现这些接口。
注意:
1.因为对Commons Logging接口不满意,有人就搞了SLF4J;因为对Log4j的性能不满意,有人就搞了Logback。
2.Logback是基于slf4j的日志规范实现的框架。
Logback日志框架 官方网站:https://logback.qos.ch/index.html
Logback日志框架有以下模块:
1.logback-core:基础模块,是其他两个模块依赖的基础(必须有)。
2.logback-classic:完整实现了slf4jAPI的模块(必须有)。
3.logback-access:与 Tomcat和Jetty等Servlet容器集成,以提供HTTP访问日志的功能(可选,以后再接触)。
想使用Logback日志框架,至少需要在项目中整合如下三个模块:
1.slf4j-api:日志接口。
2.logback-core:基础模块。
3.logback-classic:功能模块,它完整实现了slf4jAPI。
使用Logback日志框架 1.导入Logback框架到项目中去:slf4j-api、logback-core、logback-classic。
2.将Logback框架的核心配置文件logback.xml直接拷贝到src目录下(必须是src下)。
1 2 3 4 5 6 7 8 9 10 11 12 13 14 15 16 17 18 19 20 21 22 23 24 25 26 27 28 29 30 31 32 33 34 35 36 37 38 39 40 41 <?xml version="1.0" encoding="UTF-8" ?> <configuration > <appender name ="CONSOLE" class ="ch.qos.logback.core.ConsoleAppender" > <target > System.out</target > <encoder > <pattern > %d{yyyy-MM-dd HH:mm:ss.SSS} [%-5level] %c [%thread] : %msg%n</pattern > </encoder > </appender > <appender name ="FILE" class ="ch.qos.logback.core.rolling.RollingFileAppender" > <encoder > <pattern > %d{yyyy-MM-dd HH:mm:ss.SSS} [%thread] %-5level %logger{36} - %msg%n</pattern > <charset > utf-8</charset > </encoder > <file > E:/2_学习/Java/code/log/itheima-data.log</file > <rollingPolicy class ="ch.qos.logback.core.rolling.SizeAndTimeBasedRollingPolicy" > <fileNamePattern > E:/2_学习/Java/code/log/itheima-data-%i-%d{yyyy-MM-dd}-.log.gz</fileNamePattern > <maxFileSize > 1MB</maxFileSize > </rollingPolicy > </appender > <root level ="debug" > <appender-ref ref ="CONSOLE" /> <appender-ref ref ="FILE" /> </root > </configuration >
3.创建Logback框架提供的Logger对象,然后用Logger对象调用其提供的方法就可以记录系统的日志信息。
1 2 3 4 5 6 7 8 9 10 11 12 13 14 15 16 17 18 19 20 21 22 23 public class LogBackTest {public static final Logger LOGGER = LoggerFactory.getLogger("LogBackTest" );public static void main (String[] args) {try {"chu法方法开始执行~~~" );10 , 0 );"chu法方法执行成功~~~" );catch (Exception e) {"chu法方法执行失败了,出现了bug~~~" );public static void chu (int a, int b) {"参数a:" + a);"参数b:" + b);int c = a / b;"结果是:" + c);
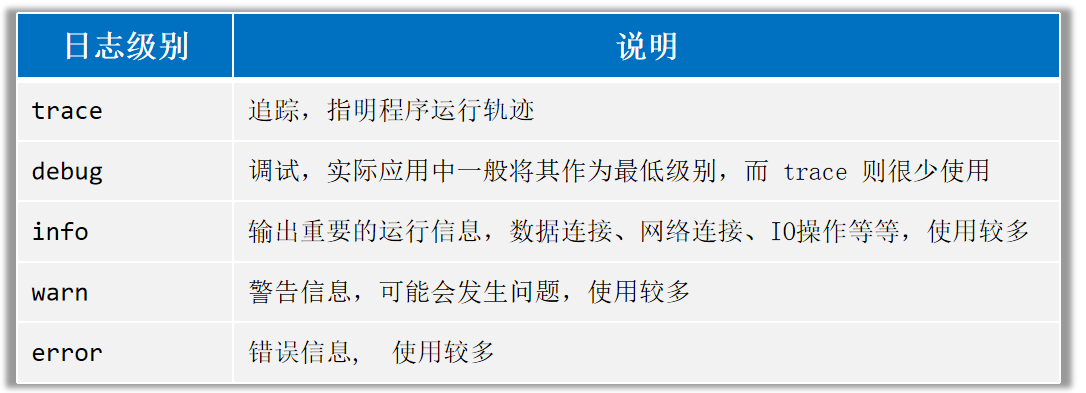
日志级别 日志级别指的是日志信息的类型,日志都会分级别,常见的日志级别如下(优先级依次升高 ):
只有日志的级别是大于或等于核心配置文件配置的日志级别 ,才会被记录 ,否则不记录。
1 2 3 4 <root level ="info" > <appender-ref ref ="CONSOLE" /> <appender-ref ref ="FILE" /> </root >
注意:
ALL和 OFF分别是打开全部日志和关闭全部日志。级别程度依次是:TRACE< DEBUG< INFO<WARN<ERROR。
默认级别是debug(忽略大小写),只输出当前级别及高于该级别的日志。