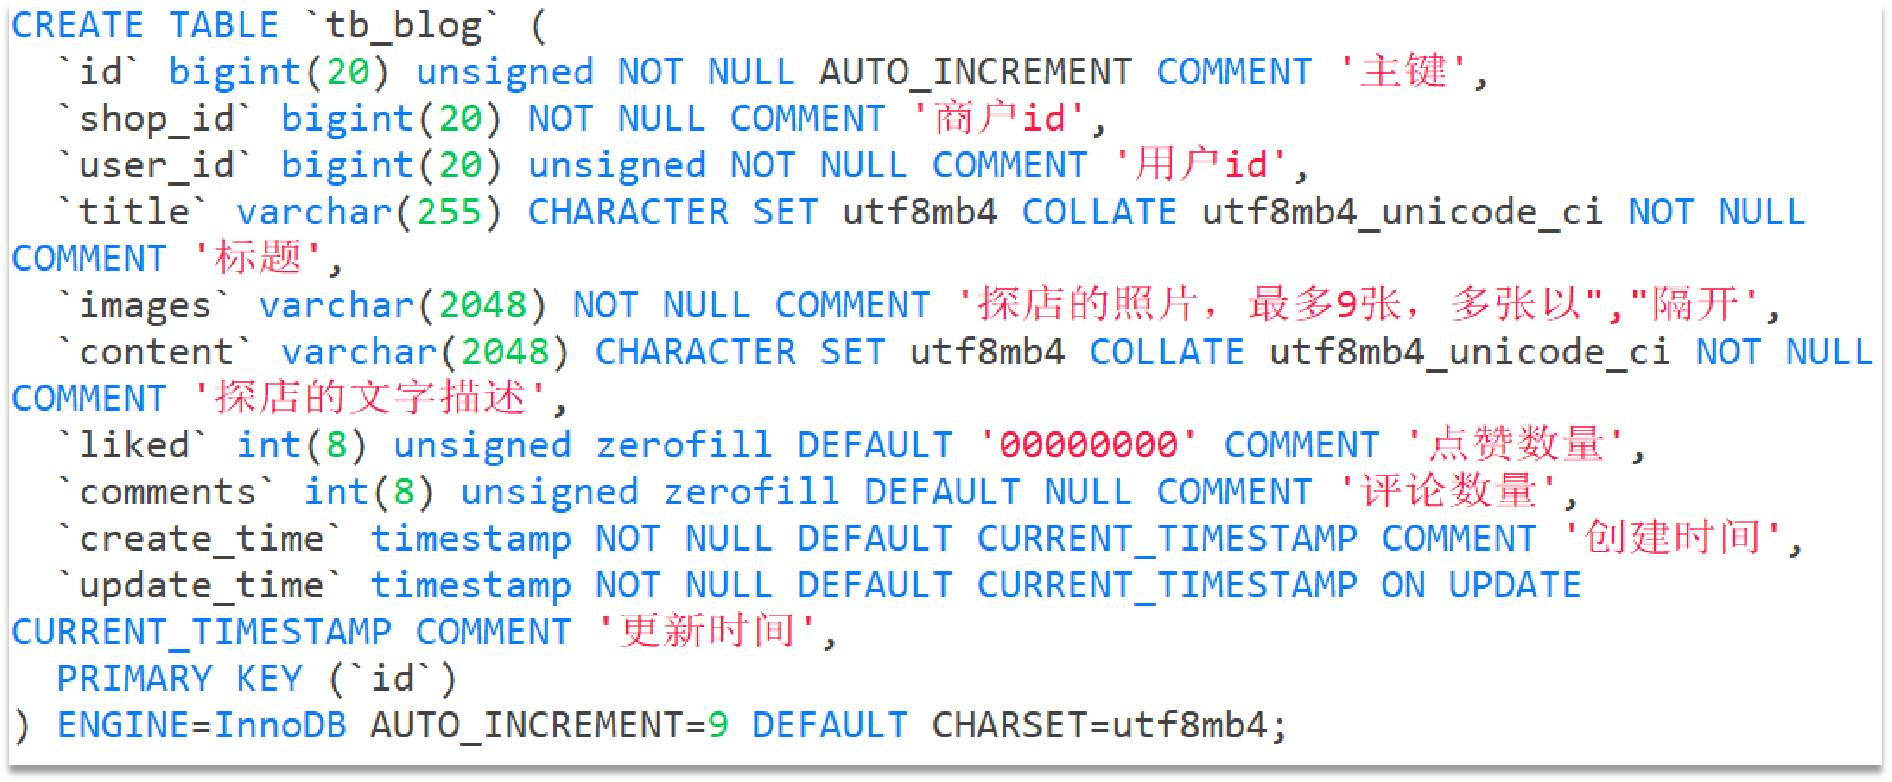
达人探店 发布探店笔记 探店笔记类似点评网站的评价,往往是图文结合。对应的表有两个:
tb_blog:探店笔记表,包含笔记中的标题、文字、图片等。tb_blog_comments:其他用户对探店笔记的评价。
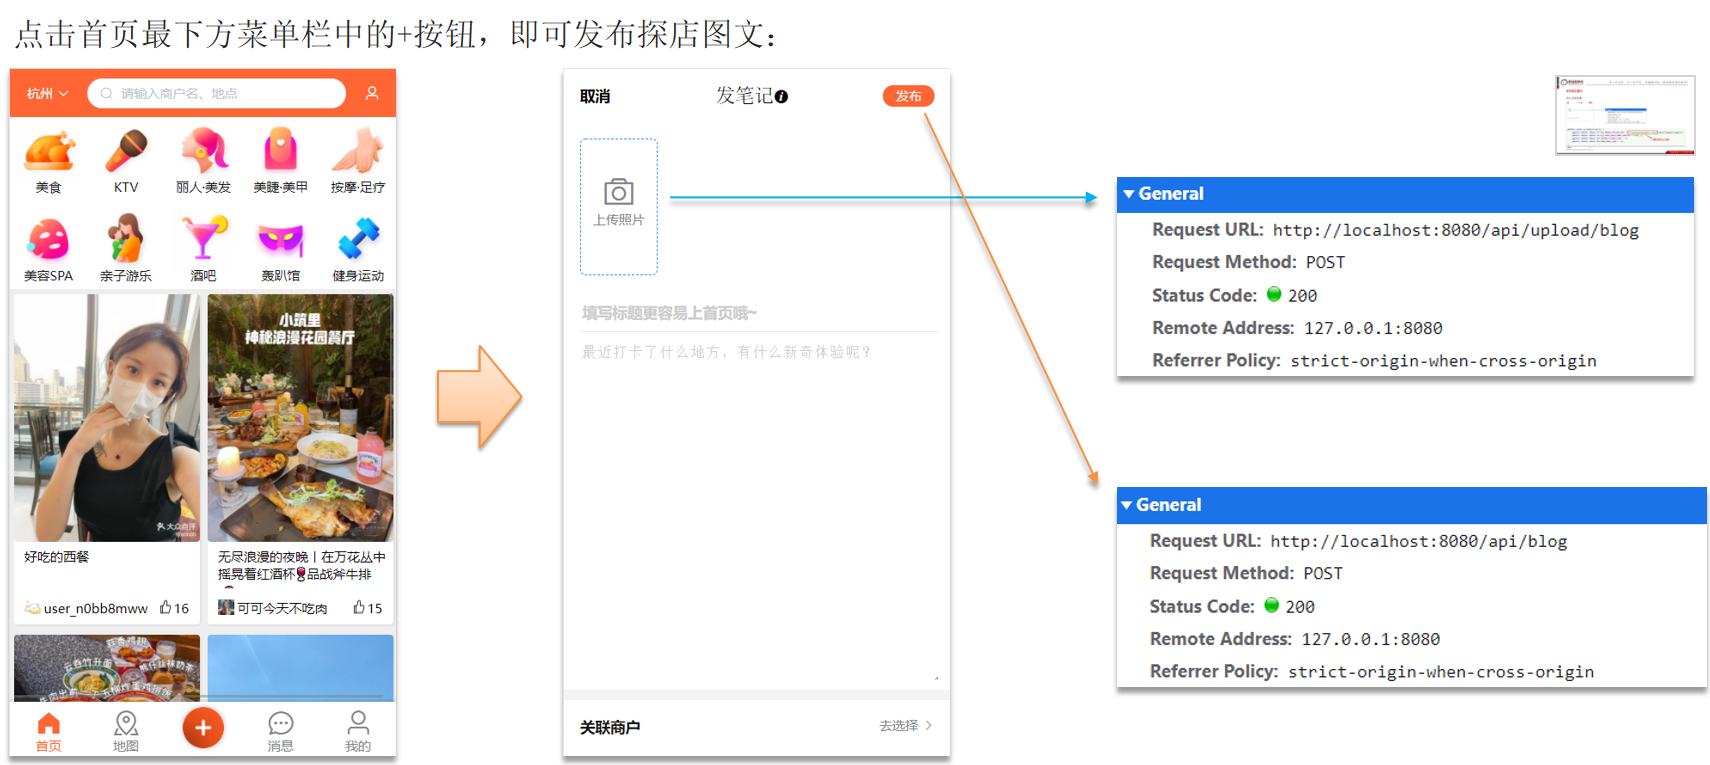
发布探店笔记流程:
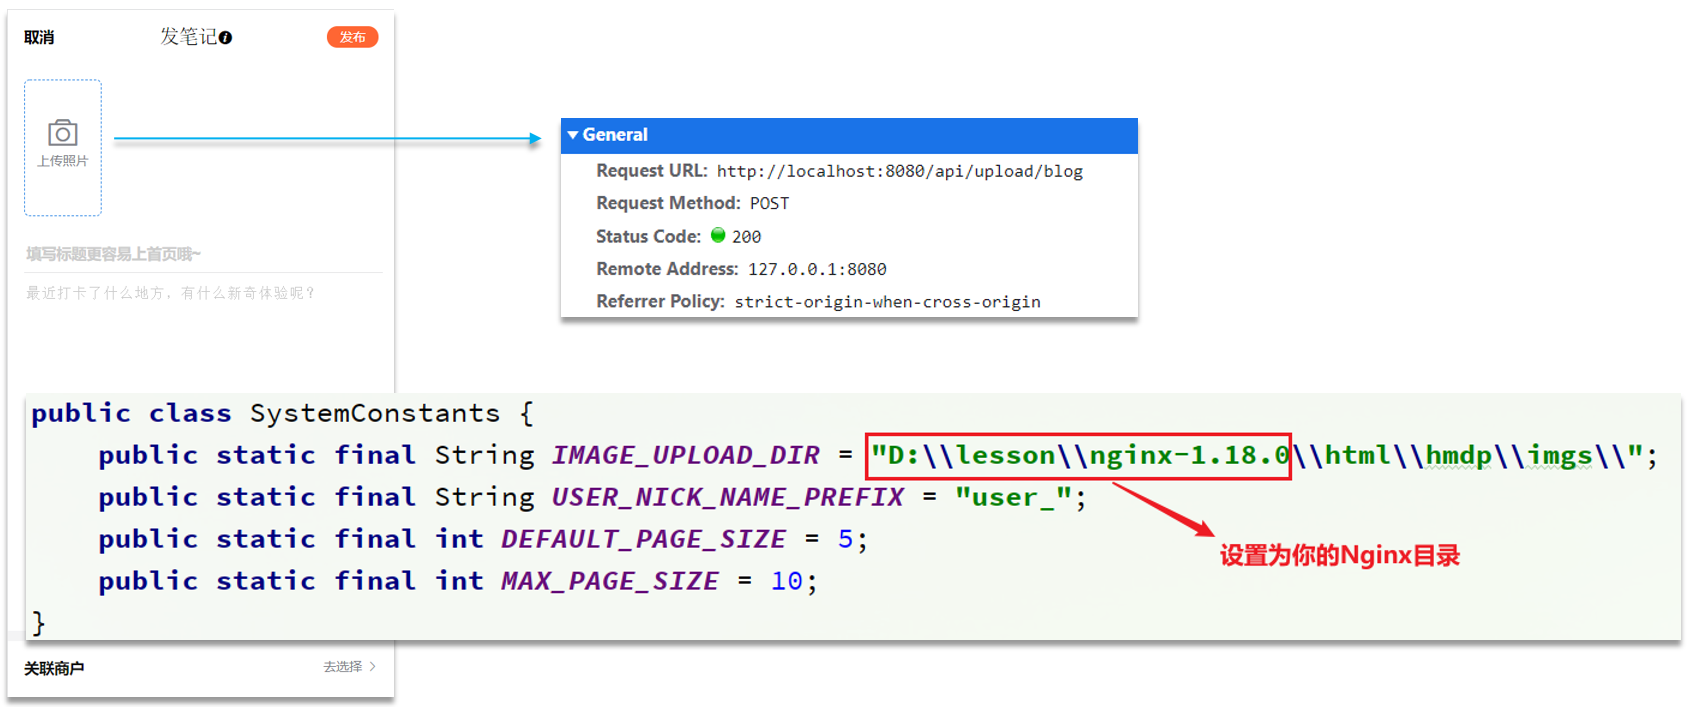
文件上传的设置:
修改SystemConstants下的图片存储目录。
1
2
3
4
5
6
7
8
package com.hmdp.utils;public class SystemConstants {public static final String IMAGE_UPLOAD_DIR = "D:\\software\\nginx-1.18.0-dianping\\html\\hmdp\\imgs\\" ;public static final String USER_NICK_NAME_PREFIX = "user_" ;public static final int DEFAULT_PAGE_SIZE = 5 ;public static final int MAX_PAGE_SIZE = 10 ;
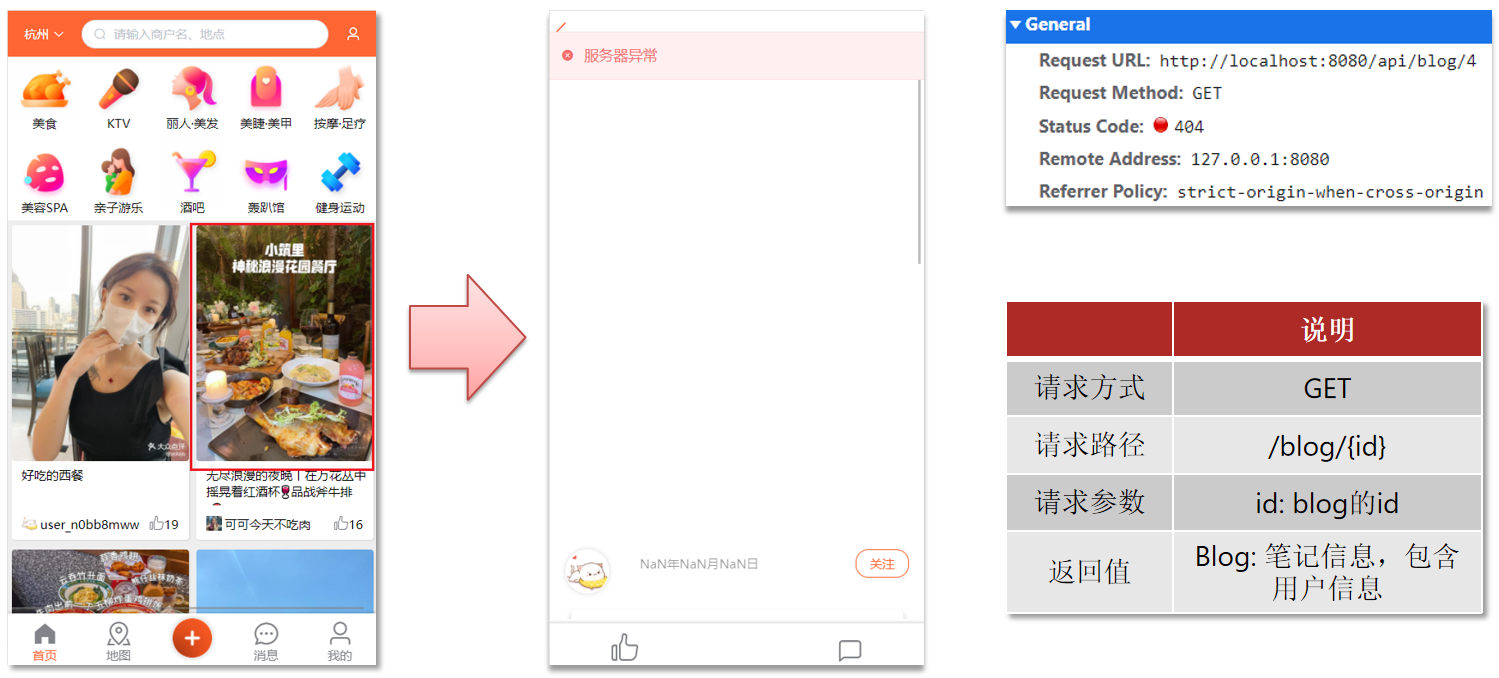
案例:实现查看发布探店笔记的接口 需求:点击首页的探店笔记,会进入详情页面,实现该页面的查询接口:
1.BlogController。
1
2
3
4
5
6
7
8
9
10
11
12
13
14
15
16
17
18
19
package com.hmdp.controller;@RestController @RequestMapping("/blog") public class BlogController {@Resource private IBlogService blogService;@GetMapping("/hot") public Result queryHotBlog (@RequestParam(value = "current", defaultValue = "1") Integer current) {return blogService.queryHotBlog(current);@GetMapping("/{id}") public Result queryBlogById (@PathVariable("id") Long id) {return blogService.queryBlogById(id);
2.IBlogService。
1
2
3
4
5
6
package com.hmdp.service;public interface IBlogService extends IService <Blog> {queryHotBlog (Integer current) ;queryBlogById (Long id) ;
3.BlogServiceImpl。
1
2
3
4
5
6
7
8
9
10
11
12
13
14
15
16
17
18
19
20
21
22
23
24
25
26
27
28
29
30
31
32
33
34
35
36
37
38
39
40
41
42
43
package com.hmdp.service.impl;@Service public class BlogServiceImpl extends ServiceImpl <BlogMapper, Blog> implements IBlogService {@Resource private IUserService userService;@Override public Result queryHotBlog (Integer current) {"liked" )new Page <>(current, SystemConstants.MAX_PAGE_SIZE));this ::queryBlogUser);return Result.ok(records);@Override public Result queryBlogById (Long id) {Blog blog = getById(id);if (blog == null ) {return Result.fail("笔记不存在" );return Result.ok(blog);private void queryBlogUser (Blog blog) {Long userId = blog.getUserId();User user = userService.getById(userId);
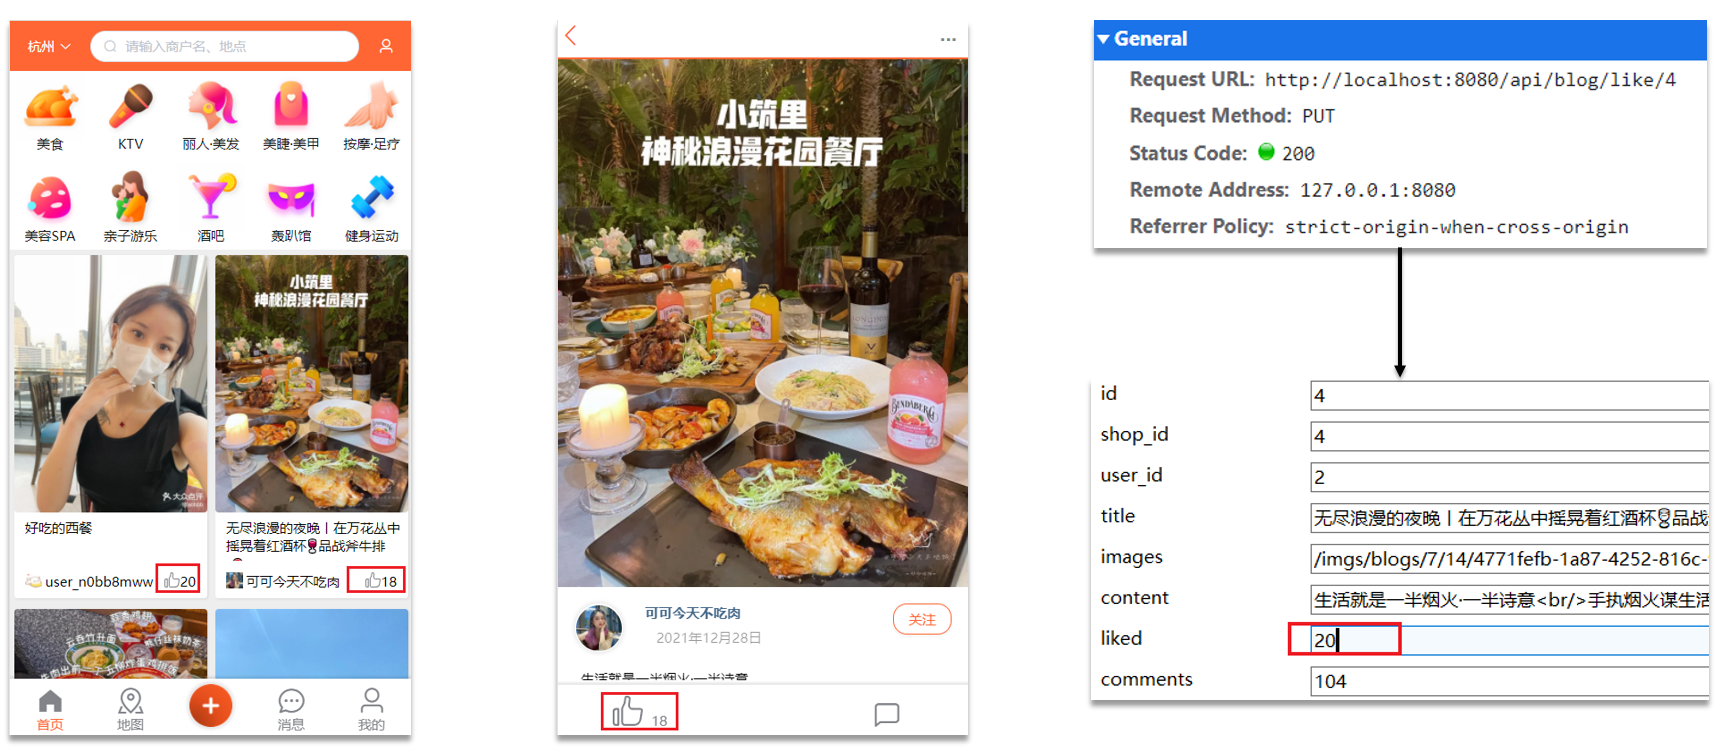
点赞 在首页的探店笔记排行榜和探店图文详情页面都有点赞的功能:
案例:完善点赞功能 需求:
同一个用户只能点赞一次,再次点击则取消点赞。
如果当前用户已经点赞,则点赞按钮高亮显示(前端已实现,判断字段Blog类的isLike属性)。
实现步骤:
给Blog类中添加一个isLike字段,标示是否被当前用户点赞。
修改点赞功能,利用Redis的set集合判断是否点赞过,未点赞过则点赞数+1,已点赞过则点赞数-1。
修改根据id查询Blog的业务,判断当前登录用户是否点赞过,赋值给isLike字段。
修改分页查询Blog业务,判断当前登录用户是否点赞过,赋值给isLike字段。
1.BlogController。
1
2
3
4
5
6
7
8
9
10
11
12
13
package com.hmdp.controller;@RestController @RequestMapping("/blog") public class BlogController {@Resource private IBlogService blogService;@PutMapping("/like/{id}") public Result likeBlog (@PathVariable("id") Long id) {return blogService.likeBlog(id);
2.IBlogService。
1
2
3
4
5
package com.hmdp.service;public interface IBlogService extends IService <Blog> {likeBlog (Long id) ;
3.BlogServiceImpl。
1
2
3
4
5
6
7
8
9
10
11
12
13
14
15
16
17
18
19
20
21
22
23
24
25
26
27
28
29
30
31
32
33
34
35
36
37
38
39
40
41
42
43
44
45
46
47
48
49
50
51
52
53
54
55
56
57
58
59
60
61
62
63
64
65
66
67
68
69
70
71
72
73
74
75
76
77
78
79
80
81
82
83
84
85
package com.hmdp.service.impl;@Service public class BlogServiceImpl extends ServiceImpl <BlogMapper, Blog> implements IBlogService {@Resource private IUserService userService;@Resource private StringRedisTemplate stringRedisTemplate;@Override public Result queryHotBlog (Integer current) {"liked" )new Page <>(current, SystemConstants.MAX_PAGE_SIZE));return Result.ok(records);@Override public Result queryBlogById (Long id) {Blog blog = getById(id);if (blog == null ) {return Result.fail("笔记不存在" );return Result.ok(blog);private void isBlogLiked (Blog blog) {Long userId = UserHolder.getUser().getId();String key = "blog:liked:" + blog.getId();Boolean isMember = stringRedisTemplate.opsForSet().isMember(key, userId.toString());private void queryBlogUser (Blog blog) {Long userId = blog.getUserId();User user = userService.getById(userId);@Override public Result likeBlog (Long id) {Long userId = UserHolder.getUser().getId();String key = "blog:liked:" + id;Boolean isMember = stringRedisTemplate.opsForSet().isMember(key, userId.toString());if (BooleanUtil.isFalse(isMember)){boolean isSuccess = update().setSql("liked = liked + 1" ).eq("id" , id).update();if (isSuccess){else {boolean isSuccess = update().setSql("liked = liked - 1" ).eq("id" , id).update();if (isSuccess){return Result.ok();
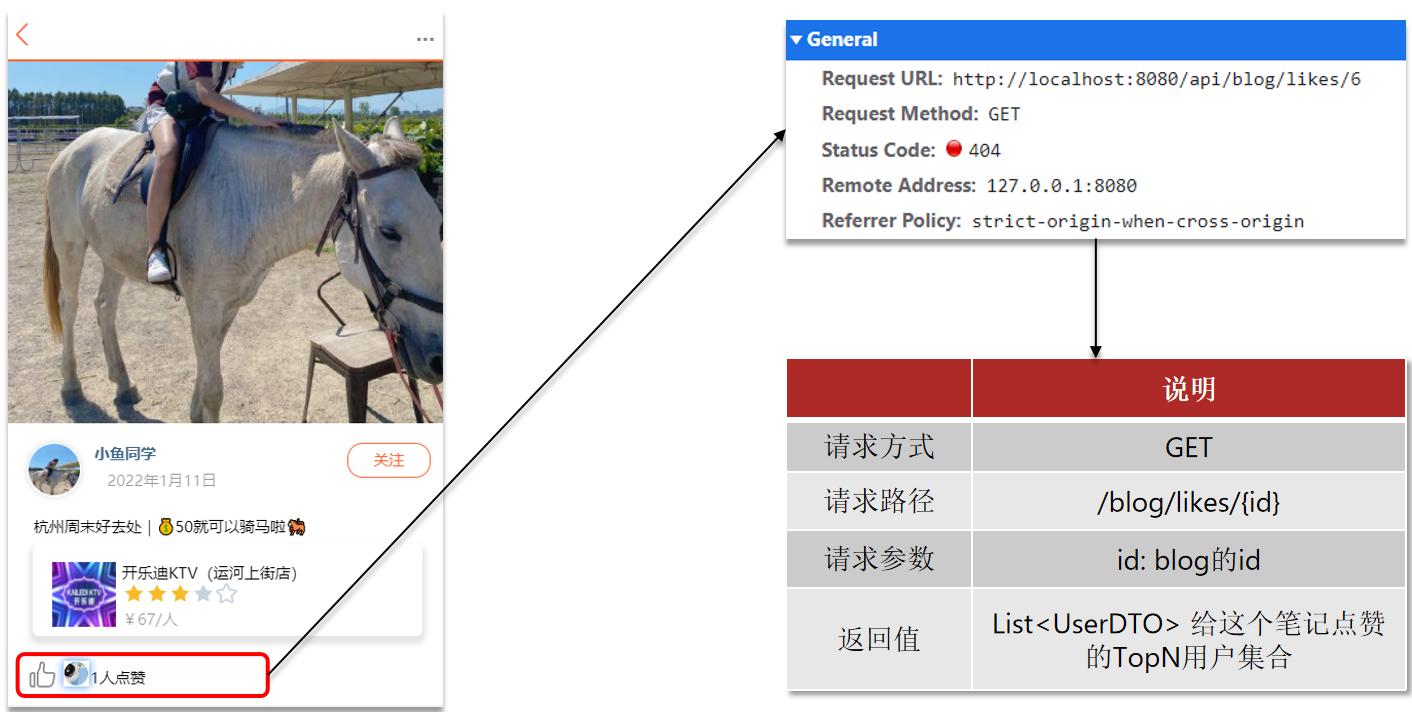
点赞排行榜
案例:实现查询点赞排行榜的接口 需求:按照点赞时间先后排序,返回Top5的用户。
List Set SortedSet
排序方式 按添加顺序排序
无法排序
根据score值排序
唯一性 不唯一
唯一
唯一
查找方式 按索引查找或首尾查找
根据元素查找
根据元素查找
选择SortedSet来存储点赞排行榜。
1.BlogController。
1
2
3
4
5
6
7
8
9
10
11
12
13
package com.hmdp.controller;@RestController @RequestMapping("/blog") public class BlogController {@Resource private IBlogService blogService;@GetMapping("/likes/{id}") public Result queryBlogLikes (@PathVariable("id") Long id) {return blogService.queryBlogLikes(id);
2.IBlogService。
1
2
3
4
5
package com.hmdp.service;public interface IBlogService extends IService <Blog> {queryBlogLikes (Long id) ;
3.BlogServiceImpl。
1
2
3
4
5
6
7
8
9
10
11
12
13
14
15
16
17
18
19
20
21
22
23
24
25
26
27
28
29
30
31
32
33
34
35
36
37
38
39
40
41
42
43
44
45
46
47
48
49
50
51
52
53
54
55
56
57
58
59
60
61
62
63
64
65
66
67
68
69
70
71
72
73
74
75
76
77
78
79
80
81
82
83
84
85
86
87
88
89
90
91
92
93
94
95
96
97
98
99
100
101
102
103
104
105
106
107
108
109
110
111
112
113
114
115
116
117
118
package com.hmdp.service.impl;@Service public class BlogServiceImpl extends ServiceImpl <BlogMapper, Blog> implements IBlogService {@Resource private IUserService userService;@Resource private StringRedisTemplate stringRedisTemplate;@Override public Result queryHotBlog (Integer current) {"liked" )new Page <>(current, SystemConstants.MAX_PAGE_SIZE));return Result.ok(records);@Override public Result queryBlogById (Long id) {Blog blog = getById(id);if (blog == null ) {return Result.fail("笔记不存在" );return Result.ok(blog);private void isBlogLiked (Blog blog) {UserDTO user = UserHolder.getUser();if (user == null ){return ;Long userId = user.getId();String key = BLOG_LIKED_KEY + blog.getId();Double score = stringRedisTemplate.opsForZSet().score(key, userId.toString());null );private void queryBlogUser (Blog blog) {Long userId = blog.getUserId();User user = userService.getById(userId);@Override public Result likeBlog (Long id) {Long userId = UserHolder.getUser().getId();String key = BLOG_LIKED_KEY + id;Double score = stringRedisTemplate.opsForZSet().score(key, userId.toString());if (score == null ){boolean isSuccess = update().setSql("liked = liked + 1" ).eq("id" , id).update();if (isSuccess){else {boolean isSuccess = update().setSql("liked = liked - 1" ).eq("id" , id).update();if (isSuccess){return Result.ok();@Override public Result queryBlogLikes (Long id) {String key = BLOG_LIKED_KEY + id;0 , 4 );if (top5 == null || top5.isEmpty()){return Result.ok(Collections.emptyList());String idStr = StrUtil.join("," , ids);"id" , ids)"ORDER BY FIELD(id," + idStr + ")" ).list()return Result.ok(userDTOS);
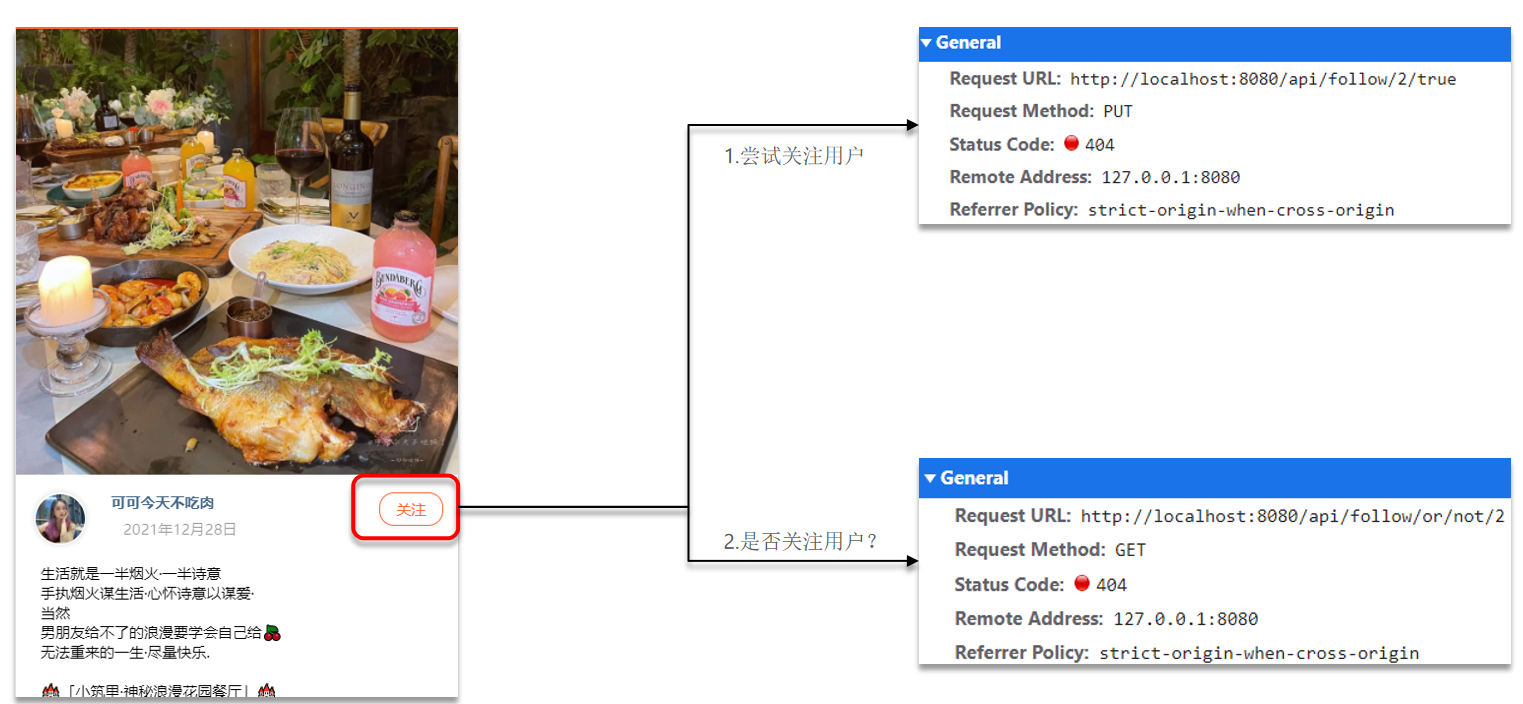
好友关注 关注和取关 在探店图文的详情页面中,可以关注发布笔记的作者:
案例:实现关注和取关功能 需求:基于该表数据结构,实现两个接口:
关注和取关接口
判断是否关注的接口
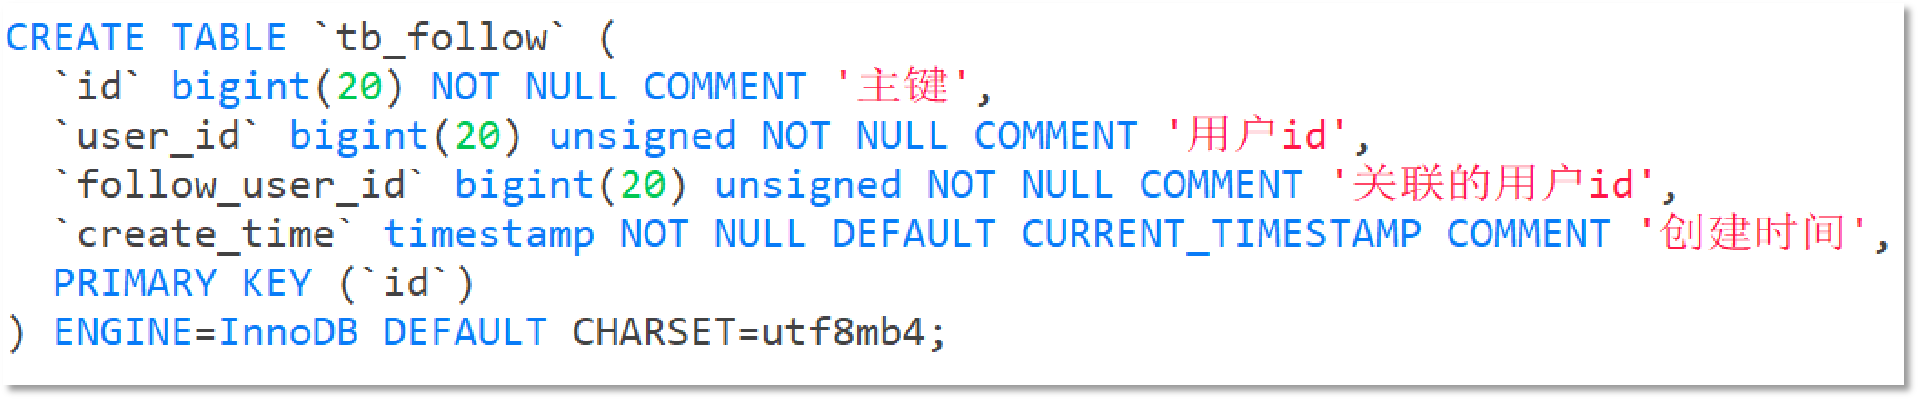
关注是User之间的关系,是博主与粉丝的关系,数据库中有一张tb_follow表来标示:
注意:这里需要把主键修改为自增长,简化开发。
1.FollowController。
1
2
3
4
5
6
7
8
9
10
11
12
13
14
15
16
17
18
package com.hmdp.controller;@RestController @RequestMapping("/follow") public class FollowController {@Resource private IFollowService followService;@PutMapping("/{id}/{isFollow}") public Result follow (@PathVariable("id") Long followUserId, @PathVariable("isFollow") Boolean isFollow) {return followService.follow(followUserId, isFollow);@GetMapping("/or/not/{id}") public Result follow (@PathVariable("id") Long followUserId) {return followService.isFollow(followUserId);
2.IFollowService。
1
2
3
4
5
6
package com.hmdp.service;public interface IFollowService extends IService <Follow> {follow (Long followUserId, Boolean isFollow) ;isFollow (Long followUserId) ;
3.FollowServiceImpl。
1
2
3
4
5
6
7
8
9
10
11
12
13
14
15
16
17
18
19
20
21
22
23
24
25
26
27
28
29
30
31
32
33
34
package com.hmdp.service.impl;@Service public class FollowServiceImpl extends ServiceImpl <FollowMapper, Follow> implements IFollowService {@Override public Result follow (Long followUserId, Boolean isFollow) {Long userId = UserHolder.getUser().getId();if (isFollow){Follow follow = new Follow ();else {new QueryWrapper <Follow>()"user_id" , userId).eq("follow_user_id" , followUserId));return Result.ok();@Override public Result isFollow (Long followUserId) {Long userId = UserHolder.getUser().getId();Integer count = query().eq("user_id" , userId).eq("follow_user_id" , followUserId).count();return Result.ok(count > 0 );
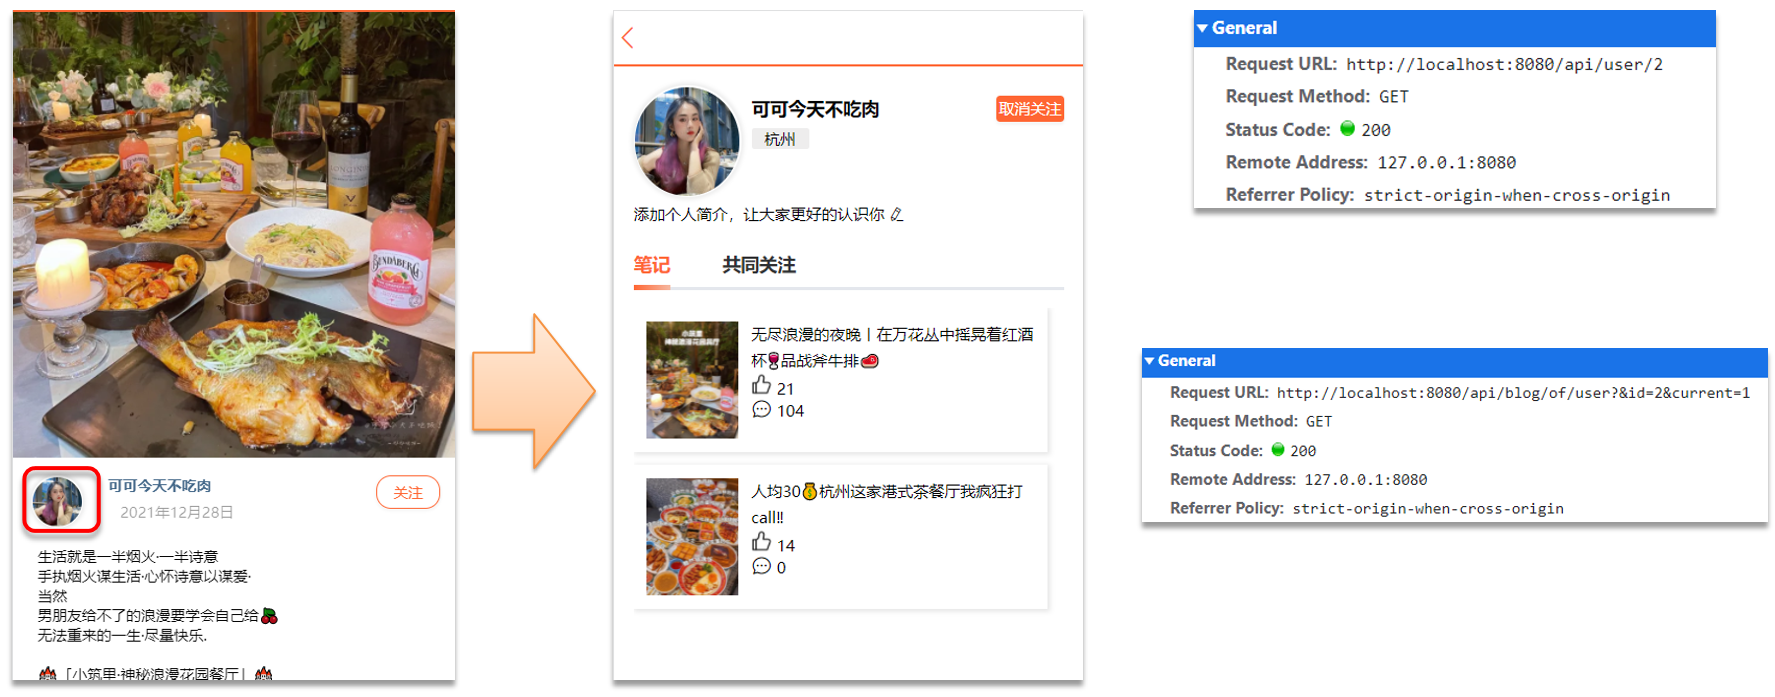
共同关注 点击博主头像,可以进入博主首页:
博主个人首页依赖两个接口:
根据id查询user信息:
1 2 3 4 5 6 7 8 9 10 11 12 13 @GetMapping("/{id}") public Result queryUserById (@PathVariable("id") Long userId) {User user = userService.getById(userId);if (user == null ) {return Result.ok();UserDTO userDTO = BeanUtil.copyProperties(user, UserDTO.class);return Result.ok(userDTO);
根据id查询博主的探店笔记:
1 2 3 4 5 6 7 8 9 10 11 12 13 @GetMapping("/of/user") public Result queryBlogByUserId ( @RequestParam(value = "current", defaultValue = "1") Integer current, @RequestParam("id") Long id) {"user_id" , id).page(new Page <>(current, SystemConstants.MAX_PAGE_SIZE));return Result.ok(records);
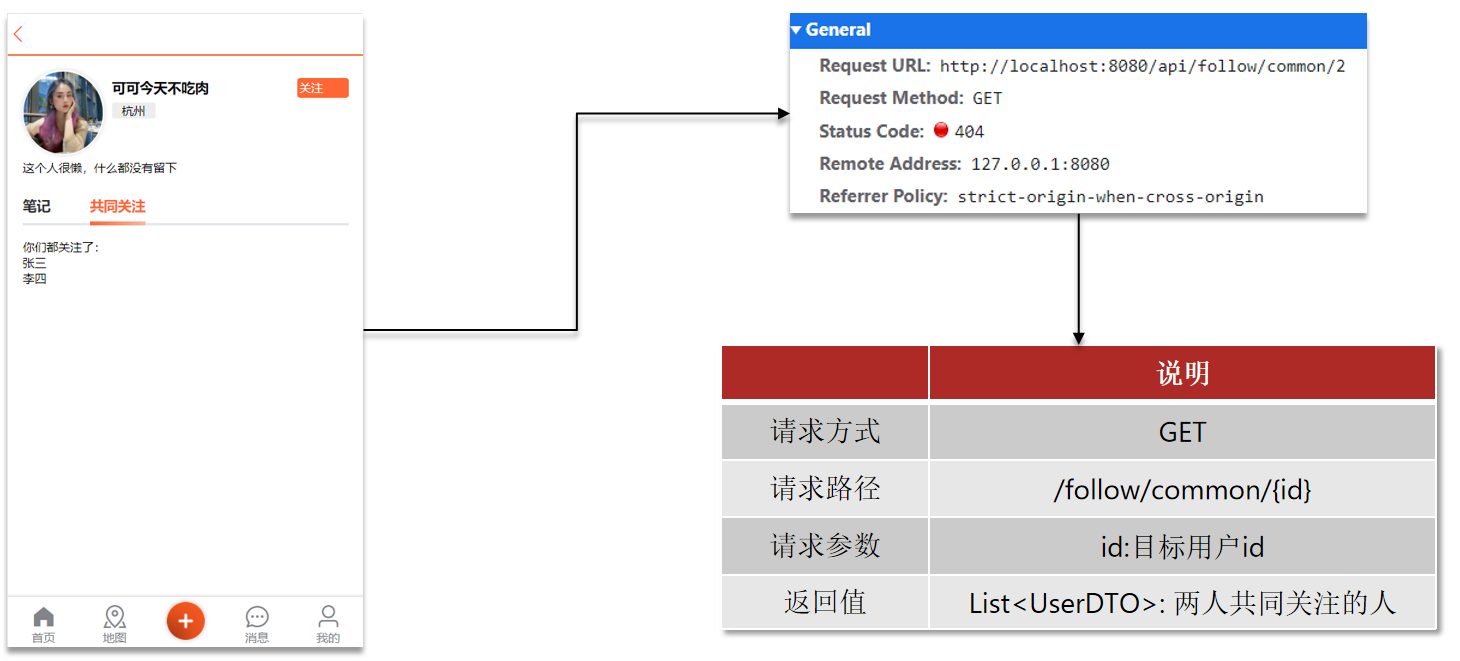
案例:实现共同关注功能 需求:利用Redis中恰当的数据结构,实现共同关注功能。在博主个人页面展示出当前用户与博主的共同好友。
1.FollowController。
1
2
3
4
5
6
7
8
9
10
11
12
13
package com.hmdp.controller;@RestController @RequestMapping("/follow") public class FollowController {@Resource private IFollowService followService;@GetMapping("/common/{id}") public Result followCommons (@PathVariable("id") Long id) {return followService.followCommons(id);
1
2
3
4
5
package com.hmdp.service;public interface IFollowService extends IService <Follow> {followCommons (Long id) ;
3.FollowServiceImpl。
1
2
3
4
5
6
7
8
9
10
11
12
13
14
15
16
17
18
19
20
21
22
23
24
25
26
27
28
29
30
31
32
33
34
35
36
37
38
39
40
41
42
43
44
45
46
47
48
49
50
51
52
53
54
55
56
57
58
59
60
61
62
63
64
65
66
67
68
69
70
package com.hmdp.service.impl;@Service public class FollowServiceImpl extends ServiceImpl <FollowMapper, Follow> implements IFollowService {@Resource private StringRedisTemplate stringRedisTemplate;@Resource private IUserService userService;@Override public Result follow (Long followUserId, Boolean isFollow) {Long userId = UserHolder.getUser().getId();String key = "follows:" + userId;if (isFollow){Follow follow = new Follow ();boolean isSuccess = save(follow);if (isSuccess){else {boolean isSuccess = remove(new QueryWrapper <Follow>()"user_id" , userId).eq("follow_user_id" , followUserId));if (isSuccess){return Result.ok();@Override public Result isFollow (Long followUserId) {Long userId = UserHolder.getUser().getId();Integer count = query().eq("user_id" , userId).eq("follow_user_id" , followUserId).count();return Result.ok(count > 0 );@Override public Result followCommons (Long id) {Long userId = UserHolder.getUser().getId();String key = "follows:" + userId;String key2 = "follows:" + id;if (intersect == null || intersect.isEmpty()){return Result.ok(Collections.emptyList());return Result.ok(users);
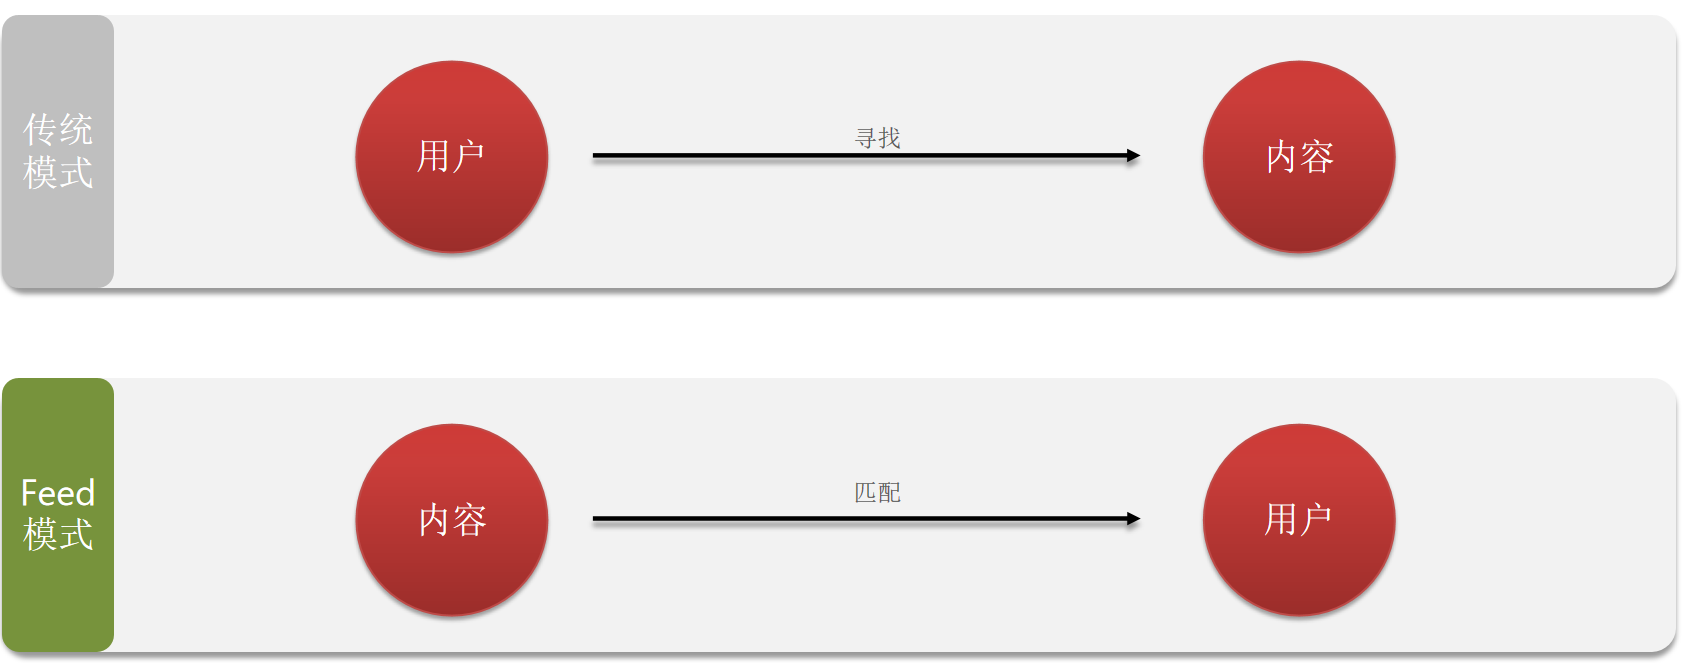
关注推送 关注推送也叫做Feed流,直译为投喂。为用户持续的提供“沉浸式”的体验,通过无限下拉刷新获取新的信息。
Feed流产品有两种常见模式:
Timeline:不做内容筛选,简单的按照内容发布时间排序,常用于好友或关注。例如朋友圈。
优点:信息全面,不会有缺失。并且实现也相对简单
缺点:信息噪音较多,用户不一定感兴趣,内容获取效率低
智能排序:利用智能算法屏蔽掉违规的、用户不感兴趣的内容。推送用户感兴趣信息来吸引用户。
优点:投喂用户感兴趣信息,用户粘度很高,容易沉迷
缺点:如果算法不精准,可能起到反作用
本例中的个人页面,是基于关注的好友来做Feed流,因此采用Timeline的模式。该模式的实现方案有三种:
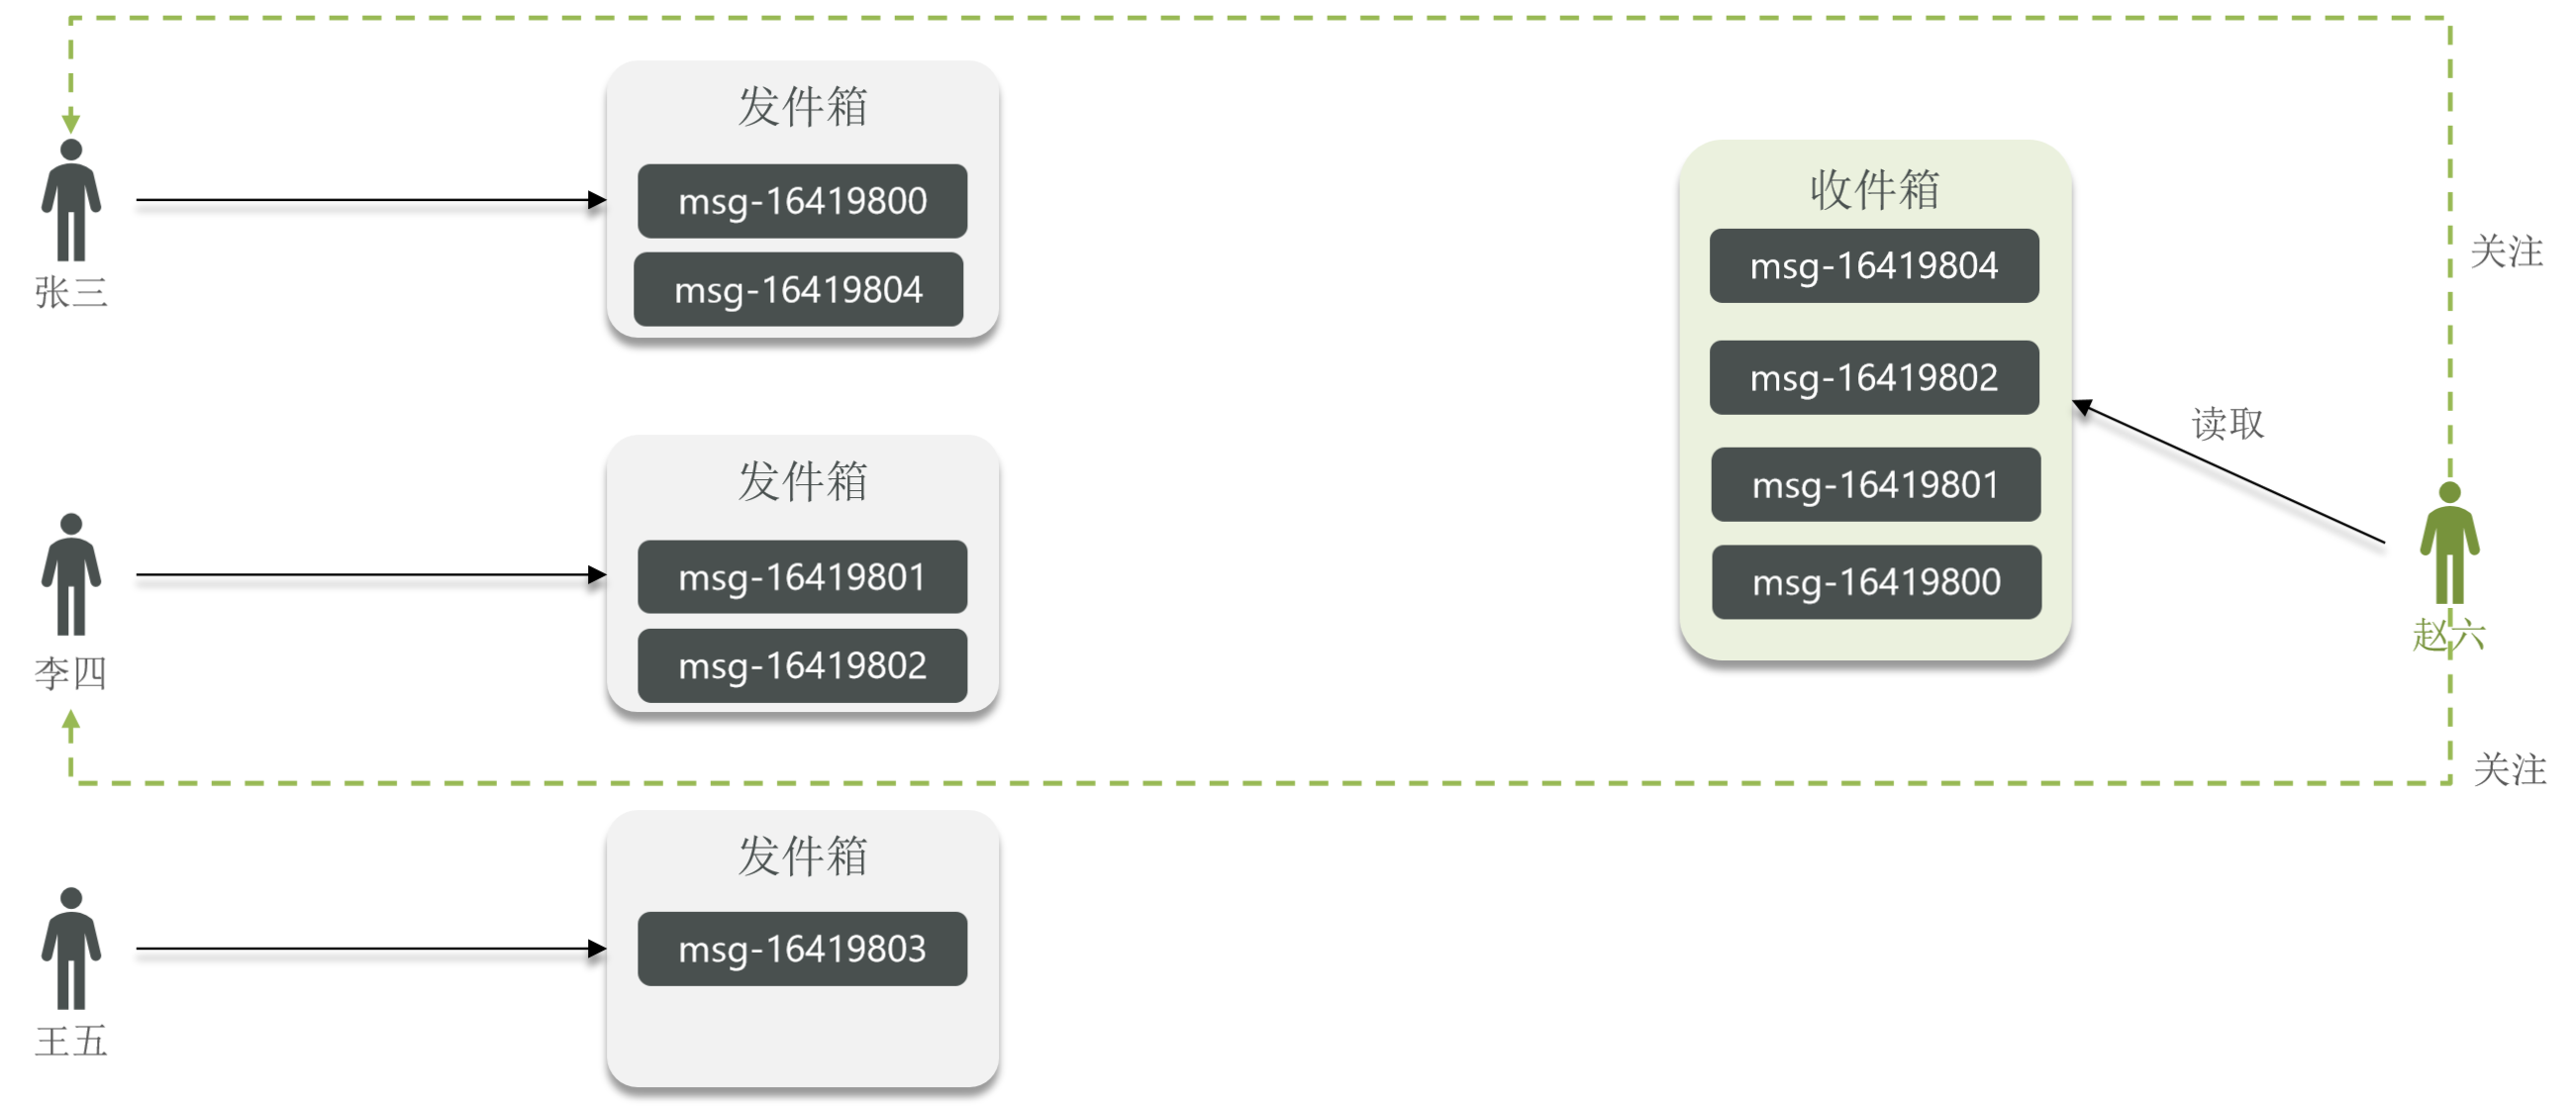
Feed流的实现方案 拉模式 拉模式:也叫做读扩散。
发件人都会把消息发到发件箱。只有用户在读取的时候,才会把关注的人的发件箱里的所有消息拉取到收件箱。
优点:节省内存空间(收件箱读完之后就清空了)、消息只保存一份(消息保存至发件人的发件箱)。
缺点:每次读消息的时候都需要重新拉取发件人的发件箱的消息,然后进行排序。读取延迟久,耗时高。
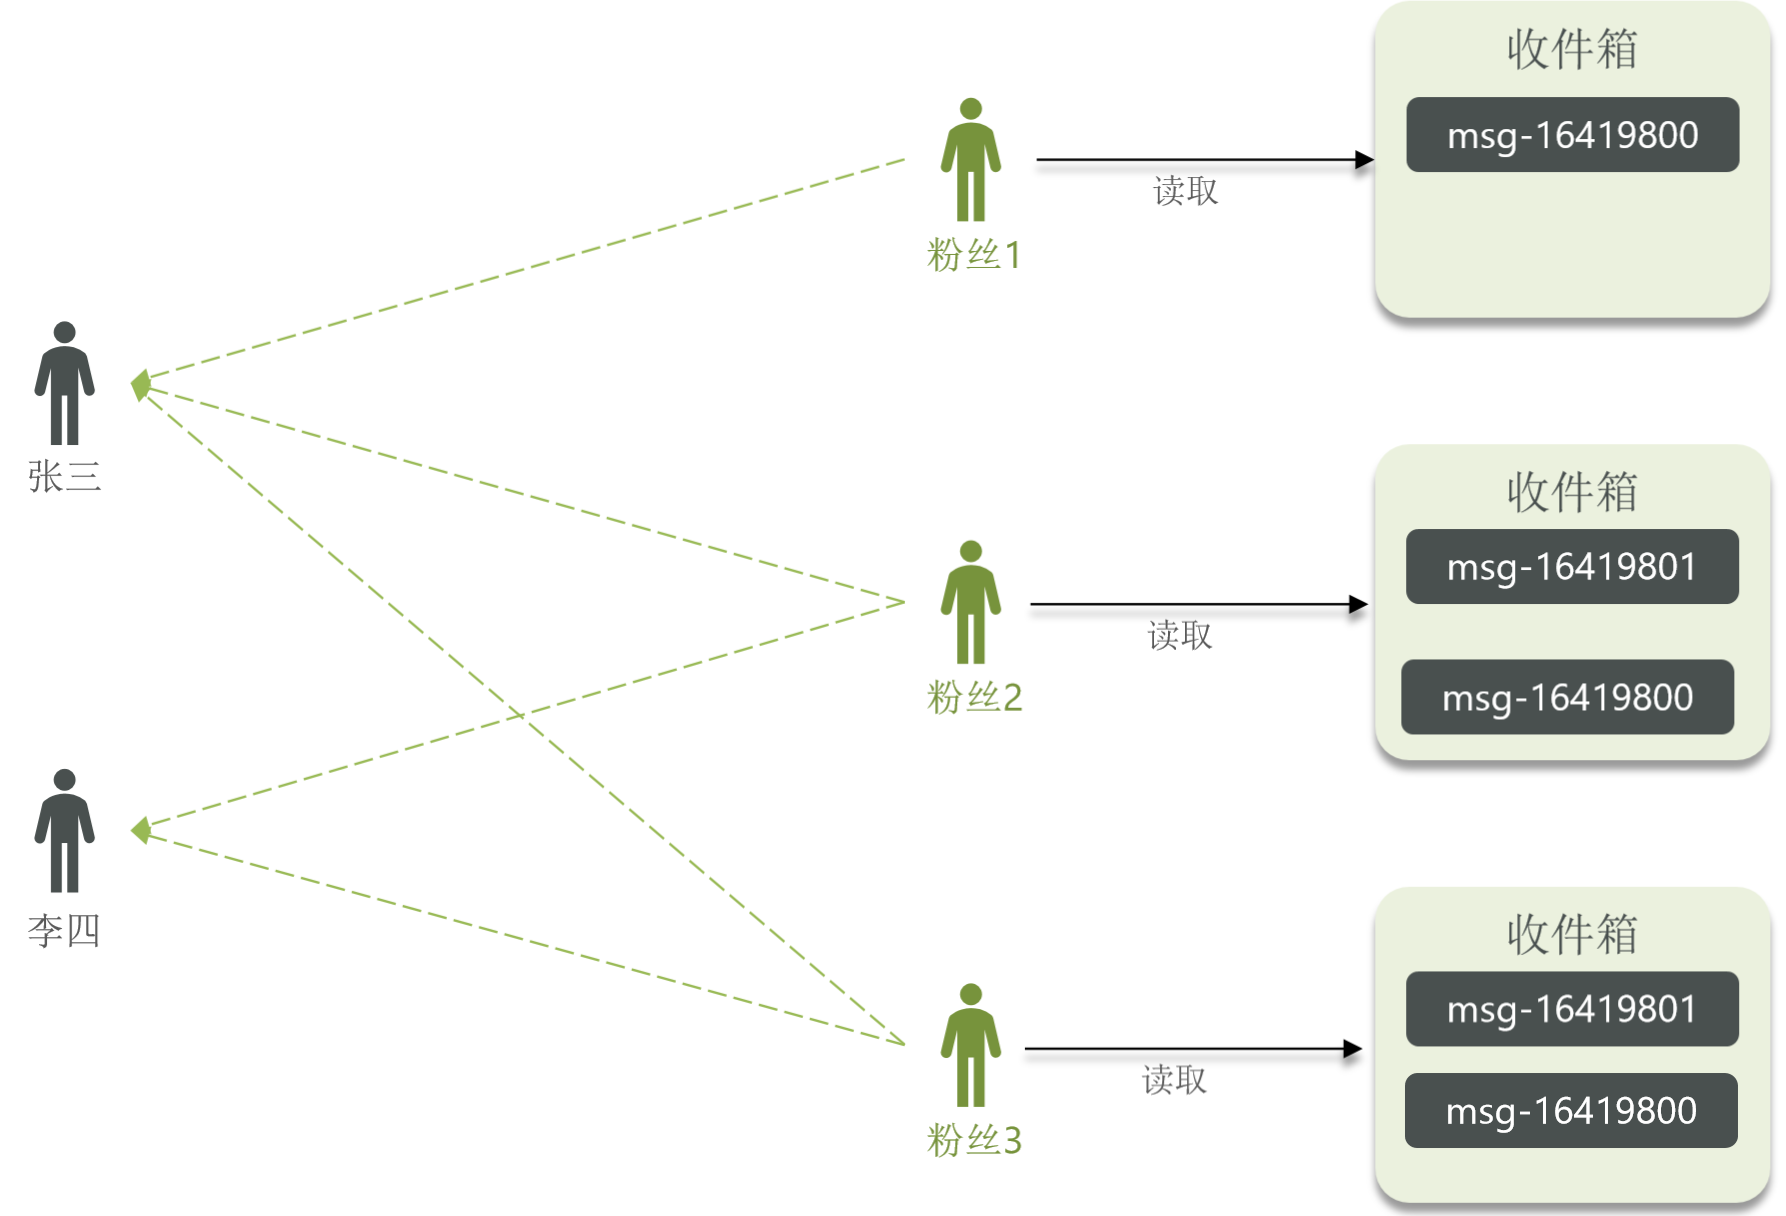
推模式 推模式:也叫做写扩散。
发件人没有发件箱,当发件人发送消息时,会推送到所有粉丝的收件箱。有几个粉丝就有几份消息。
优点:延时低。
缺点:内存占用率高。
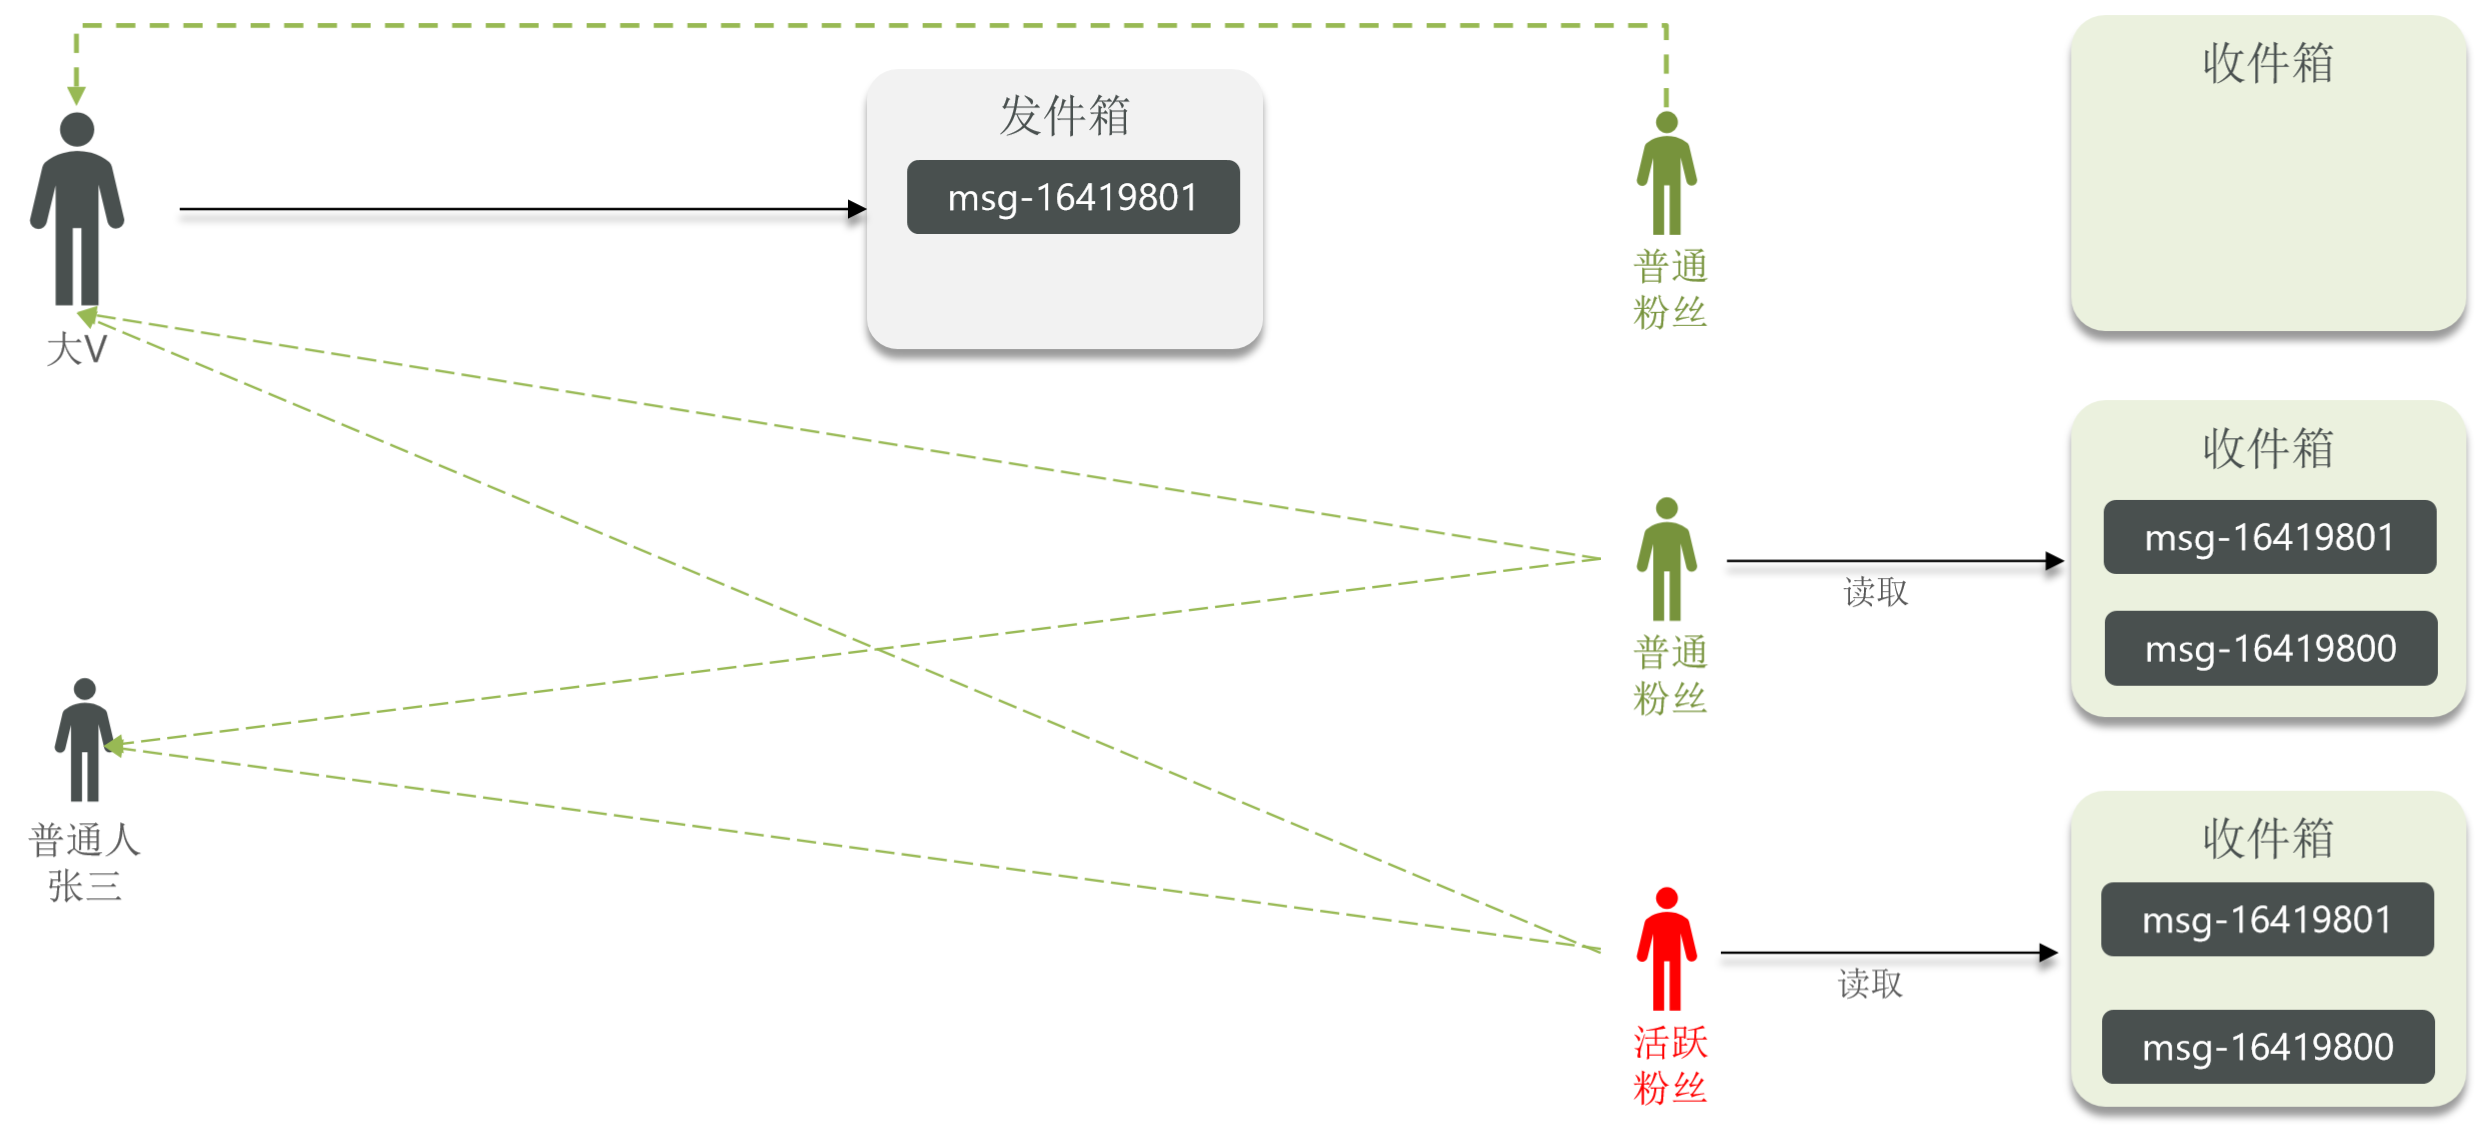
推拉结合模式 推拉结合模式:也叫做读写混合,兼具推和拉两种模式的优点。
普通发件人使用推模式,把消息推送给每一个粉丝。
大V有发件箱,使用推模式把消息发送给活跃粉丝,普通粉丝使用拉模式。
Feed流的实现方案对比
拉模式 推模式 推拉结合
写比例 低
高
中
读比例 高
低
中
用户读取延迟 高
低
低
实现难度 复杂
简单
很复杂
使用场景 很少使用
用户量少、没有大V
过千万的用户量,有大V
案例:基于推模式实现关注推送功能 需求:
修改新增探店笔记的业务,在保存blog到数据库的同时,推送到粉丝的收件箱。
收件箱满足可以根据时间戳排序,必须用Redis的数据结构实现。(使用SortedSet)
查询收件箱数据时,可以实现分页查询。
1.BlogController。
1
2
3
4
5
6
7
8
9
10
11
12
13
14
package com.hmdp.controller;@RestController @RequestMapping("/blog") public class BlogController {@Resource private IBlogService blogService;@PostMapping public Result saveBlog (@RequestBody Blog blog) {return blogService.saveBlog(blog);
2.IBlogService。
1
2
3
4
5
package com.hmdp.service;public interface IBlogService extends IService <Blog> {saveBlog (Blog blog) ;
3.BlogServiceImpl。
1
2
3
4
5
6
7
8
9
10
11
12
13
14
15
16
17
18
19
20
21
22
23
24
25
26
27
28
29
30
31
32
33
34
35
36
package com.hmdp.service.impl;@Service public class BlogServiceImpl extends ServiceImpl <BlogMapper, Blog> implements IBlogService {@Resource private IUserService userService;@Resource private StringRedisTemplate stringRedisTemplate;@Resource private IFollowService followService;@Override public Result saveBlog (Blog blog) {UserDTO user = UserHolder.getUser();boolean isSuccess = save(blog);if (!isSuccess){return Result.fail("新增笔记失败!" );"follow_user_id" , user.getId()).list();for (Follow follow : follows){Long userId = follow.getUserId();String key = "feed:" + userId;return Result.ok(blog.getId());
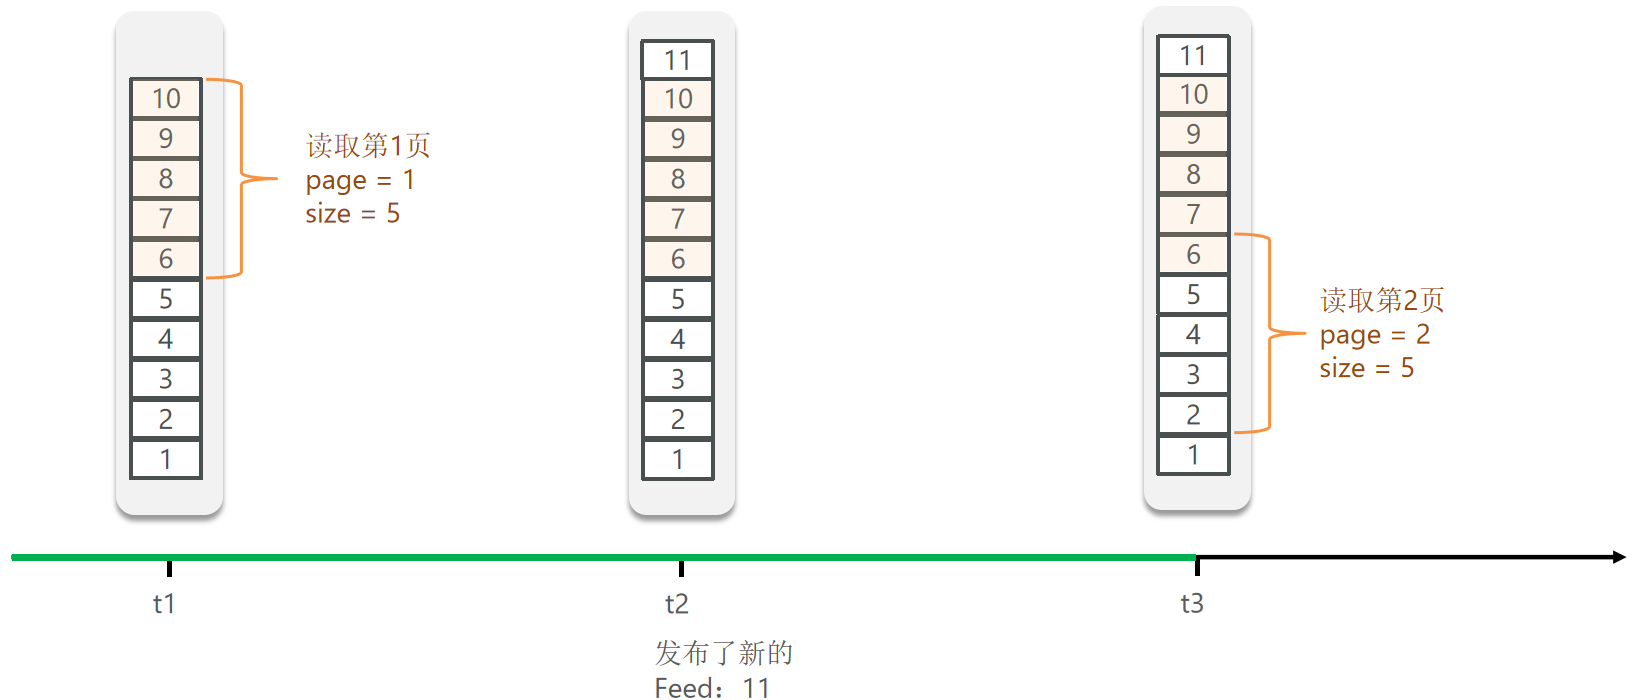
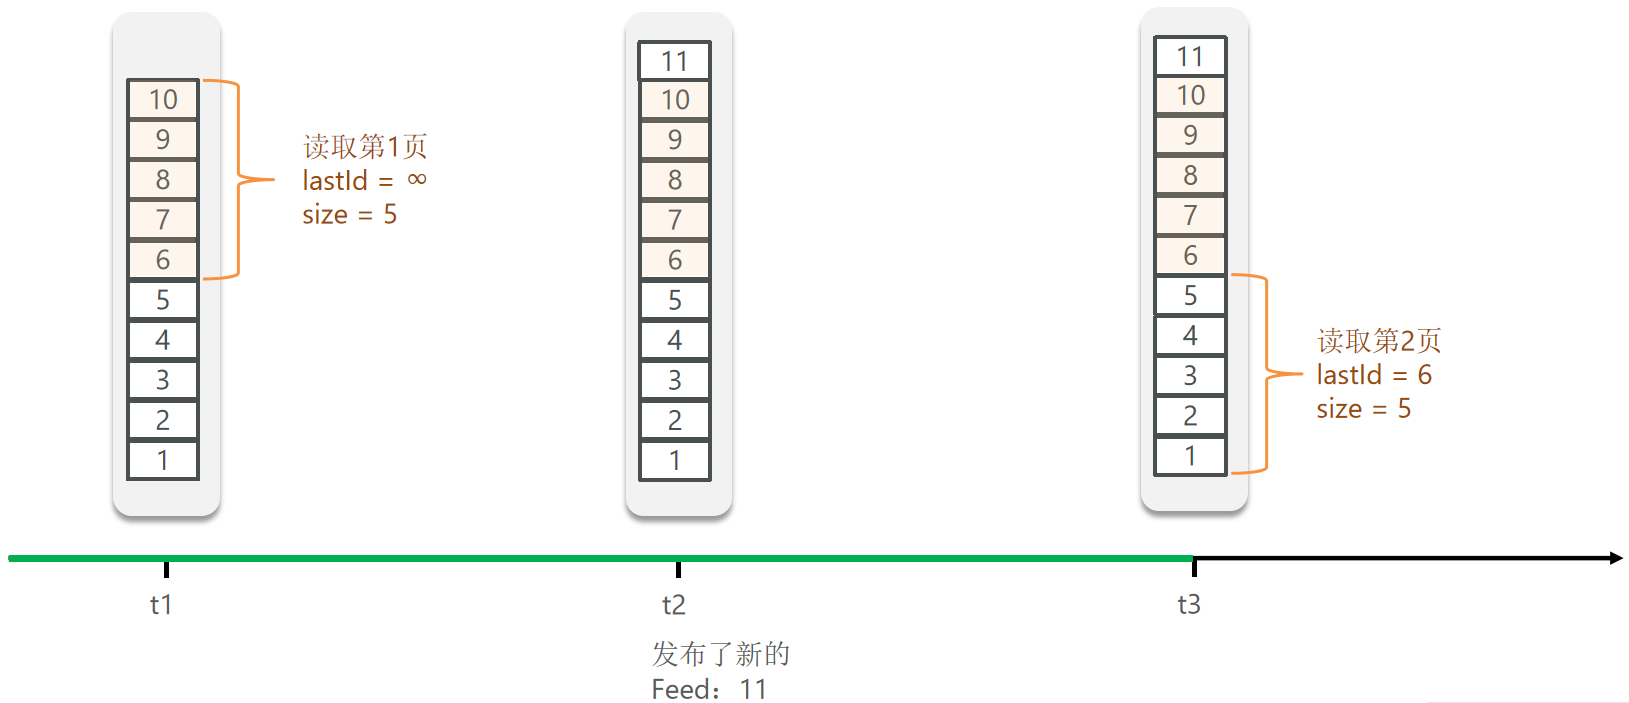
Feed流的分页问题 传统分页:
滚动分页:
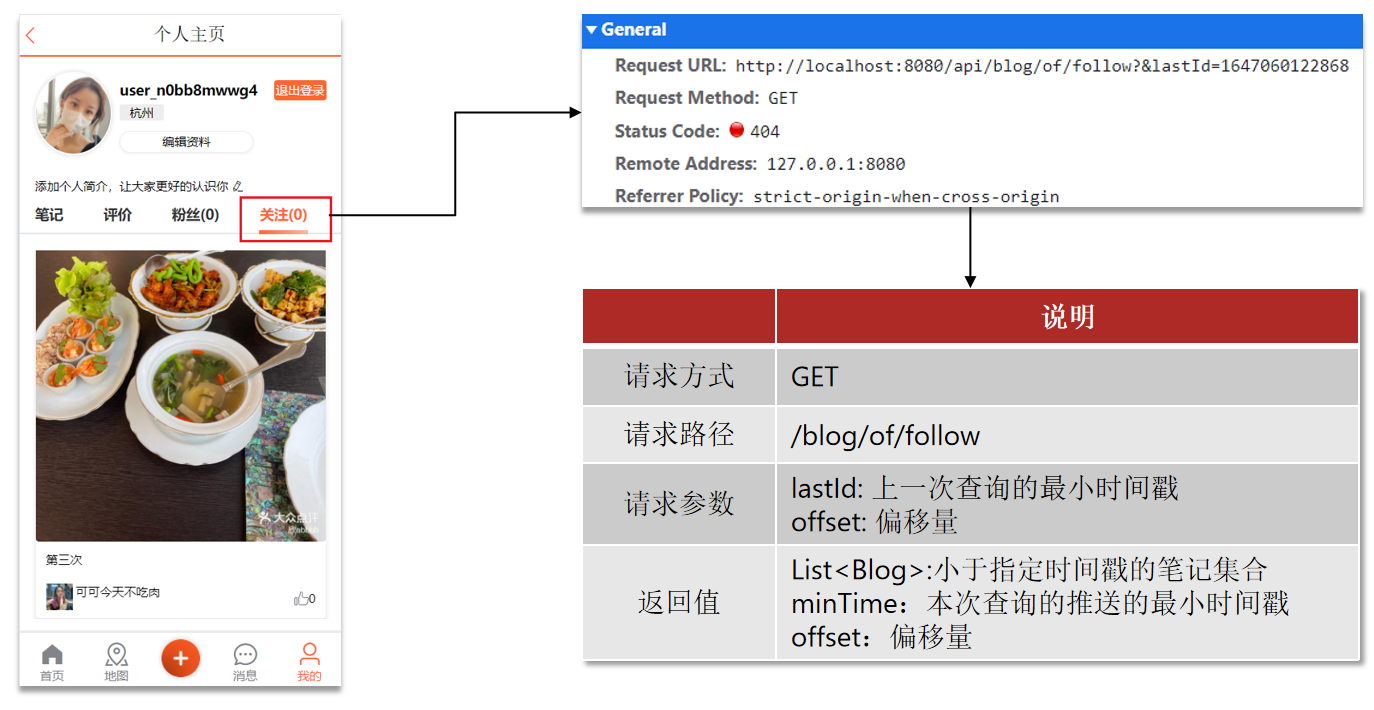
案例:实现关注推送页面的分页查询 需求:在个人主页的“关注”卡片中,查询并展示推送的Blog信息:
滚动分页查询参数:
1
2
3
4
max :当前时间戳 | 上一次查询的最小时间戳min :0 offset :0 | 在上一次的结果中,与最小值一样的元素的个数count :3 (每次显示多少个)
1.BlogController。
1
2
3
4
5
6
7
8
9
10
11
12
13
14
package com.hmdp.controller;@RestController @RequestMapping("/blog") public class BlogController {@Resource private IBlogService blogService;@GetMapping("/of/follow") public Result queryBlogOfFollow ( @RequestParam("lastId") long max, @RequestParam(value = "offset", defaultValue = "0") Integer offset) {return blogService.queryBlogOfFollow(max, offset);
2.IBlogService。
1
2
3
4
5
package com.hmdp.service;public interface IBlogService extends IService <Blog> {queryBlogOfFollow (long max, Integer offset) ;
3.BlogServiceImpl。
1
2
3
4
5
6
7
8
9
10
11
12
13
14
15
16
17
18
19
20
21
22
23
24
25
26
27
28
29
30
31
32
33
34
35
36
37
38
39
40
41
42
43
44
45
46
47
48
49
50
51
52
53
54
55
56
57
58
59
package com.hmdp.service.impl;@Service public class BlogServiceImpl extends ServiceImpl <BlogMapper, Blog> implements IBlogService {@Resource private IUserService userService;@Resource private StringRedisTemplate stringRedisTemplate;@Resource private IFollowService followService;@Override public Result queryBlogOfFollow (long max, Integer offset) {Long userId = UserHolder.getUser().getId();String key = FEED_KEY + userId;0 , max, offset, 2 );if (typedTuples == null || typedTuples.isEmpty()){return Result.ok();new ArrayList <>(typedTuples.size());long minTime = 0 ;int os = 1 ;for (ZSetOperations.TypedTuple<String> tuple : typedTuples){long time = tuple.getScore().longValue();if (time == minTime) {else {1 ;String idStr = StrUtil.join("," , ids);"id" , ids).last("ORDER BY FIELD(id," + idStr + ")" ).list();for (Blog blog : blogs){ScrollResult r = new ScrollResult ();return Result.ok(r);
附近商户 GEO数据结构 GEO就是Geolocation的简写形式,代表地理坐标。Redis在3.2版本中加入了对GEO的支持,允许存储地理坐标信息,帮助我们根据经纬度来检索数据。常见的命令有:
GEOADD:添加一个地理空间信息,包含:经度(longitude)、纬度(latitude)、值(member)。GEODIST:计算指定的两个点之间的距离并返回。GEOHASH:将指定member的坐标转为hash字符串形式并返回。GEOPOS:返回指定member的坐标。GEORADIUS:指定圆心、半径,找到该圆内包含的所有member,并按照与圆心之间的距离排序后返回。6.2以后已废弃。GEOSEARCH:在指定范围内搜索member,并按照与指定点之间的距离排序后返回。范围可以是圆形或矩形。6.2.新功能。GEOSEARCHSTORE:与GEOSEARCH功能一致,不过可以把结果存储到一个指定的key。 6.2.新功能。
案例:练习Redis的GEO功能 需求:
添加下面几条数据:
北京南站( 116.378248 39.865275 )
北京站( 116.42803 39.903738 )
北京西站( 116.322287 39.893729 )
计算北京西站到北京站的距离。
搜索天安门( 116.397904 39.909005 )附近10km内的所有火车站,并按照距离升序排序。
1
2
3
4
5
6
7
8
9
10
11
12
13
14
15
16
17
18
19
20
21
127.0.0.1:6379[1]> GEOADD g1 116.378248 39.865275 bjn 116.42803 39.903738 bjz 116.322287 39.893729 bjx
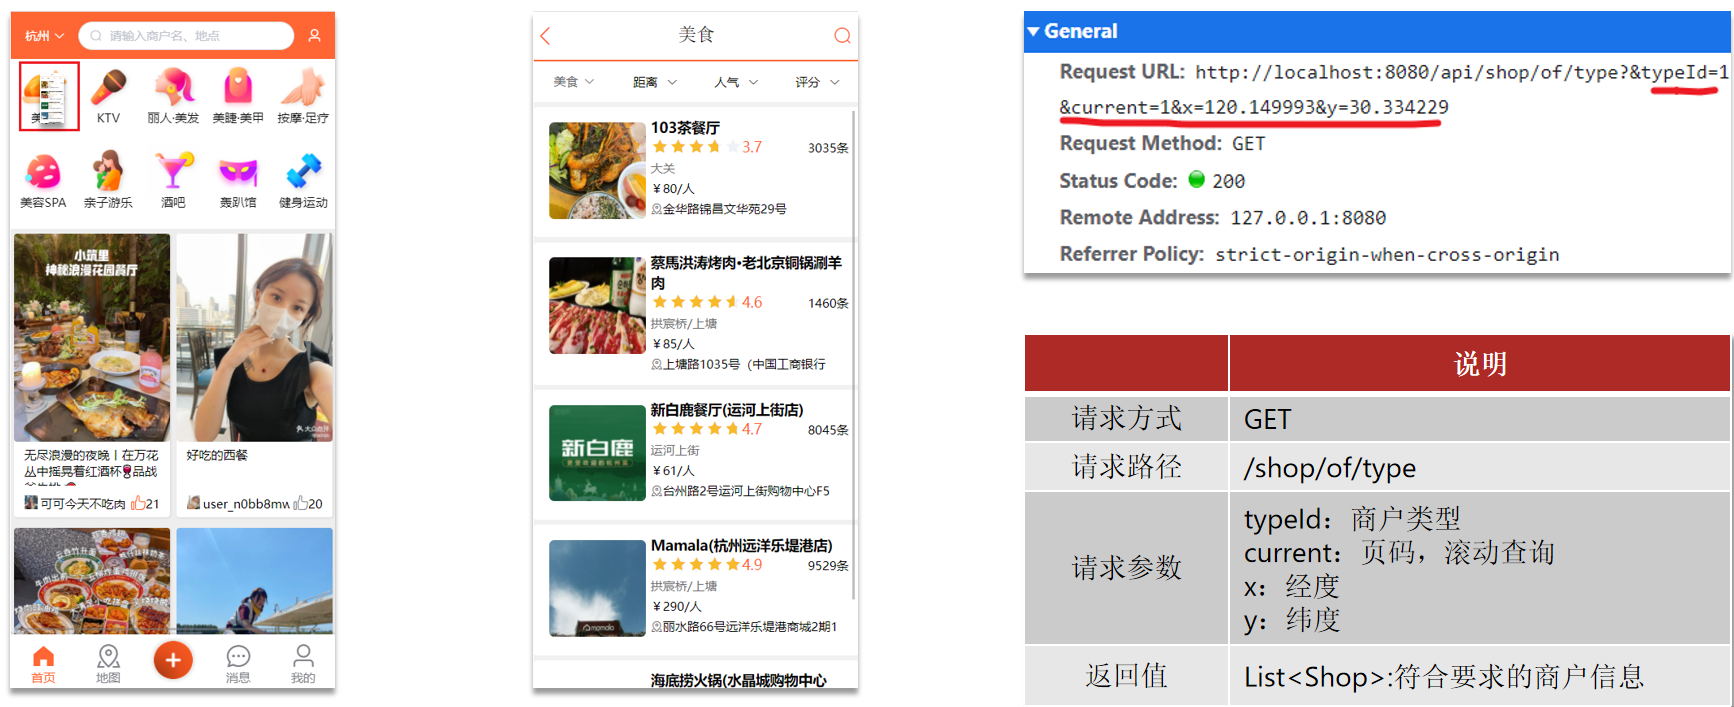
附近商户搜索 1.在首页中点击某个频道,即可看到频道下的商户:
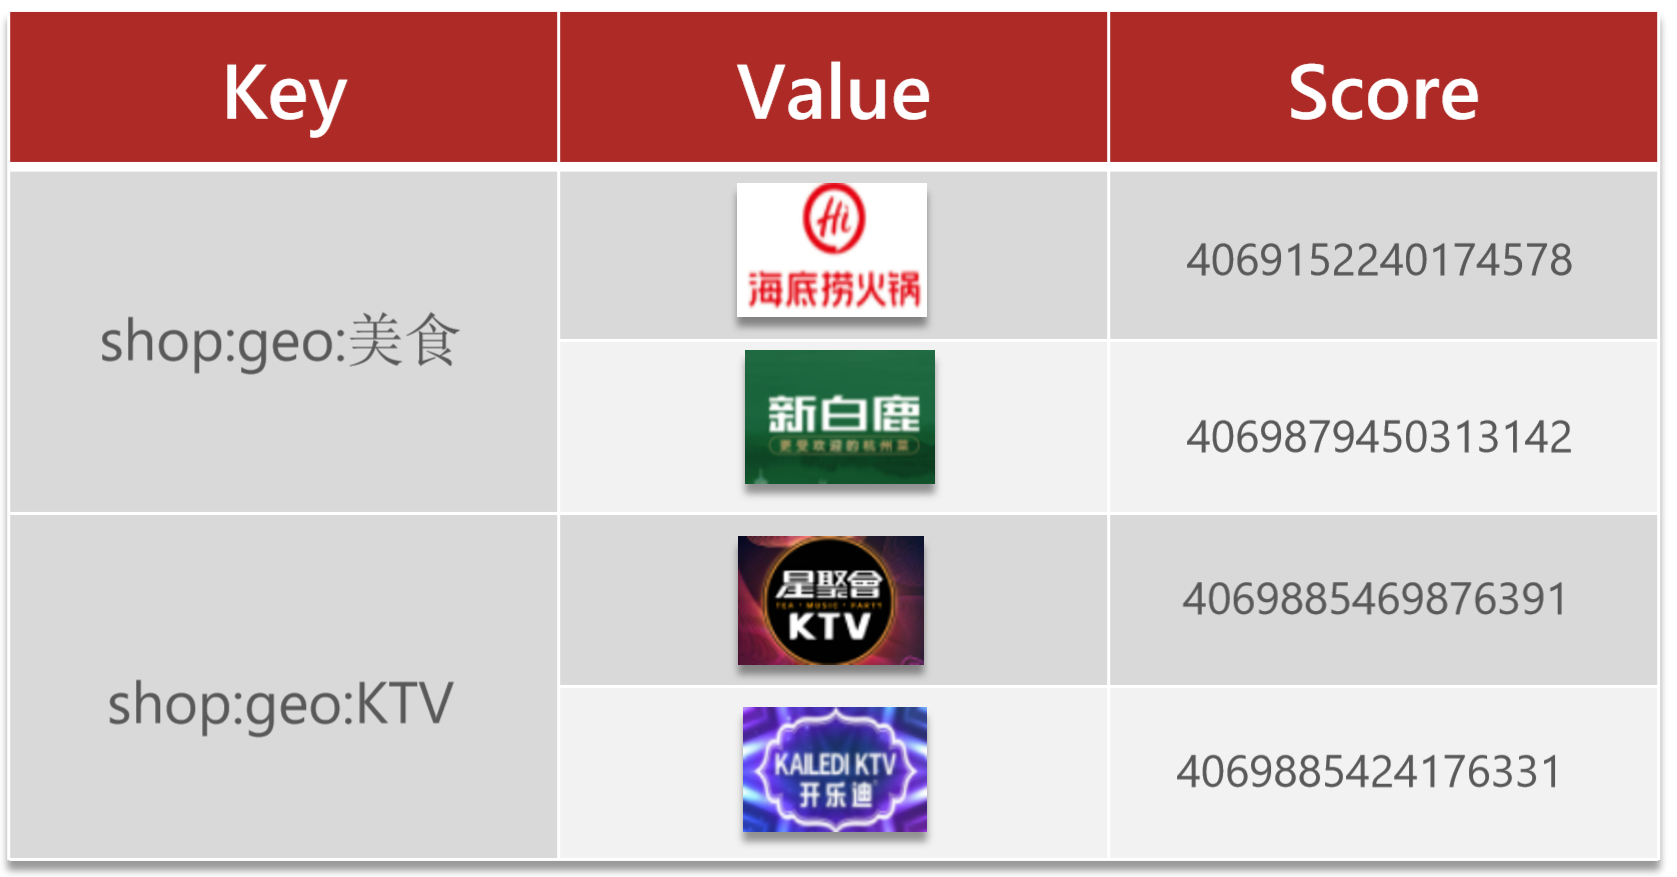
2.按照商户类型做分组,类型相同的商户作为同一组,以typeId为key存入同一个GEO集合中即可。
在测试类中导入数据:
1
2
3
4
5
6
7
8
9
10
11
12
13
14
15
16
17
18
19
20
21
22
23
24
25
26
27
28
29
30
31
32
33
34
35
36
37
package com.hmdp;@SpringBootTest class HmDianPingApplicationTests {@Resource private ShopServiceImpl shopService;@Resource private StringRedisTemplate stringRedisTemplate;@Test void loadShopData () {for (Map.Entry<Long, List<Shop>> entry : map.entrySet()){Long typeId = entry.getKey();String key = "shop:geo:" + typeId;new ArrayList <>(value.size());for (Shop shop : value){new RedisGeoCommands .GeoLocation<>(new Point (shop.getX(), shop.getY())
3.SpringDataRedis的2.3.9版本并不支持Redis 6.2提供的GEOSEARCH命令,因此我们需要提示其版本,修改自己的POM文件,内容如下:
1 2 3 4 5 6 7 8 9 10 11 12 13 14 15 16 17 18 19 20 21 22 23 24 <dependency > <groupId > org.springframework.boot</groupId > <artifactId > spring-boot-starter-data-redis</artifactId > <exclusions > <exclusion > <groupId > org.springframework.data</groupId > <artifactId > spring-data-redis</artifactId > </exclusion > <exclusion > <artifactId > lettuce-core</artifactId > <groupId > io.lettuce</groupId > </exclusion > </exclusions > </dependency > <dependency > <groupId > org.springframework.data</groupId > <artifactId > spring-data-redis</artifactId > <version > 2.7.2</version > </dependency > <dependency > <artifactId > lettuce-core</artifactId > <groupId > io.lettuce</groupId > <version > 6.1.9.RELEASE</version > </dependency >
4.ShopController。
1
2
3
4
5
6
7
8
9
10
11
12
13
14
15
16
17
18
19
20
21
22
23
24
package com.hmdp.controller;@RestController @RequestMapping("/shop") public class ShopController {@Resource public IShopService shopService;@GetMapping("/of/type") public Result queryShopByType ( @RequestParam("typeId") Integer typeId, @RequestParam(value = "current", defaultValue = "1") Integer current, @RequestParam(value = "x", required = false) Double x, @RequestParam(value = "y", required = false) Double y ) {return shopService.queryShopByType(typeId, current, x, y);
5.IShopService。
1
2
3
4
5
package com.hmdp.service;public interface IShopService extends IService <Shop> {queryShopByType (Integer typeId, Integer current, Double x, Double y) ;
6.ShopServiceImpl。
1
2
3
4
5
6
7
8
9
10
11
12
13
14
15
16
17
18
19
20
21
22
23
24
25
26
27
28
29
30
31
32
33
34
35
36
37
38
39
40
41
42
43
44
45
46
47
48
49
50
51
52
53
54
55
56
57
58
59
60
61
62
package com.hmdp.service.impl;@Service public class ShopServiceImpl extends ServiceImpl <ShopMapper, Shop> implements IShopService {@Resource private StringRedisTemplate stringRedisTemplate;@Override public Result queryShopByType (Integer typeId, Integer current, Double x, Double y) {if (x == null || y == null ){"type_id" , typeId)new Page <>(current, SystemConstants.DEFAULT_PAGE_SIZE));return Result.ok(page.getRecords());int from = (current - 1 ) * SystemConstants.DEFAULT_PAGE_SIZE;int end = current * SystemConstants.DEFAULT_PAGE_SIZE;String key = SHOP_GEO_KEY + typeId;new Distance (5000 ),if (results == null ){return Result.ok(Collections.emptyList());if (list.size() <= from){return Result.ok(Collections.emptyList());new ArrayList <>(list.size());new HashMap <>(list.size());String shopIdStr = result.getContent().getName();Distance distance = result.getDistance();String idStr = StrUtil.join("," , ids);"id" , ids).last("ORDER BY FIELD(id," + idStr + ")" ).list();for (Shop shop : shops){return Result.ok(shops);
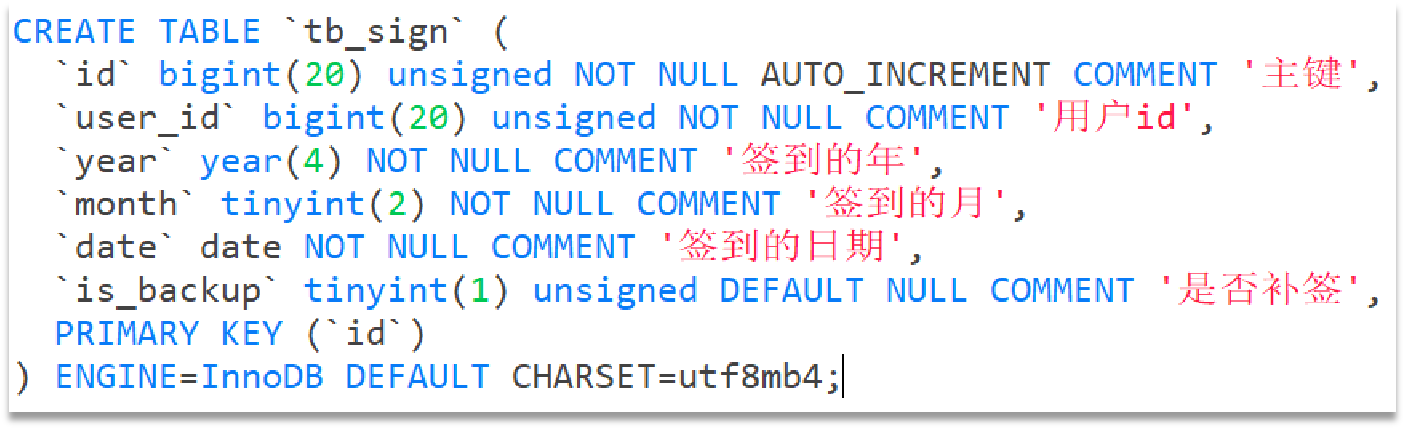
用户签到 BitMap用法 假如我们用一张表来存储用户签到信息,其结构应该如下:
假如有1000万用户,平均每人每年签到次数为10次,则这张表一年的数据量为1亿条。
每签到一次需要使用(8 + 8 + 1 + 1 + 3 + 1)共22字节的内存,一个月则最多需要600多字节。
我们按月来统计用户签到信息,签到记录为1,未签到则记录为0。
把每一个bit位对应当月的每一天,形成了映射关系。用0和1标示业务状态,这种思路就称为位图(BitMap)。
Redis中是利用string类型数据结构实现BitMap,因此最大上限是512M,转换为bit则是2^32个bit位。
BitMap的操作命令有:
SETBIT:向指定位置(offset)存入一个0或1。GETBIT :获取指定位置(offset)的bit值。BITCOUNT :统计BitMap中值为1的bit位的数量。BITFIELD:操作(查询、修改、自增)BitMap中bit数组中的指定位置(offset)的值。BITFIELD_RO:获取BitMap中bit数组,并以十进制形式返回。BITOP:将多个BitMap的结果做位运算(与 、或、异或)。BITPOS:查找bit数组中指定范围内第一个0或1出现的位置。
签到功能 案例:实现签到功能 需求:实现签到接口,将当前用户当天签到信息保存到Redis中。
说明
请求方式
Post
请求路径
/user/sign
请求参数
无
返回值
无
提示:因为BitMap底层是基于String数据结构,因此其操作也都封装在字符串相关操作中了。
1.UserController。
1
2
3
4
5
6
7
8
9
10
11
12
13
14
15
package com.hmdp.controller;@Slf4j @RestController @RequestMapping("/user") public class UserController {@Resource private IUserService userService;@PostMapping("/sign") public Result sign () {return userService.sign();
2.IUserService。
1
2
3
4
5
package com.hmdp.service;public interface IUserService extends IService <User> {sign () ;
3.UserServiceImpl。
1
2
3
4
5
6
7
8
9
10
11
12
13
14
15
16
17
18
19
20
21
22
23
24
package com.hmdp.service.impl;@Slf4j @Service public class UserServiceImpl extends ServiceImpl <UserMapper, User> implements IUserService {@Resource private StringRedisTemplate stringRedisTemplate;@Override public Result sign () {Long userId = UserHolder.getUser().getId();LocalDateTime now = LocalDateTime.now();String keySuffix = now.format(DateTimeFormatter.ofPattern(":yyyyMM" ));String key = USER_SIGN_KEY + userId + keySuffix;int dayOfMonth = now.getDayOfMonth();1 , true );return Result.ok();
测试 1.在Postman中使用http://localhost:8080/api/user/sign的POST请求,请求头带上authorization,即可给该authorization对应的用户进行签到。
2.在Redis客户端使用SETBIT进行手动添加签到信息。
1
2
3
4
5
127.0.0.1:6379> SETBIT sign:1010:202412 1 1
签到统计
连续签到天数:从最后一次签到开始向前统计,直到遇到第一次未签到为止,计算总的签到次数,就是连续签到天数。
得到本月到今天为止的所有签到数据:BITFIELD key GET u[dayOfMonth] 0。
从后向前遍历每个bit位:与 1 做与运算,就能得到最后一个bit位。随后右移1位,下一个bit位就成为了最后一个bit位。
案例:实现签到统计功能 需求:实现下面接口,统计当前用户截止当前时间在本月的连续签到天数。
说明
请求方式
GET
请求路径
/user/sign/count
请求参数
无
返回值
连续签到天数
1.UserController。
1
2
3
4
5
6
7
8
9
10
11
12
13
14
15
16
package com.hmdp.controller;@Slf4j @RestController @RequestMapping("/user") public class UserController {@Resource private IUserService userService;@GetMapping("/sign/count") public Result signCount () {return userService.signCount();
2.IUserService。
1
2
3
4
5
package com.hmdp.service;public interface IUserService extends IService <User> {signCount () ;
3.UserServiceImpl。
1
2
3
4
5
6
7
8
9
10
11
12
13
14
15
16
17
18
19
20
21
22
23
24
25
26
27
28
29
30
31
32
33
34
35
36
37
38
39
40
41
42
43
44
45
46
47
48
49
50
51
package com.hmdp.service.impl;@Slf4j @Service public class UserServiceImpl extends ServiceImpl <UserMapper, User> implements IUserService {@Resource private StringRedisTemplate stringRedisTemplate;@Override public Result signCount () {Long userId = UserHolder.getUser().getId();LocalDateTime now = LocalDateTime.now();String keySuffix = now.format(DateTimeFormatter.ofPattern(":yyyyMM" ));String key = USER_SIGN_KEY + userId + keySuffix;int dayOfMonth = now.getDayOfMonth();0 )if (result == null || result.isEmpty()){return Result.ok(0 );Long num = result.get(0 );if (num == null || num == 0 ){return Result.ok(0 );int count = 0 ;while (true ){if ((num & 1 ) == 0 ){break ;else {1 ;return Result.ok(count);
测试 1.在Postman中使用http://localhost:8080/api/user/sign/count的GET请求,请求头带上authorization,即可给该authorization对应的用户进行当前月份截止今天的连续签到时间数。
响应格式:
1
2
3
4
{ "success" : true , "data" : 3 }
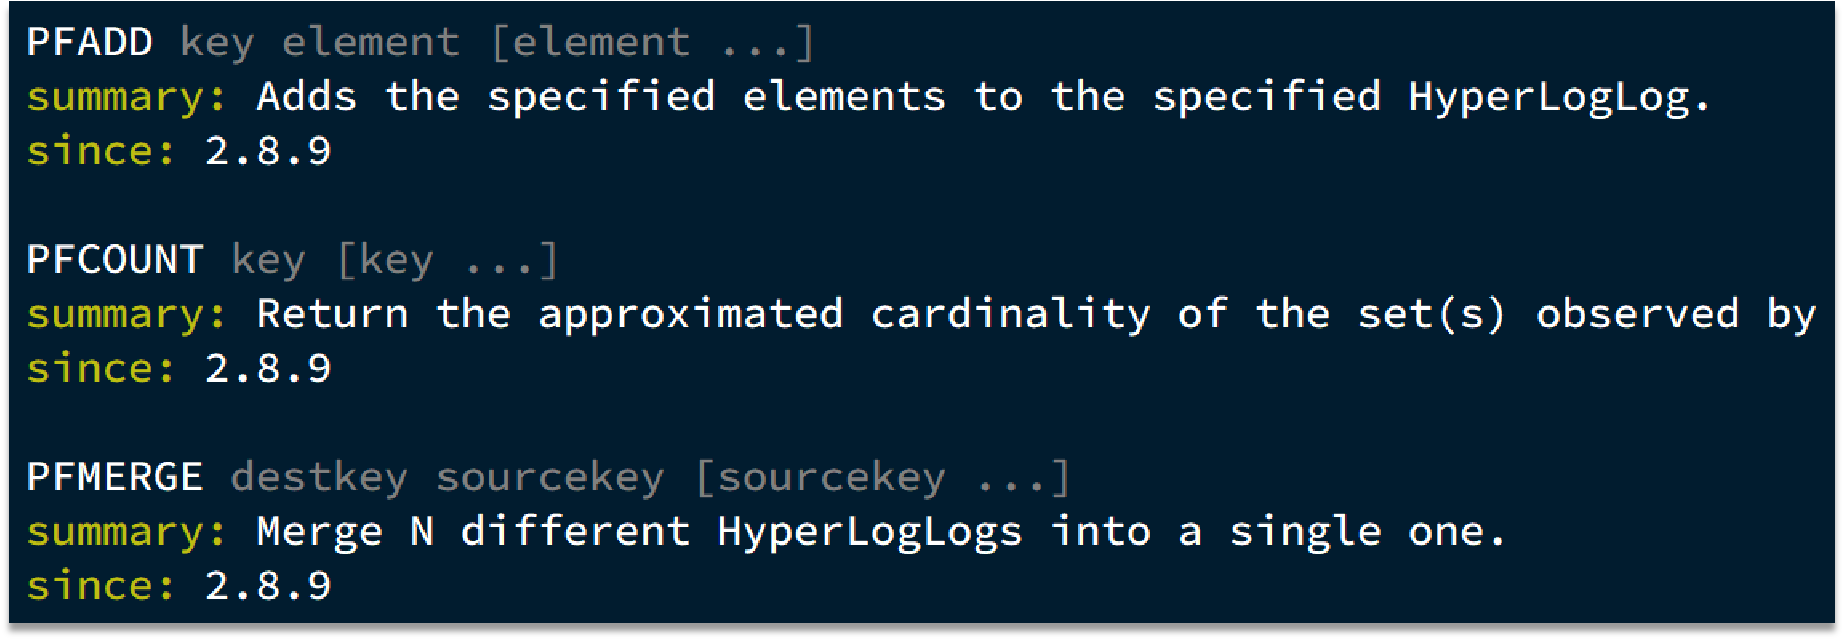
UV统计 HyperLogLog用法 首先我们搞懂两个概念:
UV:全称Unique Visitor,也叫独立访客量,是指通过互联网访问、浏览这个网页的自然人。1天内同一个用户多次访问该网站,只记录1次。PV:全称Page View,也叫页面访问量或点击量,用户每访问网站的一个页面,记录1次PV,用户多次打开页面,则记录多次PV。往往用来衡量网站的流量。
UV统计在服务端做会比较麻烦,因为要判断该用户是否已经统计过了,需要将统计过的用户信息保存。但是如果每个访问的用户都保存到Redis中,数据量会非常恐怖。
Hyperloglog(HLL)是从Loglog算法派生的概率算法,用于确定非常大的集合的基数,而不需要存储其所有值。相关算法原理可以参考:https://juejin.cn/post/6844903785744056333#heading-0
Redis中的HLL是基于string结构实现的,单个HLL的内存永远小于16kb,内存占用低的令人发指!作为代价,其测量结果是概率性的,有小于0.81%的误差。不过对于UV统计来说,这完全可以忽略。
使用 添加相同的值,也不会重复计数,而且值越少,误差越小,个数估计也越精准。
1
2
3
4
5
6
7
8
9
10
127.0.0.1:6379[1]> PFADD hl1 e1 e2 e3 e4 e5
实现UV统计 直接利用单元测试,向HyperLogLog中添加100万条数据,看看内存占用和统计效果如何:
1
2
3
4
5
6
7
8
9
10
11
12
13
14
15
16
17
18
19
20
21
22
23
24
package com.hmdp;@SpringBootTest class HmDianPingApplicationTests {@Resource private StringRedisTemplate stringRedisTemplate;@Test void testHyperLogLog () {new String [1000 ];int j = 0 ;for (int i=0 ; i<1000000 ; i++){1000 ;"user_" + i;if (j == 999 ){"hl2" , values);Long count = stringRedisTemplate.opsForHyperLogLog().size("hl2" );"count = " + count);
HyperLogLog的作用:
HyperLogLog的优点:
HyperLogLog的缺点:
Pipeline导入数据 如果要导入大量数据到Redis中,可以有多种方式: