微信登录 HttpClient 介绍 HttpClient是Apache Jakarta Common下的子项目,可以用来提供高效的、最新的、功能丰富的支持HTTP协议的客户端编程工具包,并且它支持HTTP协议最新的版本和建议。
HttpClient作用:发送HTTP请求,接收响应数据。
引入HttpClient依赖:(如果有引入aliyun-sdk-oss则不用额外引入了,aliyun-sdk-oss已经引入了HttpClient依赖)
1 2 3 4 5 <dependency > <groupId > org.apache.httpcomponents</groupId > <artifactId > httpclient</artifactId > <version > 4.5.13</version > </dependency >
核心API:HttpClient、HttpClients、CloseableHttpClient、HttpGet、HttpPost。
发送请求步骤:
创建HttpClient对象。
创建Http请求对象。
调用HttpClient的execute方法发送请求。
案例 GET方式请求 1 2 3 4 5 6 7 8 9 10 11 12 13 14 15 16 17 18 19 20 21 22 23 24 25 26 27 28 package com.sky.test;public class HttpClientTest {@Test public void testGET () throws Exception {CloseableHttpClient httpClient = HttpClients.createDefault();HttpGet httpGet = new HttpGet ("http://localhost:8080/user/shop/status" );CloseableHttpResponse response = httpClient.execute(httpGet);int statusCode = response.getStatusLine().getStatusCode();"服务端返回的状态码为:" + statusCode);HttpEntity entity = response.getEntity();String body = EntityUtils.toString(entity);"服务端返回的数据为:" + body);
POST方式请求 1 2 3 4 5 6 7 8 9 10 11 12 13 14 15 16 17 18 19 20 21 22 23 24 25 26 27 28 29 30 31 32 33 34 35 @Test public void testPOST () throws Exception {CloseableHttpClient httpClient = HttpClients.createDefault();HttpPost httpPost = new HttpPost ("http://localhost:8080/admin/employee/login" );JSONObject jsonObject = new JSONObject ();"username" , "admin" );"password" , "123456" );StringEntity entity = new StringEntity (jsonObject.toString());"UTF-8" );"application/json" );CloseableHttpResponse response = httpClient.execute(httpPost);int statusCode = response.getStatusLine().getStatusCode();"服务端返回的状态码为:" + statusCode);HttpEntity entity1 = response.getEntity();String body = EntityUtils.toString(entity1);"服务端返回的数据为:" + body);
实现工具类 1 2 3 4 5 6 7 8 9 10 11 12 13 14 15 16 17 18 19 20 21 22 23 24 25 26 27 28 29 30 31 32 33 34 35 36 37 38 39 40 41 42 43 44 45 46 47 48 49 50 51 52 53 54 55 56 57 58 59 60 61 62 63 64 65 66 67 68 69 70 71 72 73 74 75 package com.sky.test;import com.alibaba.fastjson.JSONObject;import org.apache.http.HttpEntity;import org.apache.http.client.methods.CloseableHttpResponse;import org.apache.http.client.methods.HttpGet;import org.apache.http.client.methods.HttpPost;import org.apache.http.entity.StringEntity;import org.apache.http.impl.client.CloseableHttpClient;import org.apache.http.impl.client.HttpClients;import org.apache.http.util.EntityUtils;import org.junit.jupiter.api.Test;public class HttpClientTest {@Test public void testGET () throws Exception {CloseableHttpClient httpClient = HttpClients.createDefault();HttpGet httpGet = new HttpGet ("http://localhost:8080/user/shop/status" );CloseableHttpResponse response = httpClient.execute(httpGet);int statusCode = response.getStatusLine().getStatusCode();"服务端返回的状态码为:" + statusCode);HttpEntity entity = response.getEntity();String body = EntityUtils.toString(entity);"服务端返回的数据为:" + body);@Test public void testPOST () throws Exception {CloseableHttpClient httpClient = HttpClients.createDefault();HttpPost httpPost = new HttpPost ("http://localhost:8080/admin/employee/login" );JSONObject jsonObject = new JSONObject ();"username" , "admin" );"password" , "123456" );StringEntity entity = new StringEntity (jsonObject.toString());"UTF-8" );"application/json" );CloseableHttpResponse response = httpClient.execute(httpPost);int statusCode = response.getStatusLine().getStatusCode();"服务端返回的状态码为:" + statusCode);HttpEntity entity1 = response.getEntity();String body = EntityUtils.toString(entity1);"服务端返回的数据为:" + body);
微信小程序开发 介绍 微信小程序:https://mp.weixin.qq.com/cgi-bin/wx?token=&lang=zh_CN
微信小程序注册地址:https://mp.weixin.qq.com/wxopen/waregister?action=step1
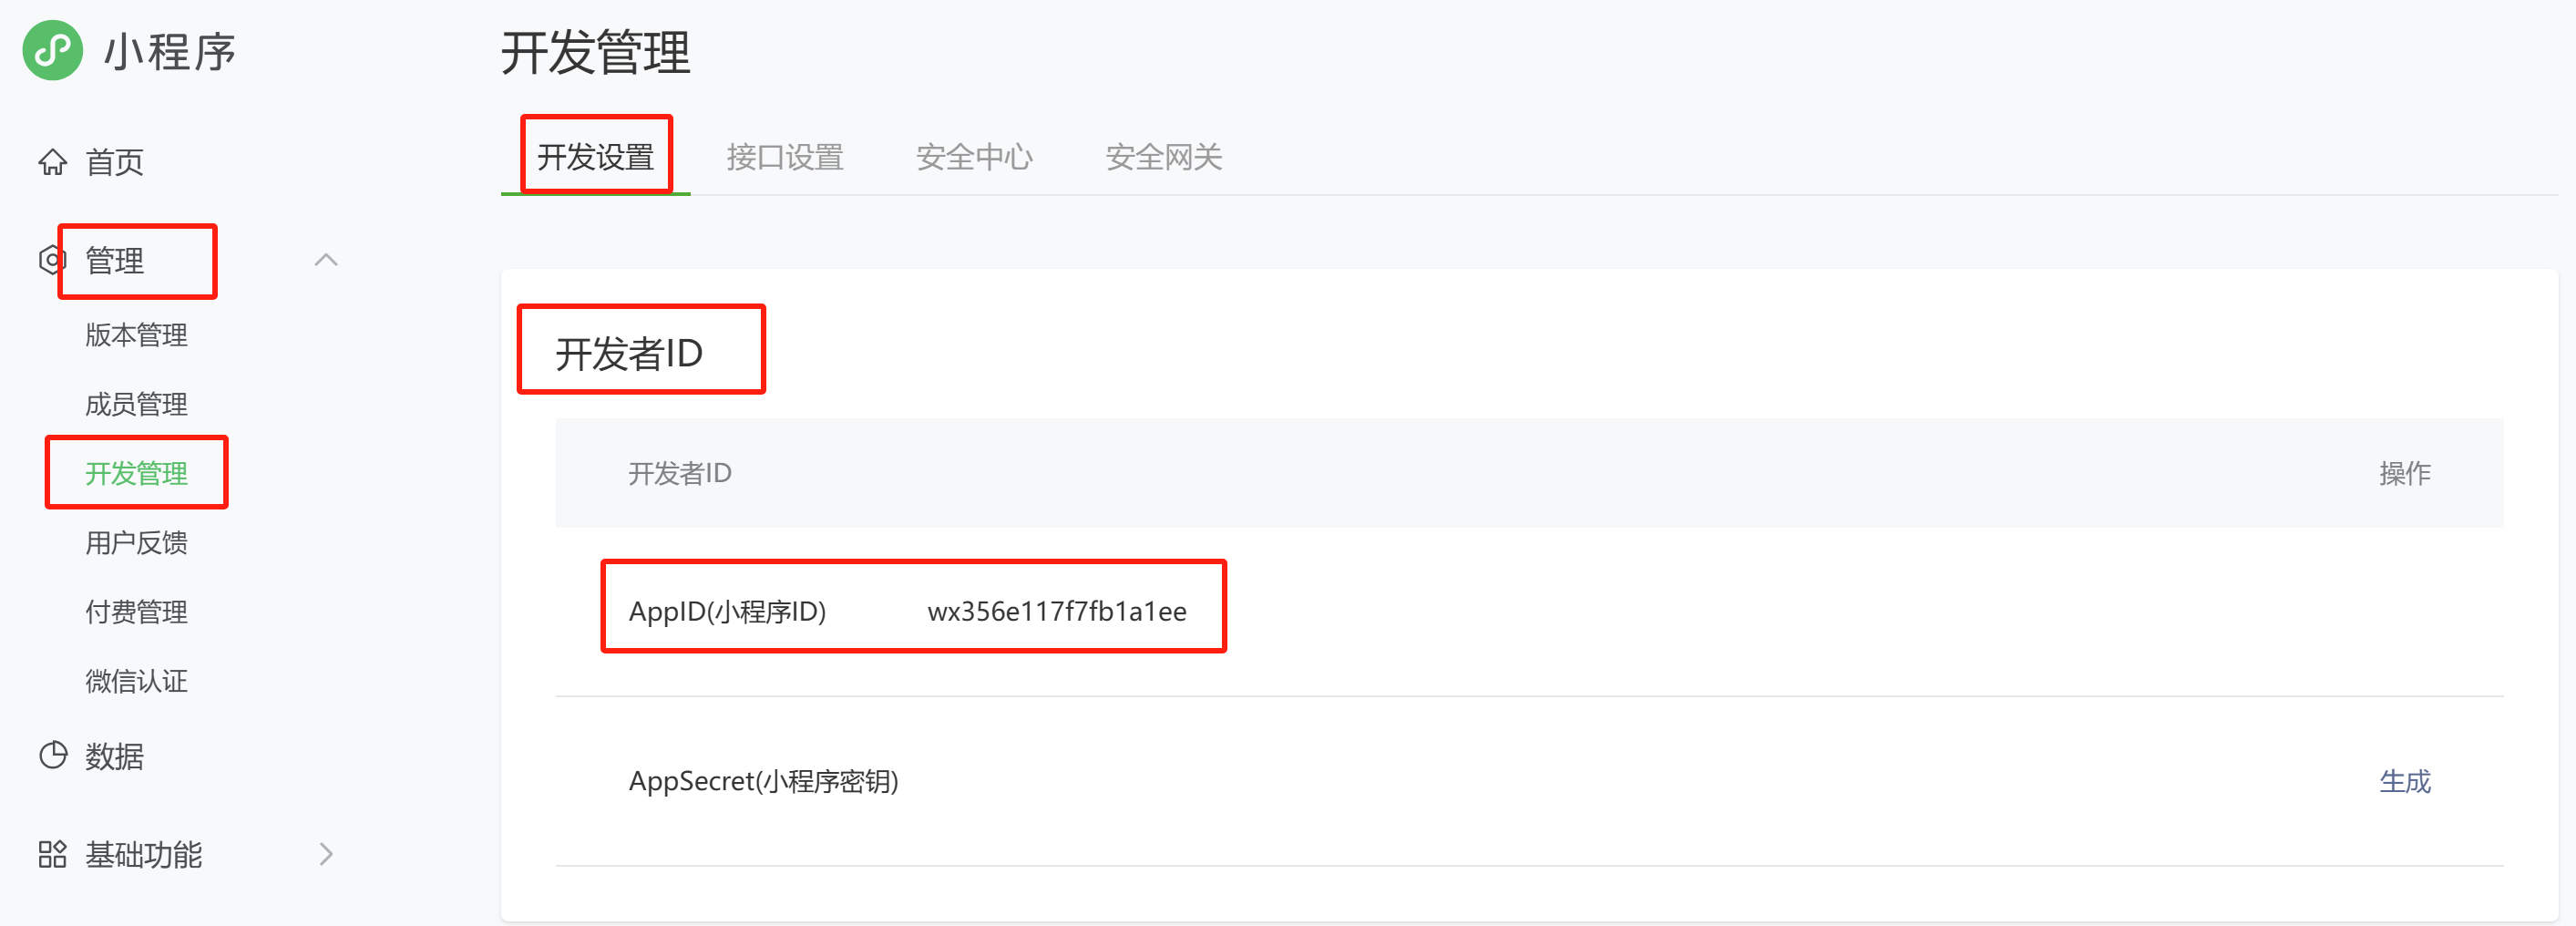
登录小程序后台:https://mp.weixin.qq.com/
查看小程序的AppID:
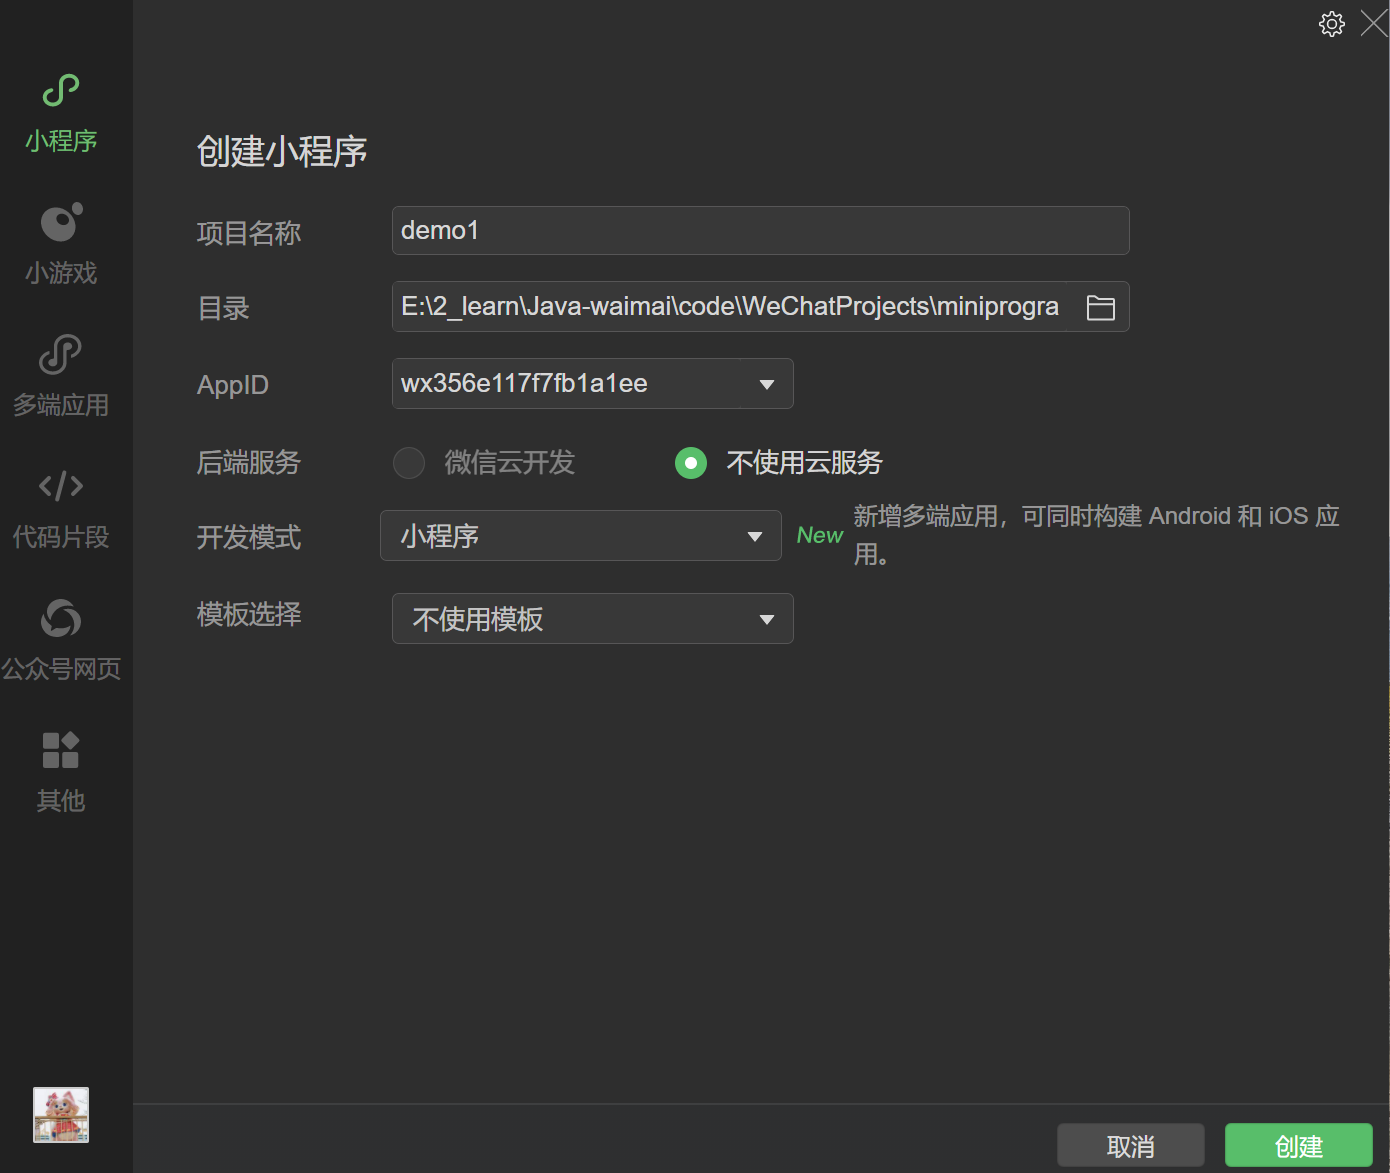
微信小程序开发者工具下载地址: https://developers.weixin.qq.com/miniprogram/dev/devtools/stable.html
开发者工具创建小程序:
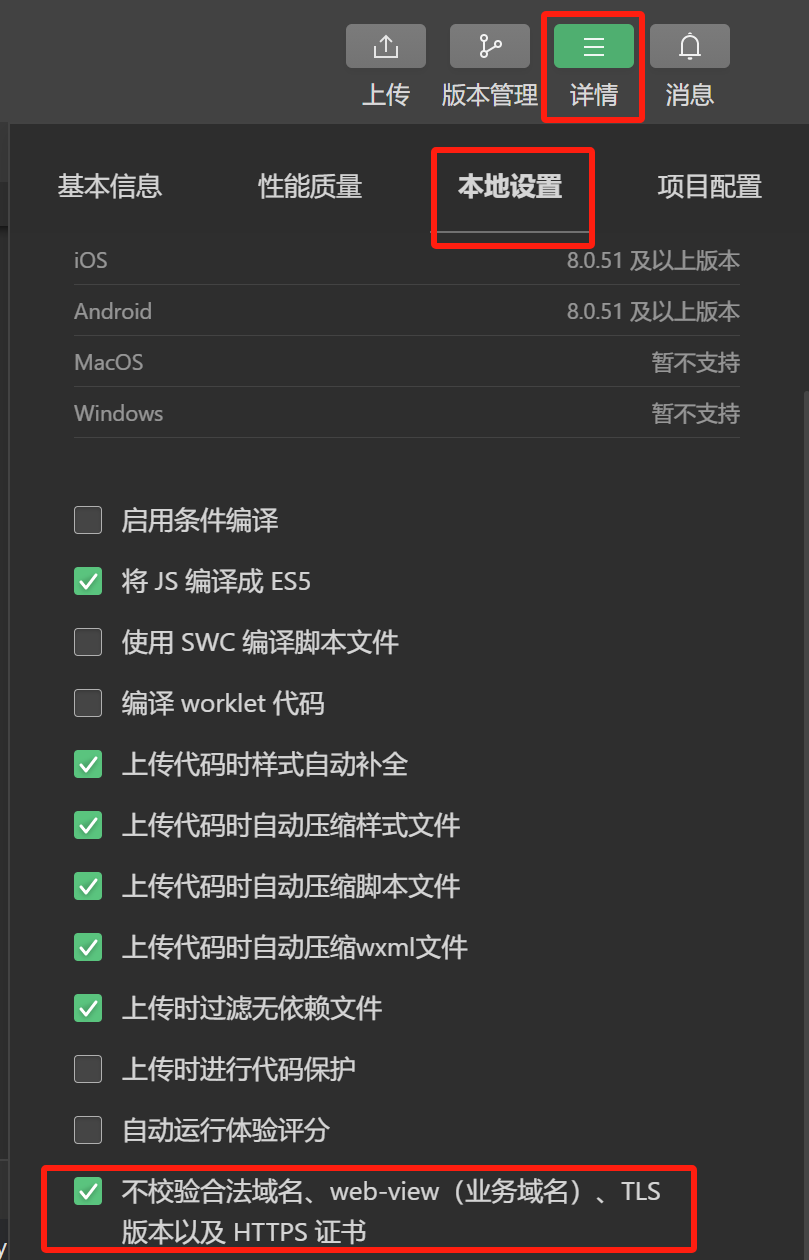
开发者工具设置不校验合法域名:需要勾选不校验合法域名,否则小程序无法向Tomcat发出请求。
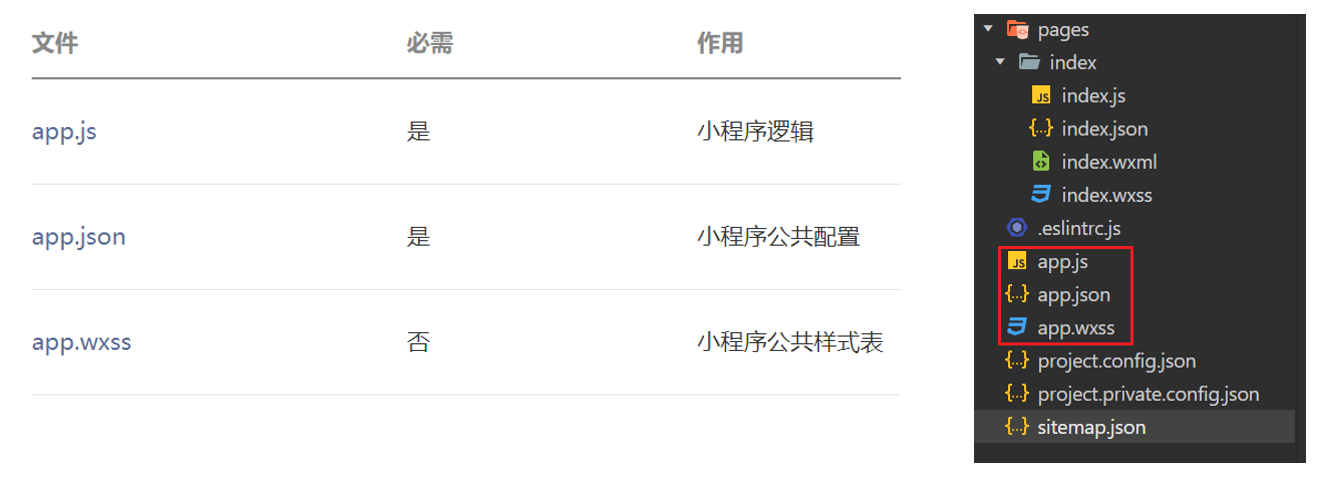
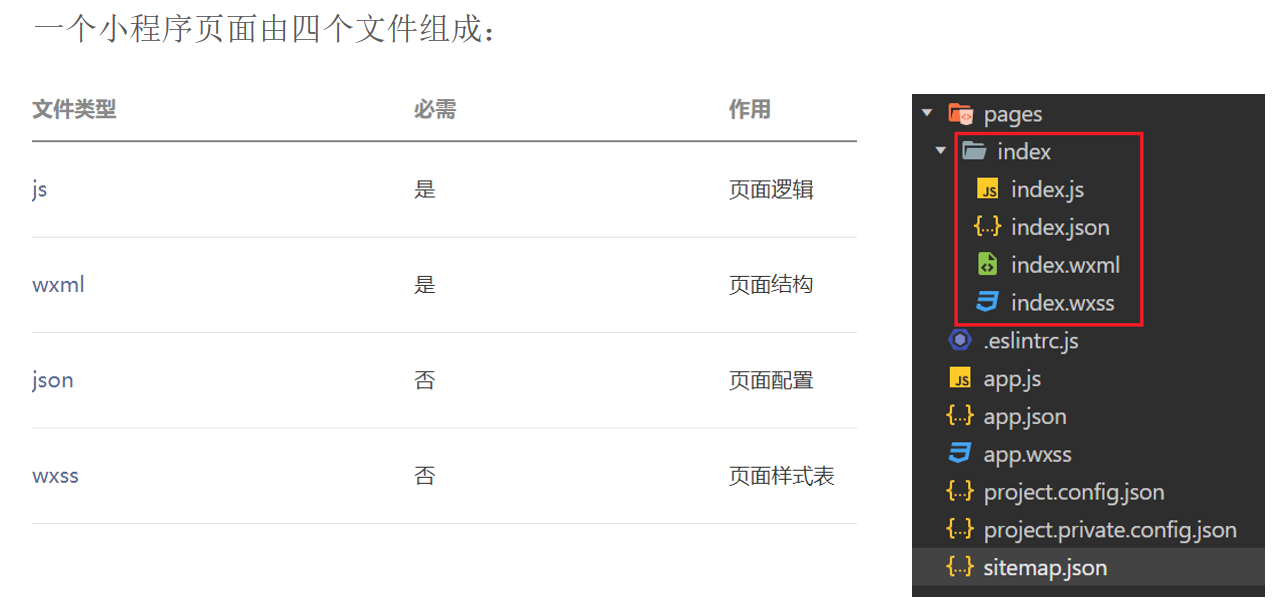
入门案例 小程序目录结构 小程序包含一个描述整体程序的app和多个描述各自页面的page。一个小程序主体部分由三个文件组成,必须放在项目的根目录,如下:
一个小程序页面由四个文件组成:
案例 注意:如果点击获取用户信息无法弹出弹窗,可以通过详情->本地设置->调试基础库,将当前版本修改为2.27.0以下版本。
1 2 3 4 5 6 7 8 9 10 11 12 13 14 15 16 17 18 19 20 21 <navigation-bar title ="Weixin" back ="{{false}}" color ="black" background ="#FFF" > </navigation-bar > <scroll-view class ="scrollarea" scroll-y type ="list" > <view class ="container" > <view > Weixin</view > <view > <button bindtap ="getUserInfo" type ="primary" > 获取用户信息</button > </view > <view > 昵称:{{nickName}}</view > <image src ="{{url}}" style ="width: 100px; height: 100px;" > </image > <view > <button bindtap ="wxLogin" type ="warn" > 微信登录</button > </view > <view > <button bindtap ="sendRequest" type ="default" > 发送请求</button > </view > </view > </scroll-view >
1 2 3 4 5 6 7 8 9 10 11 12 13 14 15 16 17 18 19 20 21 22 23 24 25 26 27 28 29 30 31 32 33 34 35 36 37 38 39 40 41 42 43 44 45 46 47 Page ({data :{msg : "hello surourou" ,nickName : "" ,url : "" ,code : "" getUserInfo (console .log ("调用方法" )getUserProfile ({desc : '获取用户信息' ,success : res =>console .log (res.userInfo )this .setData ({nickName : res.userInfo .nickName ,url : res.userInfo .avatarUrl wxLogin (login ({success : (res ) => {console .log (res.code )this .setData ({code : res.code sendRequest (request ({url : 'http://localhost:8080/user/shop/status' ,method : 'GET' ,success : (res ) => {console .log (res.data )
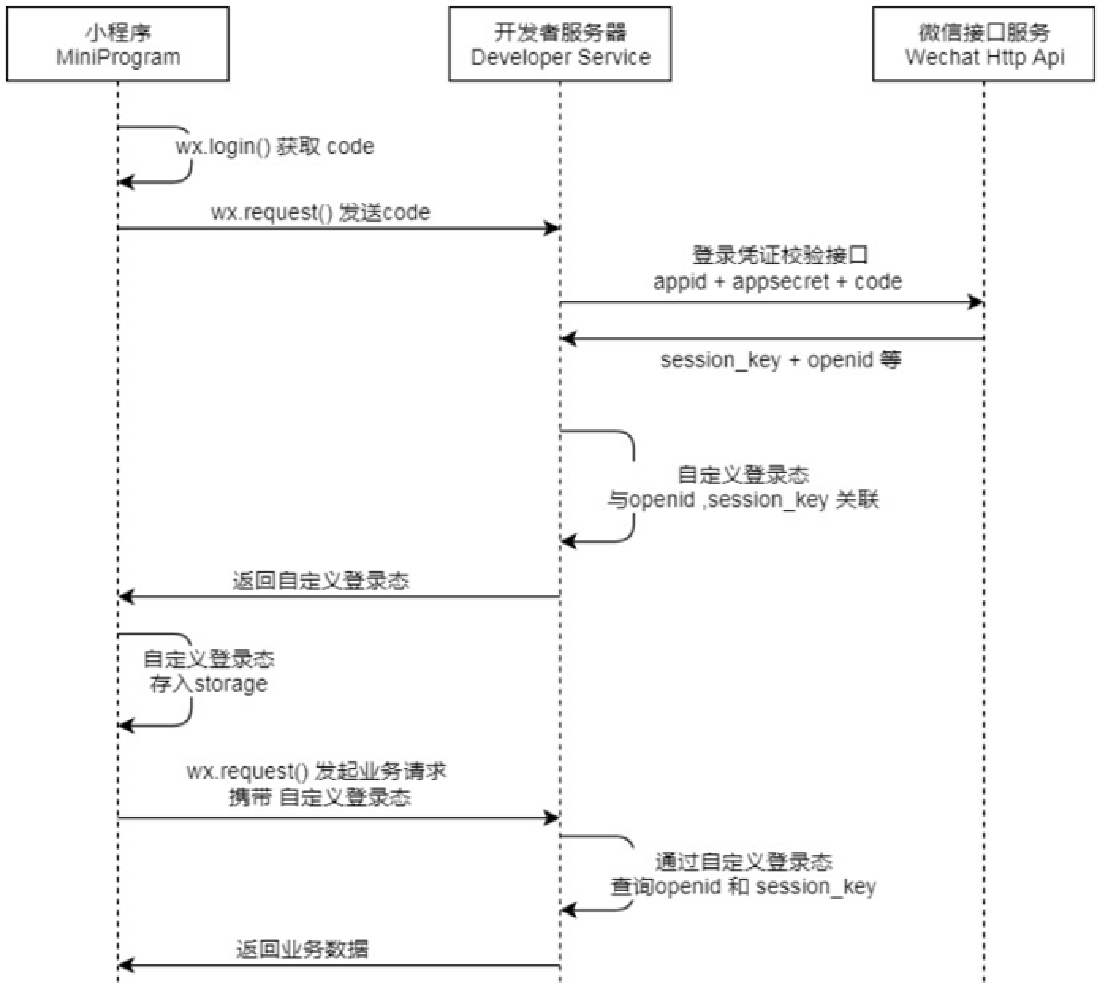
微信登录 导入小程序代码 微信登录流程 微信登录:https://developers.weixin.qq.com/miniprogram/dev/framework/open-ability/login.html
注意:可以使用postman测试登录凭证校验接口。
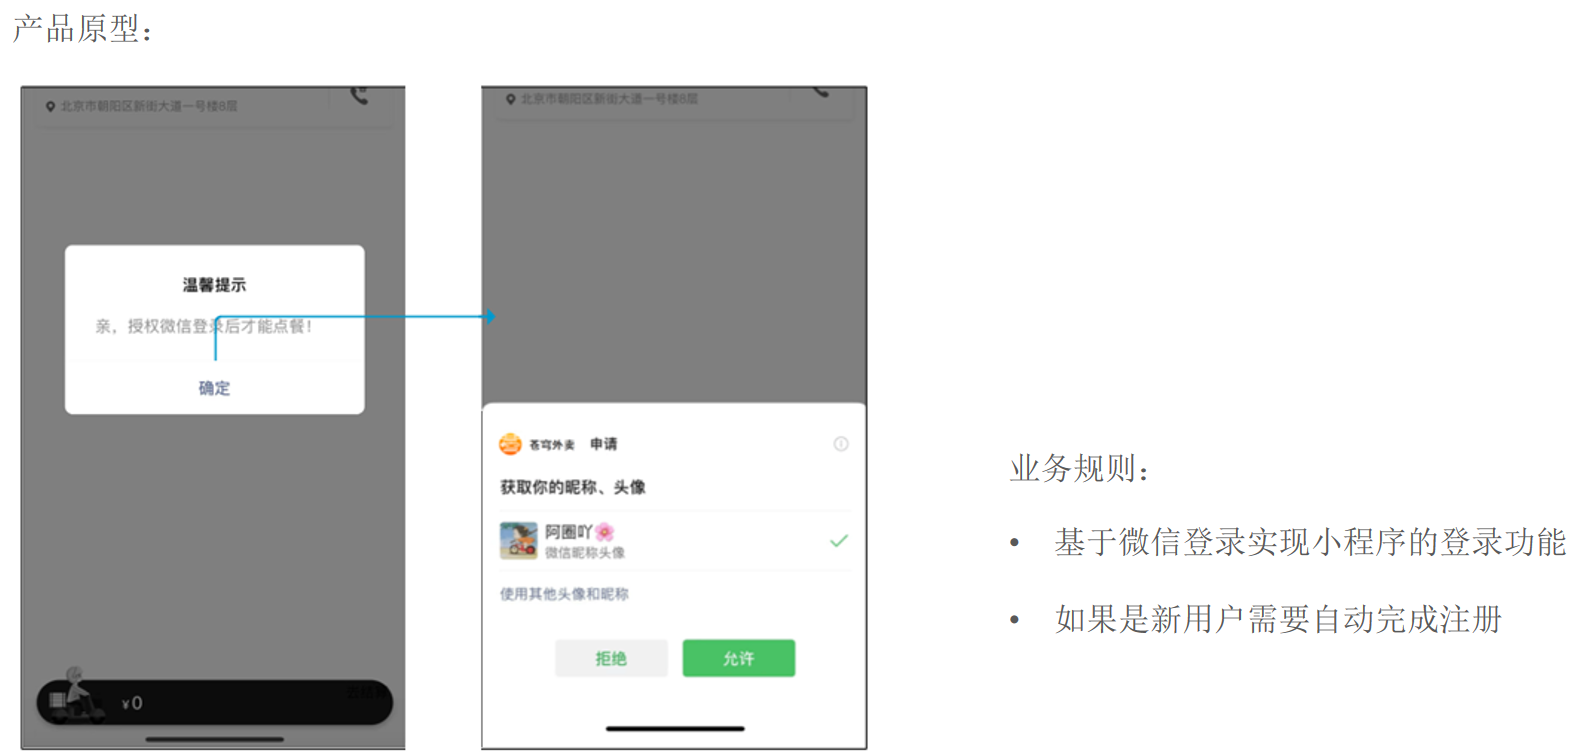
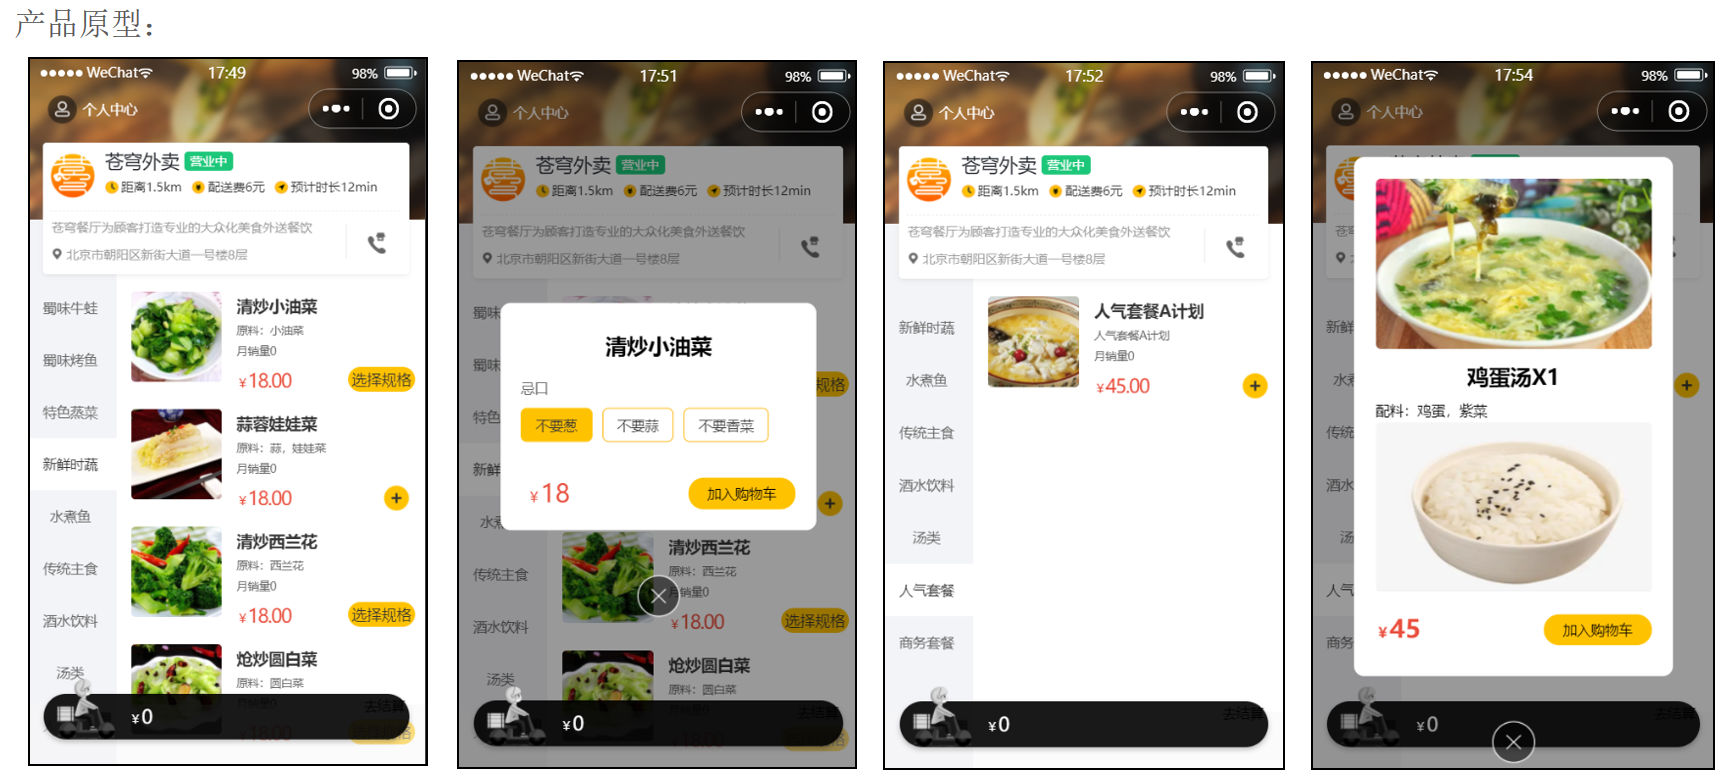
需求分析和设计 产品原型 业务规则:
基于微信登录实现小程序的登录功能。
如果是新用户需要自动完成注册。
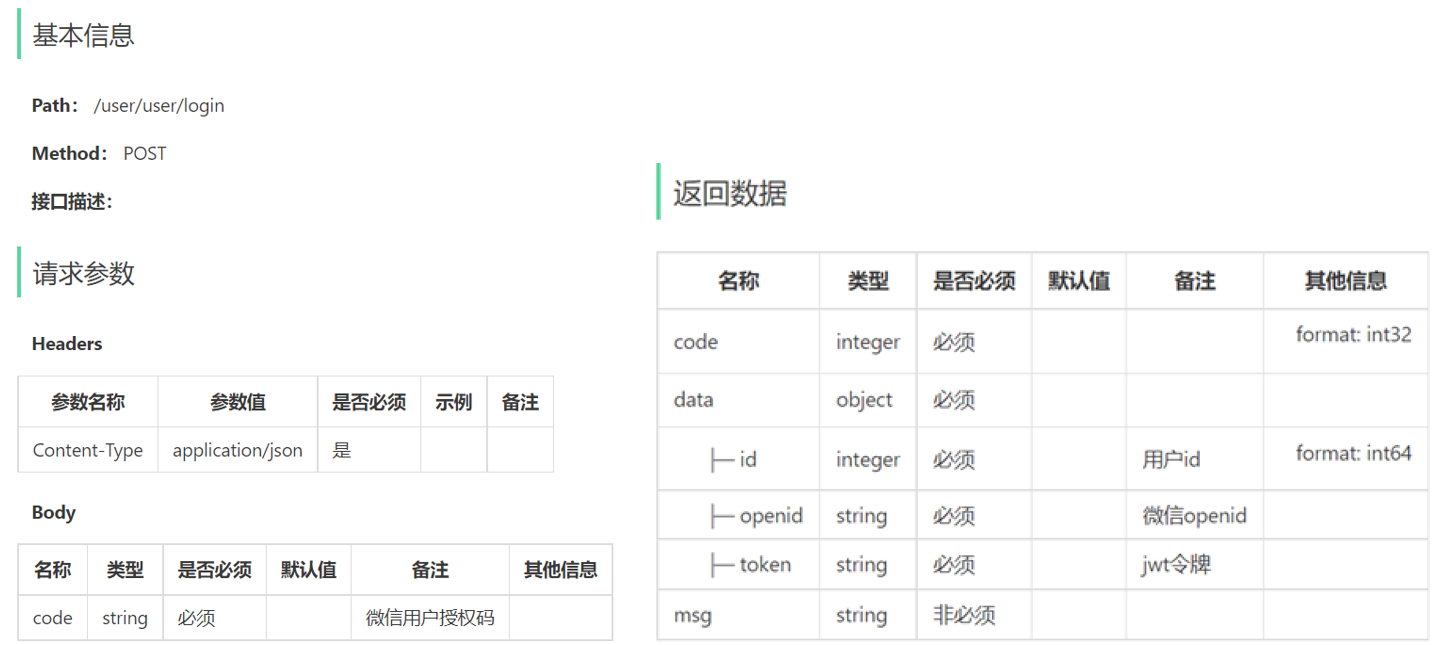
接口设计
数据库设计(user表)
字段名 数据类型 说明 备注
id
bigint
主键
自增
openid
varchar(45)
微信用户的唯一标识
name
varchar(32)
用户姓名
phone
varchar(11)
手机号
sex
varchar(2)
性别
id_number
varchar(18)
身份证号
avatar
varchar(500)
微信用户头像路径
create_time
datetime
注册时间
代码开发 1.配置微信登录所需配置项。
application-dev.yml
1 2 3 4 sky: wechat: appid: wx356e117f7fb1a1ee secret: 2b862ee13a45b6ea421c780702b66b96
application.yml
1 2 3 4 sky: wechat: appid: ${sky.wechat.appid} secret: ${sky.wechat.secret}
2.配置为微信用户生成jwt令牌时使用的配置项。
application.yml
1 2 3 4 5 6 7 8 sky: jwt: user-secret-key: itheima user-ttl: 7200000 user-token-name: authentication
3.DTO设计。
1 2 3 4 5 6 7 package com.sky.dto;@Data public class UserLoginDTO implements Serializable {private String code;
4.VO设计。
1 2 3 4 5 6 7 8 9 10 11 package com.sky.vo;@Data @Builder @NoArgsConstructor @AllArgsConstructor public class UserLoginVO implements Serializable {private Long id;private String openid;private String token;
5.根据接口定义创建UserController的login方法。
1 2 3 4 5 6 7 8 9 10 11 12 13 14 15 16 17 18 19 20 21 22 23 24 25 26 27 28 29 30 31 32 package com.sky.controller.user;@RestController @RequestMapping("/user/user") @Api(tags = "C端用户相关接口") @Slf4j public class UserController {@Autowired private UserService userService;@Autowired private JwtProperties jwtProperties;@PostMapping("/login") @ApiOperation("微信登录") public Result<UserLoginVO> login (@RequestBody UserLoginDTO userLoginDTO) {"微信用户登录:{}" , userLoginDTO);User user = userService.wxLogin(userLoginDTO);new HashMap <>();String token = JwtUtil.createJWT(jwtProperties.getUserSecretKey(), jwtProperties.getUserTtl(), claims);UserLoginVO userLoginVO = UserLoginVO.builder()return Result.success(userLoginVO);
6.创建UserService接口。
1 2 3 4 5 6 7 package com.sky.service;@Service public interface UserService {wxLogin (UserLoginDTO userLoginDTO) ;
7.创建UserServiceImpl实现类。在UserServiceImpl中创建私有方法getOpenid。完善UserServiceImpl的wxLogin方法。
1 2 3 4 5 6 7 8 9 10 11 12 13 14 15 16 17 18 19 20 21 22 23 24 25 26 27 28 29 30 31 32 33 34 35 36 37 38 39 40 41 42 43 44 45 46 47 48 49 50 51 package com.sky.service.impl;@Service @Slf4j public class UserServiceImpl implements UserService {public static final String WX_LOGIN = "https://api.weixin.qq.com/sns/jscode2session" ;@Autowired private WeChatProperties weChatProperties;@Autowired private UserMapper userMapper;@Override public User wxLogin (UserLoginDTO userLoginDTO) {String openid = getOpenid(userLoginDTO.getCode());if (openid == null ){throw new LoginFailedException (MessageConstant.LOGIN_FAILED);User user = userMapper.getByOpenid(openid);if (user == null ){return user;private String getOpenid (String code) {new HashMap <>();"appid" , weChatProperties.getAppid());"secret" , weChatProperties.getSecret());"js_code" , code);"grant_type" , "authorization_code" );String json = HttpClientUtil.doGet(WX_LOGIN, map);JSONObject jsonObject = JSONObject.parseObject(json);String openid = jsonObject.getString("openid" );return openid;
8.创建UserMapper接口。
1 2 3 4 5 6 7 8 9 10 11 package com.sky.mapper;@Mapper public interface UserMapper {@Select("select * from user where openid = #{openid}") getByOpenid (String openid) ;void insert (User user) ;
9.创建UserMapper.xml映射文件。
1 2 3 4 5 6 7 8 9 <?xml version="1.0" encoding="UTF-8" ?> <!DOCTYPE mapper PUBLIC "-//mybatis.org//DTD Mapper 3.0//EN" "http://mybatis.org/dtd/mybatis-3-mapper.dtd" > <mapper namespace ="com.sky.mapper.UserMapper" > <insert id ="insert" useGeneratedKeys ="true" keyProperty ="id" > </insert > </mapper >
10.编写拦截器JwtTokenUserInterceptor,统一拦截用户端发送的请求并进行jwt校验。
1 2 3 4 5 6 7 8 9 10 11 12 13 14 15 16 17 18 19 20 21 22 23 24 25 26 27 28 29 30 31 32 33 34 35 36 37 package com.sky.interceptor;@Component @Slf4j public class JwtTokenUserInterceptor implements HandlerInterceptor {@Autowired private JwtProperties jwtProperties;public boolean preHandle (HttpServletRequest request, HttpServletResponse response, Object handler) throws Exception {if (!(handler instanceof HandlerMethod)) {return true ;String token = request.getHeader(jwtProperties.getUserTokenName());try {"jwt校验:{}" , token);Claims claims = JwtUtil.parseJWT(jwtProperties.getUserSecretKey(), token);Long userId = Long.valueOf(claims.get(JwtClaimsConstant.USER_ID).toString());"当前用户id:" , userId);return true ;catch (Exception ex) {401 );return false ;
11.在WebMvcConfiguration配置类中注册拦截器。
1 2 3 4 5 6 7 8 9 10 11 12 13 14 15 @Autowired private JwtTokenUserInterceptor jwtTokenUserInterceptor;protected void addInterceptors (InterceptorRegistry registry) {"开始注册自定义拦截器..." );"/admin/**" )"/admin/employee/login" );"/user/**" )"/user/user/login" )"/user/shop/status" );
导入商品浏览功能代码 产品原型
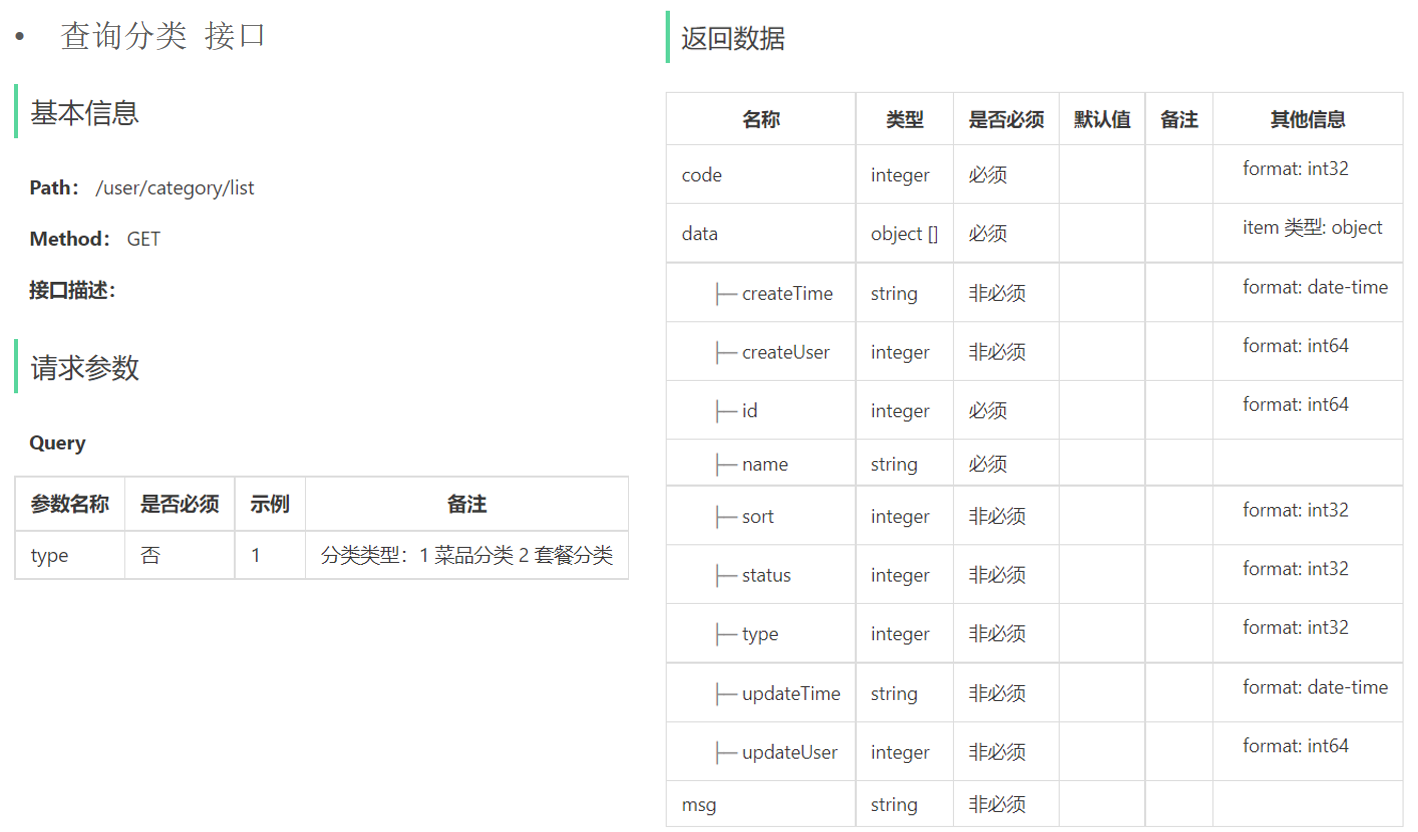
接口设计 查询分类
根据分类id查询菜品
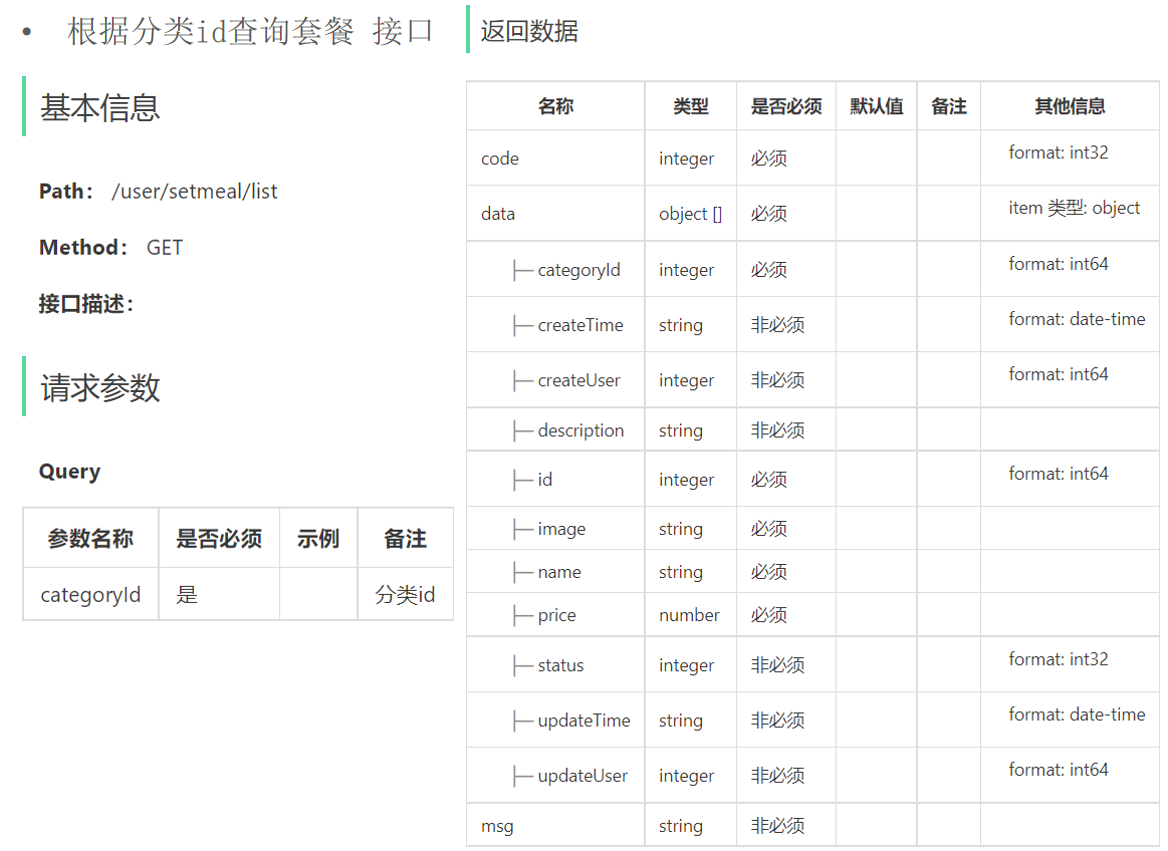
根据分类id查询套餐
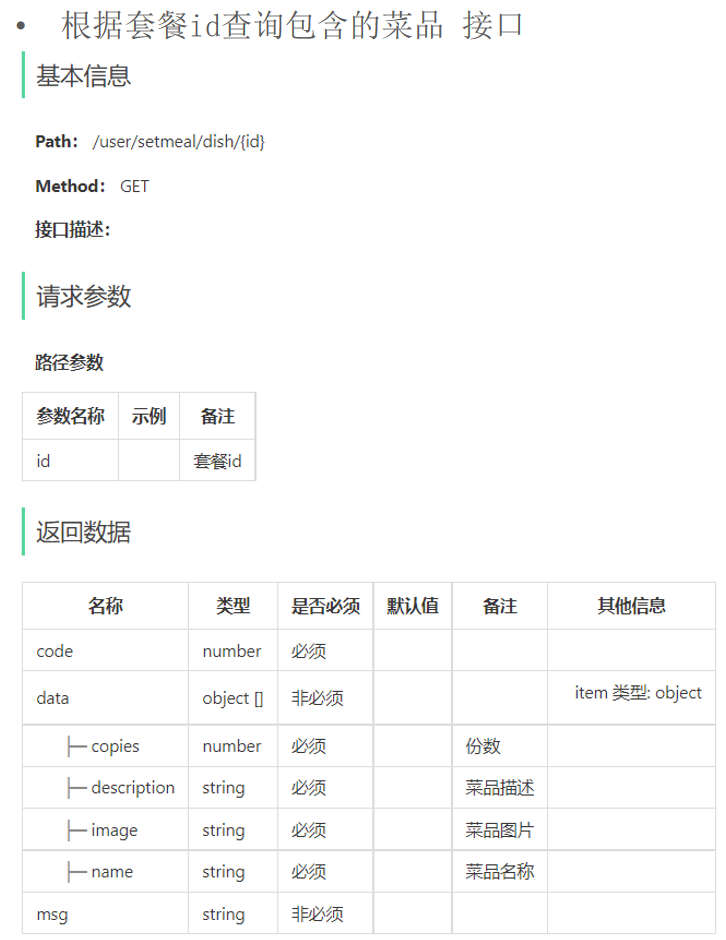
根据套餐id查询包含的菜品
代码开发 1.CategoryController。
1 2 3 4 5 6 7 8 9 10 11 12 13 14 15 16 17 18 19 20 21 22 package com.sky.controller.user;@RestController("userCategoryController") @RequestMapping("/user/category") @Api(tags = "C端-分类接口") public class CategoryController {@Autowired private CategoryService categoryService;@GetMapping("/list") @ApiOperation("查询分类") public Result<List<Category>> list (Integer type) {return Result.success(list);
2.DishController。
1 2 3 4 5 6 7 8 9 10 11 12 13 14 15 16 17 18 19 20 21 22 23 24 25 26 27 28 29 package com.sky.controller.user;@RestController("userDishController") @RequestMapping("/user/dish") @Slf4j @Api(tags = "C端-菜品浏览接口") public class DishController {@Autowired private DishService dishService;@GetMapping("/list") @ApiOperation("根据分类id查询菜品") public Result<List<DishVO>> list (Long categoryId) {Dish dish = new Dish ();return Result.success(list);
3.SetmealController。
1 2 3 4 5 6 7 8 9 10 11 12 13 14 15 16 17 18 19 20 21 22 23 24 25 26 27 28 29 30 31 32 33 34 35 36 37 38 39 package com.sky.controller.user;@RestController("userSetmealController") @RequestMapping("/user/setmeal") @Api(tags = "C端-套餐浏览接口") public class SetmealController {@Autowired private SetmealService setmealService;@GetMapping("/list") @ApiOperation("根据分类id查询套餐") public Result<List<Setmeal>> list (Long categoryId) {Setmeal setmeal = new Setmeal ();return Result.success(list);@GetMapping("/dish/{id}") @ApiOperation("根据套餐id查询包含的菜品列表") public Result<List<DishItemVO>> dishList (@PathVariable("id") Long id) {return Result.success(list);
4.DishService。
1 2 listWithFlavor (Dish dish) ;
5.DishServiceImpl。
1 2 3 4 5 6 7 8 9 10 11 12 13 14 15 16 17 18 19 public List<DishVO> listWithFlavor (Dish dish) {new ArrayList <>();for (Dish d : dishList) {DishVO dishVO = new DishVO ();return dishVOList;
6.SetmealService。
1 2 3 4 5 list (Setmeal setmeal) ;getDishItemById (Long id) ;
7.SetmealServiceImpl。
1 2 3 4 5 6 7 8 9 10 public List<Setmeal> list (Setmeal setmeal) {return list;public List<DishItemVO> getDishItemById (Long id) {return setmealMapper.getDishItemBySetmealId(id);
8.SetmealMapper。
1 2 3 4 5 6 7 8 list (Setmeal setmeal) ;@Select("select sd.name, sd.copies, d.image, d.description " + "from setmeal_dish sd left join dish d on sd.dish_id = d.id " + "where sd.setmeal_id = #{setmealId}") getDishItemBySetmealId (Long setmealId) ;
9.SetmealMapper.xml。
1 2 3 4 5 6 7 8 9 10 11 12 13 14 <select id ="list" parameterType ="Setmeal" resultType ="Setmeal" > <where > <if test ="name != null" > </if > <if test ="categoryId != null" > </if > <if test ="status != null" > </if > </where > </select >
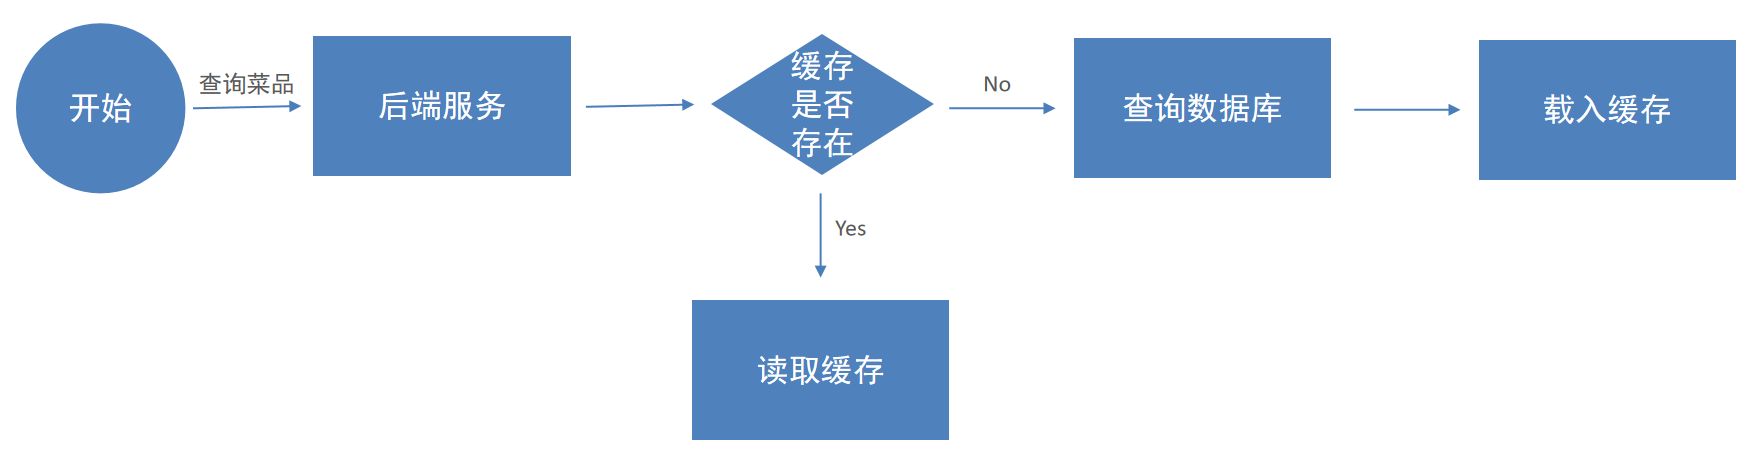
缓存商品 缓存菜品 问题说明 用户端小程序展示的菜品数据都是通过查询数据库获得,如果用户端访问量比较大,数据库访问压力随之增大。
结果:系统响应慢、用户体验差。
实现思路 通过Redis来缓存菜品数据,减少数据库查询操作。
缓存逻辑分析:
每个分类下的菜品保存一份缓存数据。
数据库中菜品数据有变更时清理缓存数据。
代码开发 添加缓存 修改用户端接口DishController的list方法,加入缓存处理逻辑。
1 2 3 4 5 6 7 8 9 10 11 12 13 14 15 16 17 18 19 20 21 22 23 24 25 26 27 28 29 30 31 32 33 34 35 36 37 38 39 40 41 42 43 package com.sky.controller.user;@RestController("userDishController") @RequestMapping("/user/dish") @Slf4j @Api(tags = "C端-菜品浏览接口") public class DishController {@Autowired private DishService dishService;@Autowired private RedisTemplate redisTemplate;@GetMapping("/list") @ApiOperation("根据分类id查询菜品") public Result<List<DishVO>> list (Long categoryId) {String key = "dish_" + categoryId;if (list != null && list.size() > 0 ) {return Result.success(list);Dish dish = new Dish ();return Result.success(list);
清理缓存 1.修改管理端接口DishController的相关方法,加入清理缓存的逻辑,需要改造的方法:
2.抽取清理缓存的方法。
1 2 3 4 5 private void cleanCache (String pattern) {Set keys = redisTemplate.keys(pattern);
3.调用清理缓存的方法,保证数据一致性。
对于save(新增方法):
1 2 3 String key = "dish_" + dishDTO.getCategoryId();
对于delete、update、startOrStop方法:
Spring Cache 介绍 Spring Cache是一个框架,实现了基于注解的缓存功能,只需要简单地加一个注解,就能实现缓存功能。
Spring Cache提供了一层抽象,底层可以切换不同的缓存实现,例如:
引入Spring Cache依赖:
1 2 3 4 5 <dependency > <groupId > org.springframework.boot</groupId > <artifactId > spring-boot-starter-cache</artifactId > <version > 2.7.3</version > </dependency >
常用注解
注解 说明
@EnableCaching
开启缓存注解功能,通常加在启动类上
@Cacheable
在方法执行前先查询缓存中是否有数据,如果有数据,则直接返回缓存数据;如果没有缓存数据,调用方法并将方法返回值放到缓存中
@CachePut
将方法的返回值放到缓存中
@CacheEvict
将一条或多条数据从缓存中删除
入门案例 导入资料中的初始工程,在此基础上加入Spring Cache注解即可。
在启动类加入@EnableCaching开启缓存注解功能。
1 2 3 4 5 6 7 8 9 10 11 12 13 14 15 16 17 18 19 20 21 22 23 24 25 26 27 28 29 30 31 32 33 34 35 36 37 38 39 40 41 42 43 44 45 package com.itheima.controller;@RestController @RequestMapping("/user") @Slf4j public class UserController {@Autowired private UserMapper userMapper;@PostMapping @CachePut(cacheNames = "userCache", key = "#user.id") public User save (@RequestBody User user) {return user;@DeleteMapping @CacheEvict(cacheNames = "userCache", key = "#id") public void deleteById (Long id) {@DeleteMapping("/delAll") @CacheEvict(cacheNames = "userCache", allEntries = true) public void deleteAll () {@GetMapping @Cacheable(cacheNames = "userCache", key = "#id") public User getById (Long id) {User user = userMapper.getById(id);return user;
缓存套餐 实现思路
导入Spring Cache和Redis相关maven坐标。
在启动类上加入@EnableCaching注解,开启缓存注解功能。
在用户端接口SetmealController的list方法上加入@Cacheable注解。
在管理端接口SetmealController的save、delete、update、startOrStop等方法上加入CacheEvict注解。
代码开发 1.在用户端接口SetmealController的list方法上加入@Cacheable注解。
1 @Cacheable(cacheNames = "setmealCache", key = "#categoryId")
2.在管理端接口SetmealController的save、delete、update、startOrStop等方法上加入CacheEvict注解。
1 2 3 4 @CacheEvict(cacheNames = "setmealCache", key = "#setmealDTO.categoryId") @CacheEvict(cacheNames = "setmealCache", allEntries = true)
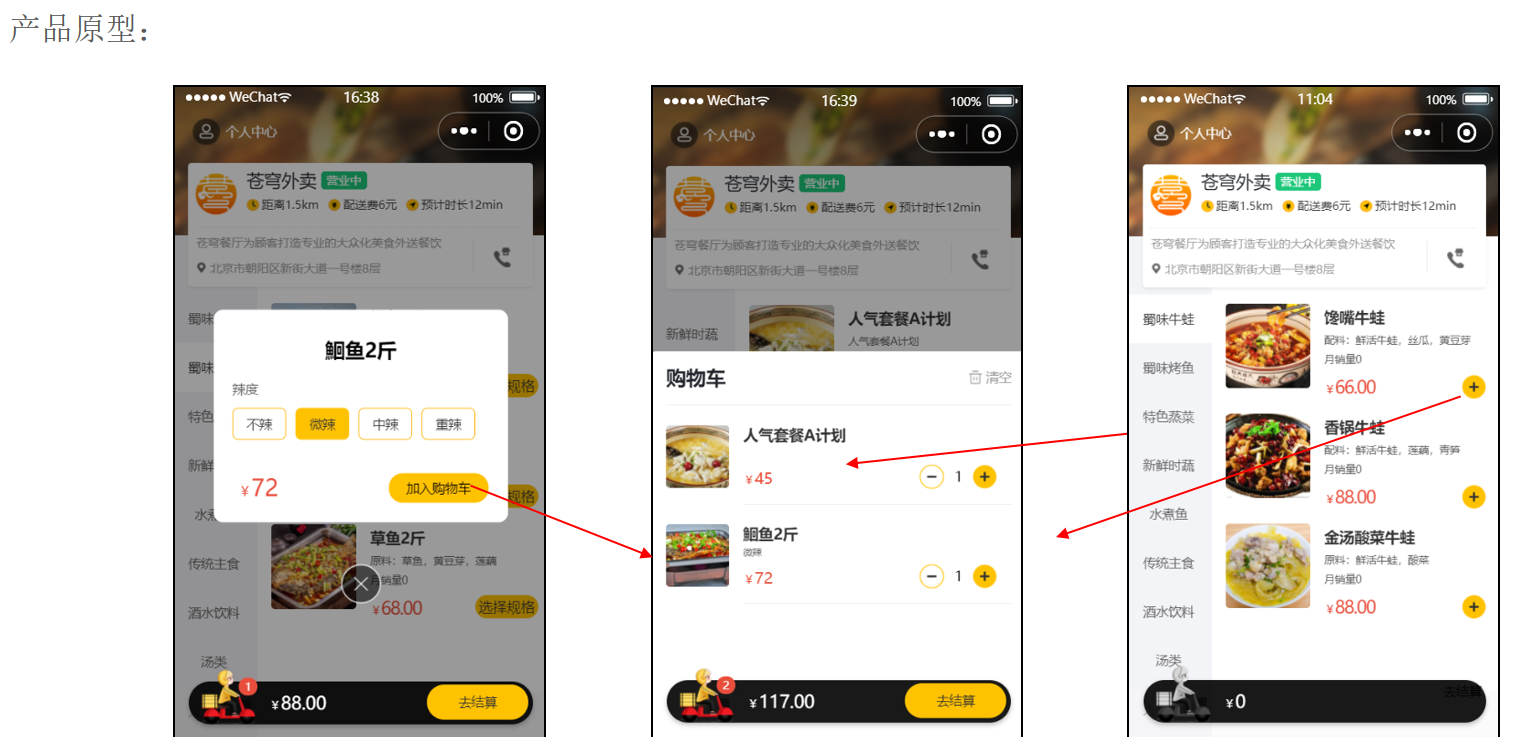
购物车 添加购物车 产品原型
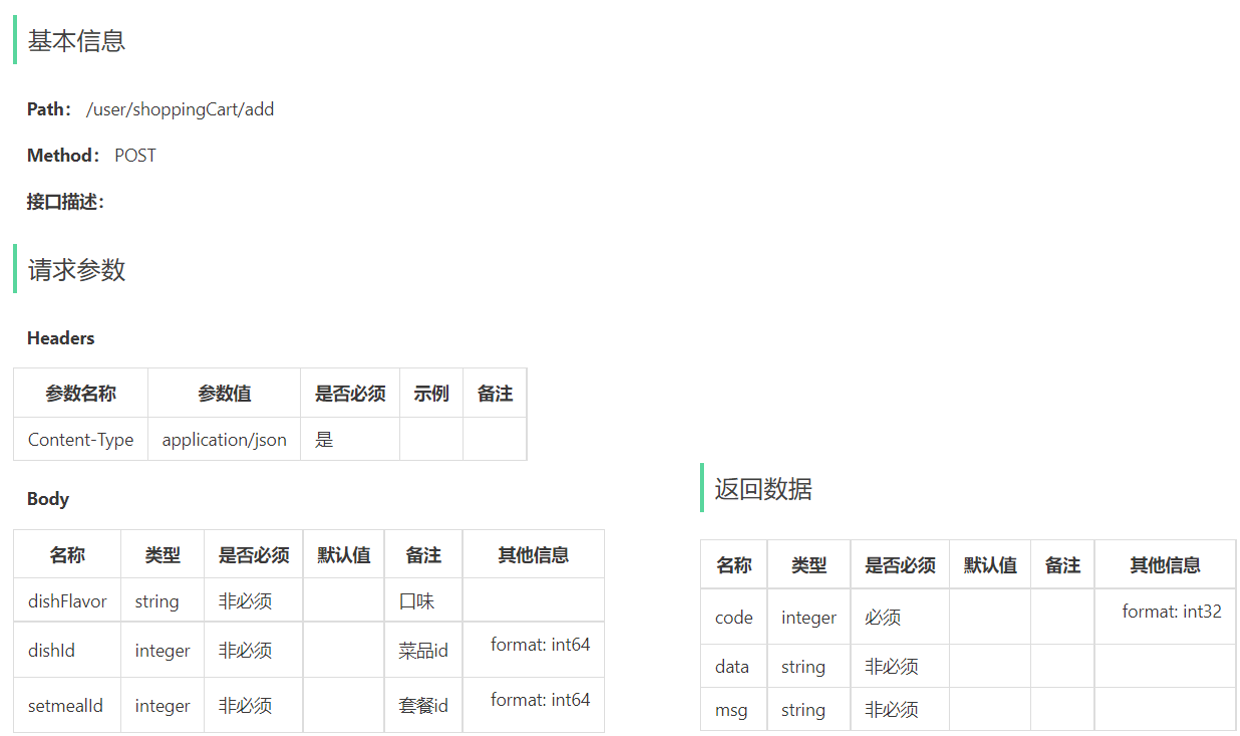
接口设计
请求方式:POST
请求路径:/user/shoppingCart/add
请求参数:套餐id、菜品id、口味
返回结果:code、data、msg
作用:暂时存放所选商品的地方,选的什么商品,每个商品都买了几个,不同用户的购物车需要区分开。
字段名 数据类型 说明 备注
id
bigint
主键
自增
name
varchar(32)
商品名称
冗余字段
image
varchar(255)
商品图片路径
冗余字段
user_id
bigint
用户id
逻辑外键
dish_id
bigint
菜品id
逻辑外键
setmeal_id
bigint
套餐id
逻辑外键
dish_flavor
varchar(50)
菜品口味
number
int
商品数量
amount
decimal(10,2)
商品单价
冗余字段
create_time
datetime
创建时间
代码开发 1.根据添加购物车接口的参数设计DTO。
1 2 3 4 5 6 7 8 package com.sky.dto;@Data public class ShoppingCartDTO implements Serializable {private Long dishId;private Long setmealId;private String dishFlavor;
2.根据添加购物车接口创建ShoppingCartController。
1 2 3 4 5 6 7 8 9 10 11 12 13 14 15 16 17 18 19 package com.sky.controller.user;@RestController @RequestMapping("/user/shoppingCart") @Slf4j @Api(tags = "C端购物车相关接口") public class ShoppingCartController {@Autowired private ShoppingCartService shoppingCartService;@PostMapping("/add") @ApiOperation("添加购物车") public Result add (@RequestBody ShoppingCartDTO shoppingCartDTO) {"添加购物车,商品信息为:{}" ,shoppingCartDTO);return Result.success();
3.创建ShoppingCartService接口。
1 2 3 4 5 6 7 package com.sky.service;@Service public interface ShoppingCartService {void addShoppingCart (ShoppingCartDTO shoppingCartDTO) ;
4.创建ShoppingCartServiceImpl实现类,并实现add方法。
1 2 3 4 5 6 7 8 9 10 11 12 13 14 15 16 17 18 19 20 21 22 23 24 25 26 27 28 29 30 31 32 33 34 35 36 37 38 39 40 41 42 43 44 45 46 47 48 49 50 package com.sky.service.impl;@Service public class ShoppingCartServiceImpl implements ShoppingCartService {@Autowired private ShoppingCartMapper shoppingCartMapper;@Autowired private DishMapper dishMapper;@Autowired private SetmealMapper setmealMapper;@Override public void addShoppingCart (ShoppingCartDTO shoppingCartDTO) {ShoppingCart shoppingCart = new ShoppingCart ();Long userId = BaseContext.getCurrentId();if (list != null && list.size() > 0 ) {ShoppingCart cart = list.get(0 );1 );else {Long dishId = shoppingCartDTO.getDishId();if (dishId != null ) {Dish dish = dishMapper.getById(dishId);else {Long setmealId = shoppingCartDTO.getSetmealId();Setmeal setmeal = setmealMapper.getById(setmealId);1 );
5.创建ShoppingCartMapper接口。
1 2 3 4 5 6 7 8 9 10 11 12 13 14 15 16 package com.sky.mapper;@Mapper public interface ShoppingCartMapper {list (ShoppingCart shoppingCart) ;@Update("update shopping_cart set number = #{number} where id = #{id};") void updateNumberById (ShoppingCart shoppingCart) ;@Insert("insert into shopping_cart (name, user_id, dish_id, setmeal_id, dish_flavor, number, amount, image, create_time) " + "values (#{name}, #{userId}, #{dishId}, #{setmealId}, #{dishFlavor}, #{number}, #{amount}, #{image}, #{createTime});") void insert (ShoppingCart shoppingCart) ;
6.创建ShoppingCartMapper.xml。
1 2 3 4 5 6 7 8 9 10 11 12 13 14 15 <?xml version="1.0" encoding="UTF-8" ?> <!DOCTYPE mapper PUBLIC "-//mybatis.org//DTD Mapper 3.0//EN" "http://mybatis.org/dtd/mybatis-3-mapper.dtd" > <mapper namespace ="com.sky.mapper.ShoppingCartMapper" > <select id ="list" resultType ="com.sky.entity.ShoppingCart" > <where > <if test ="userId != null" > and user_id = #{userId}</if > <if test ="setmealId != null" > and setmeal_id = #{setmealId}</if > <if test ="dishId != null" > and dish_id = #{dishId}</if > <if test ="dishFlavor != null" > and dish_flavor = #{dishFlavor}</if > </where > </select > </mapper >
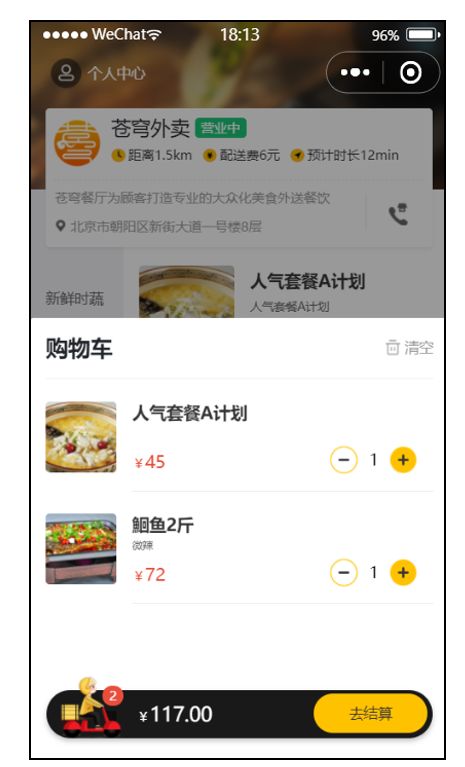
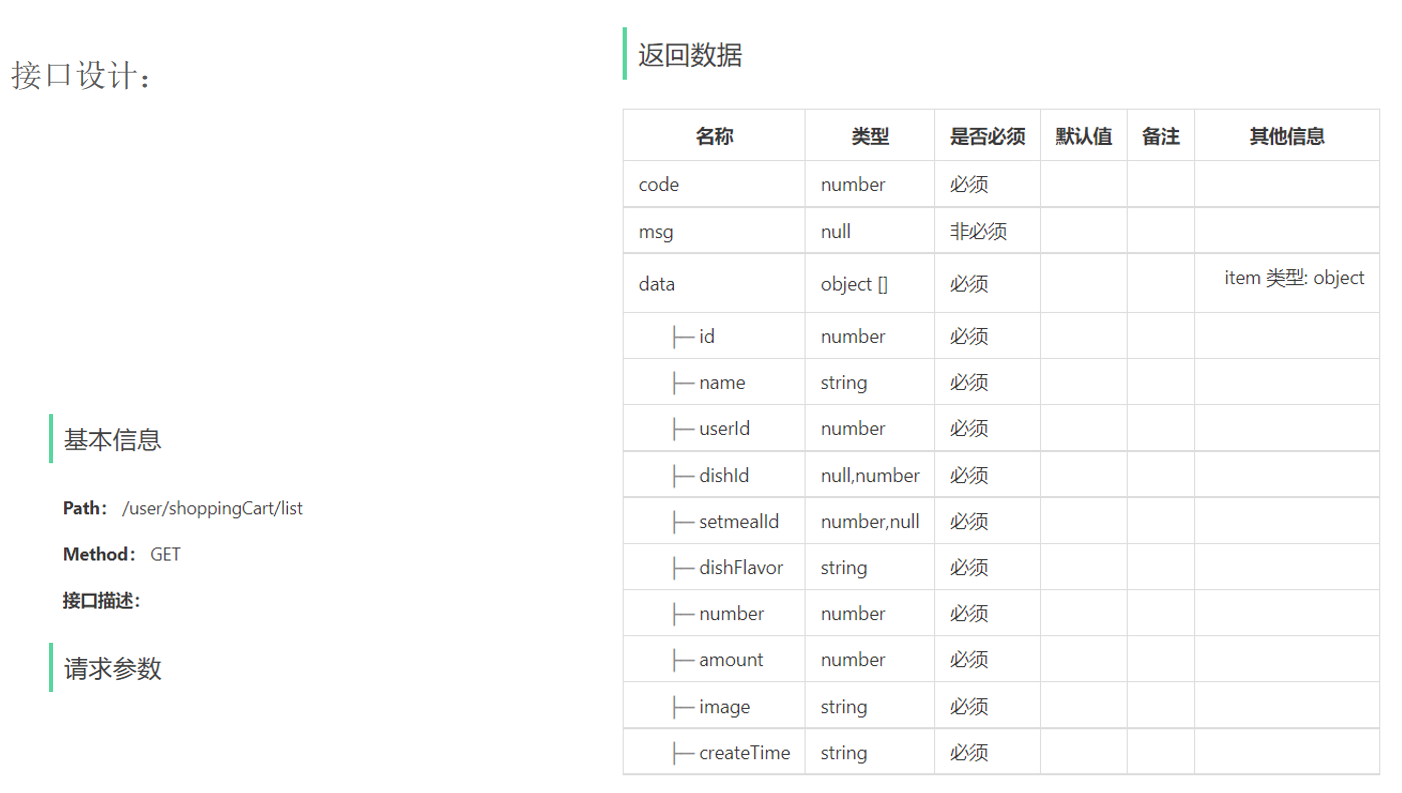
查看购物车 产品原型
接口设计
代码开发 1.在ShoppingCartController中创建查看购物车的方法。
1 2 3 4 5 6 7 @GetMapping("/list") @ApiOperation("查看购物车") public Result<List<ShoppingCart>> list () {return Result.success(list);
2.在ShoppingCartService接口中声明查看购物车的方法。
1 2 showShoppingCart () ;
3.在ShoppingCartServiceImpl中实现查看购物车的方法。
1 2 3 4 5 6 7 8 9 @Override public List<ShoppingCart> showShoppingCart () {Long UserId = BaseContext.getCurrentId();ShoppingCart shoppingCart = ShoppingCart.builder().userId(UserId).build();return list;
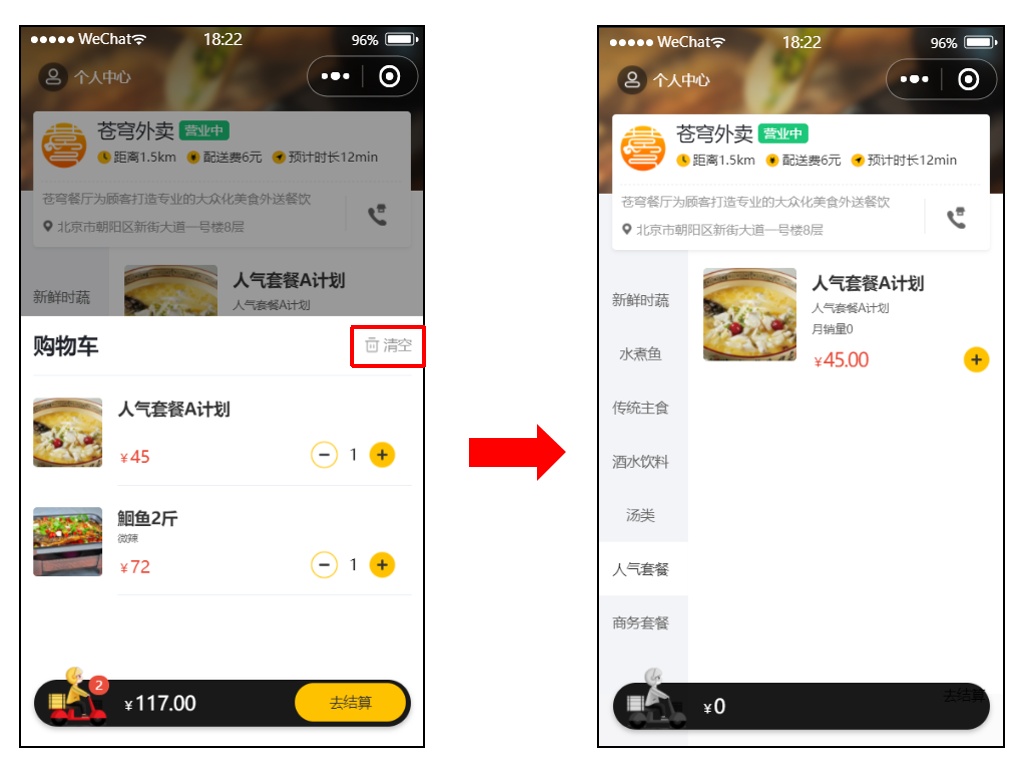
清空购物车 产品原型
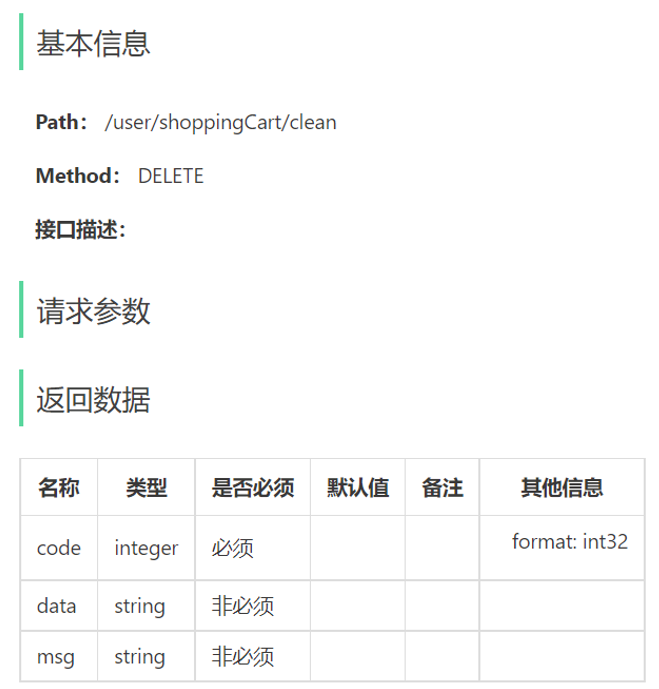
接口设计
代码开发 1.在ShoppingCartController中创建清空购物车的方法。
1 2 3 4 5 6 7 @DeleteMapping("/clean") @ApiOperation("清空购物车") public Result clean () {return Result.success();
2.在ShoppingCartService接口中声明清空购物车的方法。
1 2 void cleanShoppingCart () ;
3.在ShoppingCartServiceImpl中实现清空购物车的方法。
1 2 3 4 5 6 7 @Override public void cleanShoppingCart () {Long UserId = BaseContext.getCurrentId();
4.在ShoppingCartMapper接口中创建删除购物车数据的方法。
1 2 3 @Delete("delete from shopping_cart where user_id = #{userId}") void deleteByUserId (Long userId) ;
删除购物车中一个商品 产品原型
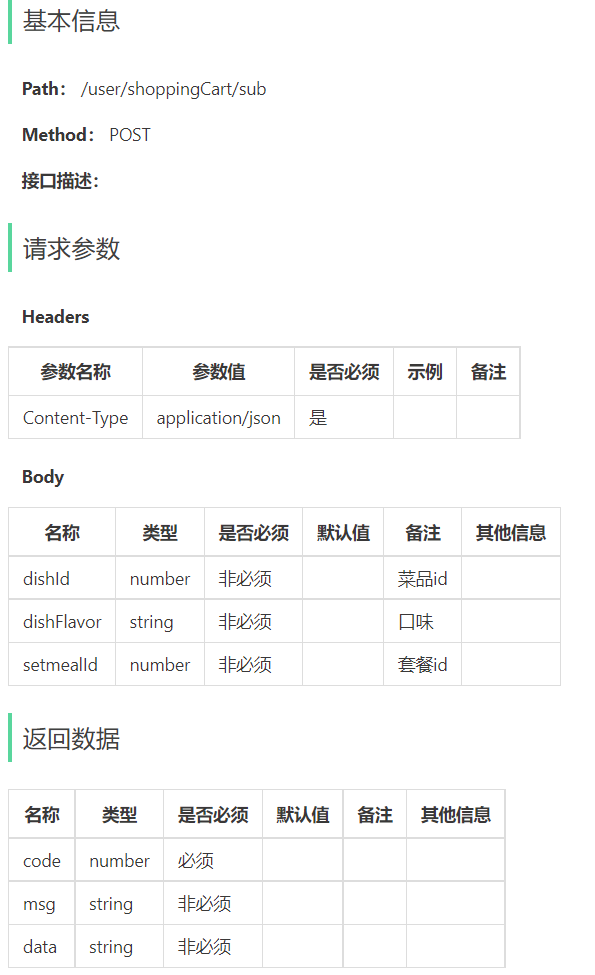
接口设计
代码开发 1.ShoppingCartController。
1 2 3 4 5 6 7 8 @PostMapping("/sub") @ApiOperation("删除购物车中一个商品") public Result sub (@RequestBody ShoppingCartDTO shoppingCartDTO) {"删除购物车中一个商品,商品:{}" , shoppingCartDTO);return Result.success();
2.ShoppingCartService。
1 2 void subShoppingCart (ShoppingCartDTO shoppingCartDTO) ;
3.ShoppingCartServiceImpl。
1 2 3 4 5 6 7 8 9 10 11 12 13 14 15 16 17 18 19 20 21 22 23 public void subShoppingCart (ShoppingCartDTO shoppingCartDTO) {ShoppingCart shoppingCart = new ShoppingCart ();if (list != null && list.size() > 0 ){0 );Integer number = shoppingCart.getNumber();if (number == 1 ){else {1 );
4.ShoppingCartMapper。
1 2 3 @Delete("delete from shopping_cart where id = #{id}") void deleteById (Long id) ;