JavaWeb后端开发:MySQL和MyBatis
MySQL
MySQL概述
MySQL安装
官网下载地址:https://dev.mysql.com/downloads/mysql/
1.下载mysql-9.0.1-winx64.msi或mysql-9.0.1-winx64.zip两个安装包,下载两者中的任何一个都可以,将zip解压后可以得到MySQL的软件本体了(就是一个文件夹),把它放在安装的位置 。
2.配置环境变量
新建系统变量:MYSQL_HOME,值为安装目录。
系统变量的Path中新建:%MYSQL_HOME%\bin。
3.验证是否安装成功:命令行输入mysql,出现以下结果则表明安装成功。
1 | |
如果提示mysql不是内部或外部命令,也不是可运行的程序或批处理文件则表示添加添加失败,请重新检查步骤并重试。
初始化MySQL
管理员身份打开命令行窗口:
1 | |
稍微等待一会,如果出现没有出现报错信息,则证明data目录初始化成功,查看MySQL目录下已经有data目录生成。
注意:若出现 Errcode:13 -Permission denied错误,则是由于权限不足导致的,以管理员方式运行cmd即可。
注册MySQL服务
命令行(必须以管理员身份启动)中:
1 | |
显示Service successfully installed.则表示安装好MySQL服务。
启动MySQL服务
命令行输入:
1 | |
修改默认账户密码
在命令行里输入mysql admin -u root password 1234,这里的1234就是指修改后的默认管理员(即root账户)的密码。
1 | |
登录MySQL
1 | |
上述-p后面是密码,默认的root账号没有密码,可以使用mysql -uroot登录,命令行要求输入密码,直接回车即可。
登录参数:
1 | |
退出MySQL
1 | |
MySQL图形化工具DataGrip(IDEA内置有DataGrip)
介绍:DataGrip是JetBrains旗下的一款数据库管理工具,是管理和开发MySQL、Oracle、PostgreSQL的理想解决方案。
官网: https://www.jetbrains.com/zh-cn/datagrip/
注意:IDEA会提示要下载插件,点击下载插件即可。
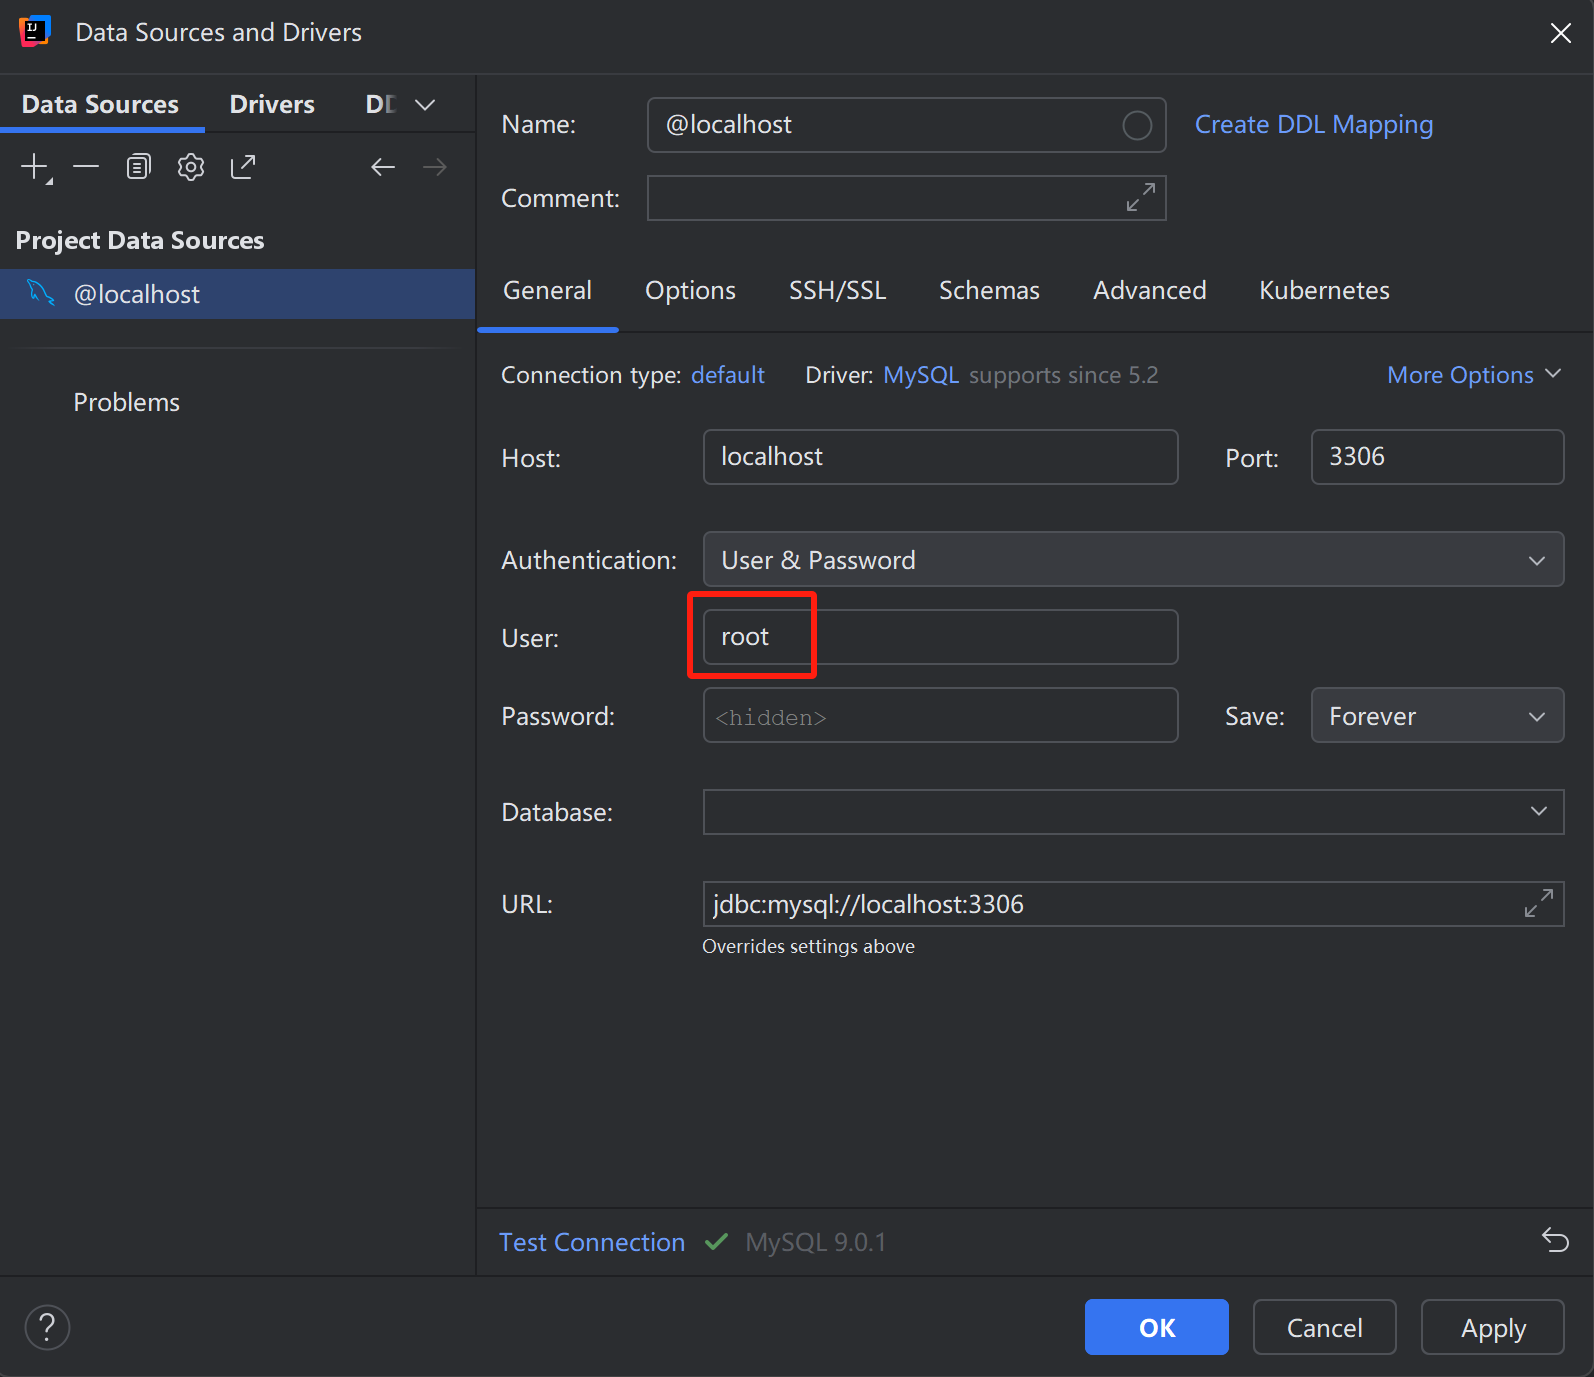
点击Test Connection,显示如下则表示连接数据库成功。
1 | |
MySQL数据模型
关系型数据库(RDBMS): 建立在关系模型基础上,由多张相互连接的二维表组成的数据库。
SQL
SQL:一门操作关系型数据库的编程语言,定义操作所有关系型数据库的统一标准。
SQL语句可以单行或多行书写,以分号结尾。
SQL语句可以使用空格/缩进来增强语句的可读性。
MySQL数据库的SQL语句不区分大小写。
注释:
单行注释:-- 注释内容或# 注释内容(MySQL特有)
多行注释: /* 注释内容 */
SQL语句通常被分为四大类:
| 分类 | 全称 | 说明 |
|---|---|---|
| DDL | Data Definition Language | 数据定义语言,用来定义数据库对象(数据库,表,字段) |
| DML | Data Manipulation Language | 数据操作语言,用来对数据库表中的数据进行增删改 |
| DQL | Data Query Language | 数据查询语言,用来查询数据库中表的记录 |
| DCL | Data Control Language | 数据控制语言,用来创建数据库用户、控制数据库的访问权限 |
数据库设计DDL
DDL英文全称是Data Definition Language,数据定义语言,用来定义数据库对象(数据库、表)。
数据库操作
查询
- 查询所有数据库:
show databases; - 查询当前数据库:
select database();
使用
- 使用数据库:
use 数据库名 ;
创建
- 创建数据库:
create database [ if not exists ] 数据库名 ;
删除
- 删除数据库:
drop database [ if exists ] 数据库名 ;
注意:上述语法中的database,也可以替换成schema。如:create schema db01;
1 | |
表操作
创建
1 | |
约束:约束是作用于表中字段上的规则,用于限制存储在表中的数据。
| 约束 | 描述 | 关键字 |
|---|---|---|
| 非空约束 | 限制该字段值不能为null | not null |
| 唯一约束 | 保证字段的所有数据都是唯一、不重复的 | unique |
| 主键约束 | 主键是一行数据的唯一标识,要求非空且唯一 | primary key |
| 默认约束 | 保存数据时,如果未指定该字段值,则采用默认值 | default |
| 外键约束 | 让两张表的数据建立连接,保证数据的一致性和完整性 | foreign key |
数据类型:MySQL中的数据类型有很多,主要分为三类:数值类型、字符串类型、日期时间类型。
1.数值类型
| 类型 | 大小(byte) | 有符号(SIGNED)范围 | 无符号(UNSIGNED)范围 | 描述 | 备注 |
|---|---|---|---|---|---|
| tinyint | 1 | (-128,127) | (0,255) | 小整数值 | |
| smallint | 2 | (-32768,32767) | (0,65535) | 大整数值 | |
| mediumint | 3 | (-8388608,8388607) | (0,16777215) | 大整数值 | |
| int | 4 | (-2147483648,2147483647) | (0,4294967295) | 大整数值 | |
| bigint | 8 | (-2^63,2^63-1) | (0,2^64-1) | 极大整数值 | |
| float | 4 | (-3.402823466 E+38,3.402823466351 E+38) | 0 和 (1.175494351 E-38,3.402823466 E+38) | 单精度浮点数值 | float(5,2):5表示整个数字长度,2 表示小数位个数 |
| double | 8 | (-1.7976931348623157 E+308,1.7976931348623157 E+308) | 0 和 (2.2250738585072014 E-308,1.7976931348623157 E+308) | 双精度浮点数值 | double(5,2):5表示整个数字长度,2 表示小数位个数 |
| decimal | 小数值(精度更高) | decimal(5,2):5表示整个数字长度,2 表示小数位个数 |
2.字符串类型
| 类型 | 大小 | 描述 |
|---|---|---|
| char | 0-255 bytes | 定长字符串 |
| varchar | 0-65535 bytes | 变长字符串 |
| tinyblob | 0-255 bytes | 不超过255个字符的二进制数据 |
| tinytext | 0-255 bytes | 短文本字符串 |
| blob | 0-65 535 bytes | 二进制形式的长文本数据 |
| text | 0-65 535 bytes | 长文本数据 |
| mediumblob | 0-16 777 215 bytes | 二进制形式的中等长度文本数据 |
| mediumtext | 0-16 777 215 bytes | 中等长度文本数据 |
| longblob | 0-4 294 967 295 bytes | 二进制形式的极大文本数据 |
| longtext | 0-4 294 967 295 bytes | 极大文本数据 |
注意:char和varchar的区别:
char(10):最多只能存10个字符,不足10个字符,占用10个字符空间。性能高,浪费空间。
varchar(10)::最多只能存10个字符,不足10个字符,按照实际长度存储。性能低,节省空间。
3.日期时间类型
| 类型 | 大小(byte) | 范围 | 格式 | 描述 |
|---|---|---|---|---|
| date | 3 | 1000-01-01 至 9999-12-31 | YYYY-MM-DD | 日期值 |
| time | 3 | -838:59:59 至 838:59:59 | HH:MM:SS | 时间值或持续时间 |
| year | 1 | 1901 至 2155 | YYYY | 年份值 |
| datetime | 8 | 1000-01-01 00:00:00 至 9999-12-31 23:59:59 | YYYY-MM-DD HH:MM:SS | 混合日期和时间值 |
| timestamp | 4 | 1970-01-01 00:00:01 至 2038-01-19 03:14:07 | YYYY-MM-DD HH:MM:SS | 混合日期和时间值,时间戳 |
1 | |
查询
- 查询当前数据库所有表:
show tables; - 查询表结构:
desc 表名; - 查询建表语句:
show create table 表名;
【注意】使用IDEA图形化界面建表,右键表->Navigation->Go to DDL可以查看建表语句。
1 | |
修改
- 添加字段:
alter table 表名 add 字段名 类型(长度) [comment 注释] [约束]; - 修改字段类型:
alter table 表名 modify 字段名 新数据类型(长度); - 修改字段名和字段类型:
alter table 表名 change 旧字段名 新字段名 类型 (长度) [comment 注释] [约束]; - 删除字段:
alter table 表名 drop column 字段名; - 修改表名:
rename table 表名 to 新表名;
1 | |
删除
- 删除表:
drop table [ if exists ] 表名;
注意:在删除表时,表中的全部数据也会被删除。
1 | |
数据库操作DML
DML英文全称是Data Manipulation Language(数据操作语言),用来对数据库中表的数据记录进行增、删、改操作。
添加数据INSERT
- 指定字段添加数据:
insert into 表名 (字段名1, 字段名2) values (值1, 值2); - 全部字段添加数据:
insert into 表名 values (值1, 值2, ...); - 批量添加数据(指定字段):
insert into 表名 (字段名1, 字段名2) values (值1, 值2), (值1, 值2); - 批量添加数据(全部字段):
insert into 表名 values (值1, 值2, ...), (值1, 值2, ...);
注意:
- 插入数据时,指定的字段顺序需要与值的顺序是一一对应的。
- 字符串和日期型数据应该包含在引号中。
- 插入的数据大小,应该在字段的规定范围内。
1 | |
修改数据UPDATE
- 修改数据:
update 表名 set 字段名1 = 值1 , 字段名2 = 值2 , .... [ where 条件 ] ;
注意:修改语句的条件可以有,也可以没有,如果没有条件,则会修改整张表的所有数据。
1 | |
删除DELETE
- 删除数据:
delete from 表名 [ where 条件 ];
注意:
DELETE语句的条件可以有,也可以没有,如果没有条件,则会删除整张表的所有数据。DELETE语句不能删除某一个字段的值(如果要操作,可以使用UPDATE,将该字段的值置为NULL)。
1 | |
数据库查询DQL
DQL英文全称是Data Query Language(数据查询语言),用来查询数据库表中的记录。
关键字:SELECT
基本查询
- 查询多个字段:
select 字段1, 字段2, 字段3 from 表名; - 查询所有字段(通配符):
select * from 表名; - 设置别名:
select 字段1 [ as 别名1 ] , 字段2 [ as 别名2 ] from 表名; - 去除重复记录:
select distinct 字段列表 from 表名;
注意:*号代表查询所有字段,在实际开发中尽量少用(不直观、影响效率)。
1 | |
1 | |
条件查询
- 条件查询:
select 字段列表 from 表名 where 条件列表 ;
| 比较运算符 | 功能 |
|---|---|
| > | 大于 |
| >= | 大于等于 |
| < | 小于 |
| <= | 小于等于 |
| = | 等于 |
| <> 或 != | 不等于 |
| between … and … | 在某个范围之内(含最小、最大值) |
| in(…) | 在in之后的列表中的值,多选一 |
| like 占位符 | 模糊匹配(_匹配单个字符, %匹配任意个字符) |
| is null | 是null |
| 逻辑运算符 | 功能 |
|---|---|
| and 或 && | 并且 (多个条件同时成立) |
| or 或 || | 或者 (多个条件任意一个成立) |
| not 或 ! | 非 , 不是 |
1 | |
分组查询
介绍:将一列数据作为一个整体,进行纵向计算。
1.select 聚合函数(字段列表) from 表名 ;
| 函数 | 功能 |
|---|---|
| count | 统计数量 |
| max | 最大值 |
| min | 最小值 |
| avg | 平均值 |
| sum | 求和 |
注意:
null值不参与所有聚合函数运算。- 统计数量可以使用:
count()、count(字段)、count(常量),推荐使用count()。
2.select 字段列表 from 表名 [ where 条件 ] group by 分组字段名 [ having 分组后过滤条件 ];
where与having区别:
执行时机不同:where是分组之前进行过滤,不满足where条件,不参与分组;而having是分组之后对结果进行过滤。
判断条件不同:where不能对聚合函数进行判断,而having可以。
注意:
- 分组之后,查询的字段一般为聚合函数和分组字段,查询其他字段无任何意义。
- 执行顺序:
where> 聚合函数 >having。where在分组之前执行,having在分组之后执行。
1 | |
排序查询
select 字段列表 from 表名 [ where 条件列表 ] [ group by 分组字段 ] order by 字段1 排序方式1 , 字段2 排序方式2 … ;
排序方式:ASC升序(默认值),DESC:降序。
注意:如果是多字段排序,当第一个字段值相同时,才会根据第二个字段进行排序。
1 | |
分页查询
select 字段列表 from 表名 limit 起始索引, 查询记录数 ;
注意:
- 起始索引从0开始,
起始索引 = (查询页码 - 1)* 每页显示记录数。 - 分页查询是数据库的方言,不同的数据库有不同的实现,
MySQL中是LIMIT。 - 如果查询的是第一页数据,起始索引可以省略,直接简写为
limit 10。
1 | |
函数
if(表达式, tvalue, fvalue):当表达式为true时,取值tvalue;当表达式为false时,取值fvalue。case expr when value1 then result1 [when value2 then value2 ...] [else result] end
1 | |
多表查询
一对多(多对一)
案例:员工表和部门表的关系。
实现:在数据库表中多的一方,添加字段,来关联一的一方的主键。
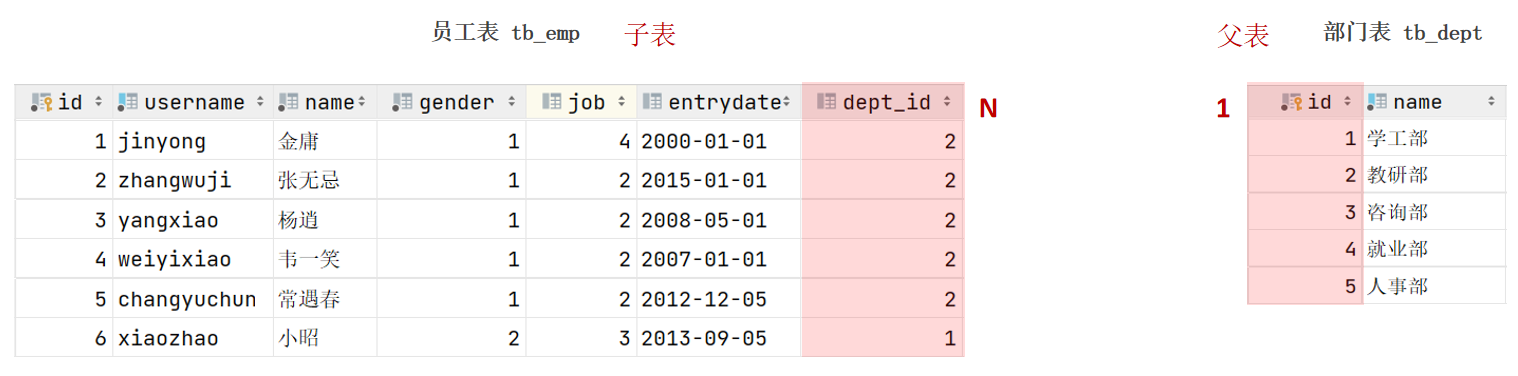
外键:
1 | |
物理外键:使用
foreign key定义外键关联另外一张表。缺点:影响增、删、改的效率(需要检查外键关系)。仅用于单节点数据库,不适用与分布式、集群场景。容易引发数据库的死锁问题,消耗性能。
逻辑外键(推荐使用):在业务层逻辑中,解决外键关联。通过逻辑外键,就可以很方便的解决上述问题。
1 | |
一对一
案例:用户与身份证信息的关系。
关系:一对一关系,多用于单表拆分,将一张表的基础字段放在一张表中,其他字段放在另一张表中,以提升操作效率。
实现:在任意一方加入外键,关联另外一方的主键,并且设置外键为唯一的UNIQUE。

1 | |
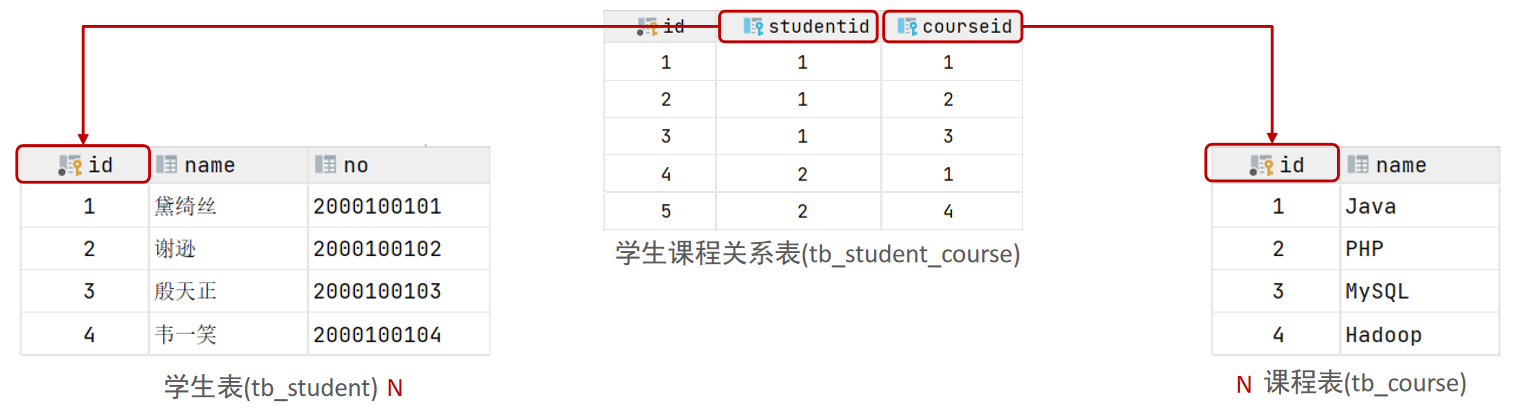
多对多
案例:学生与课程的关系。
关系:一个学生可以选修多门课程,一门课程也可以供多个学生选择。
实现:建立第三张中间表,中间表至少包含两个外键,分别关联两方主键。
1 | |
多表查询定义
多表查询:指从多张表中查询数据。
笛卡尔积:笛卡尔乘积是指在数学中,两个集合(A集合和B集合)所有组合情况。(在多表查询时,需要消除无效的笛卡尔积。)
分类:
连接查询
内连接:相当于查询A、B交集部分数据。
外连接:
左外连接:查询左表所有数据(包括两张表交集部分数据)。
右外连接:查询右表所有数据(包括两张表交集部分数据)。
子查询
1 | |
内连接
隐式内连接:select 字段列表 from 表1 , 表2 where 条件 ... ;
显式内连接:select 字段列表 from 表1 [ inner ] join 表2 on 连接条件 ... ;
1 | |
外连接
左外连接:select 字段列表 from 表1 left [ outer ] join 表2 on 连接条件 ... ;
右外连接:select 字段列表 from 表1 right [ outer ] join 表2 on 连接条件 ... ;
1 | |
子查询
介绍:SQL语句中嵌套select语句,称为嵌套查询,又称子查询。
形式:select * from t1 where column1 = ( select column1 from t2 … );
子查询外部的语句可以是insert/update/delete/select 的任何一个,最常见的是select。
分类:
- 标量子查询:子查询返回的结果为单个值。
- 列子查询:子查询返回的结果为一列。
- 行子查询:子查询返回的结果为一行。
- 表子查询:子查询返回的结果为多行多列。
标量子查询
子查询返回的结果是单个值(数字、字符串、日期等),最简单的形式。
常用的操作符:= <> > >= < <=
1 | |
列子查询
子查询返回的结果是一列(可以是多行)。
常用的操作符:in、not in等。
1 | |
行子查询
子查询返回的结果是一行(可以是多列)。
常用的操作符:= 、<> 、in 、not in
1 | |
表子查询
子查询返回的结果是多行多列,常作为临时表。
常用的操作符:in
1 | |
案例
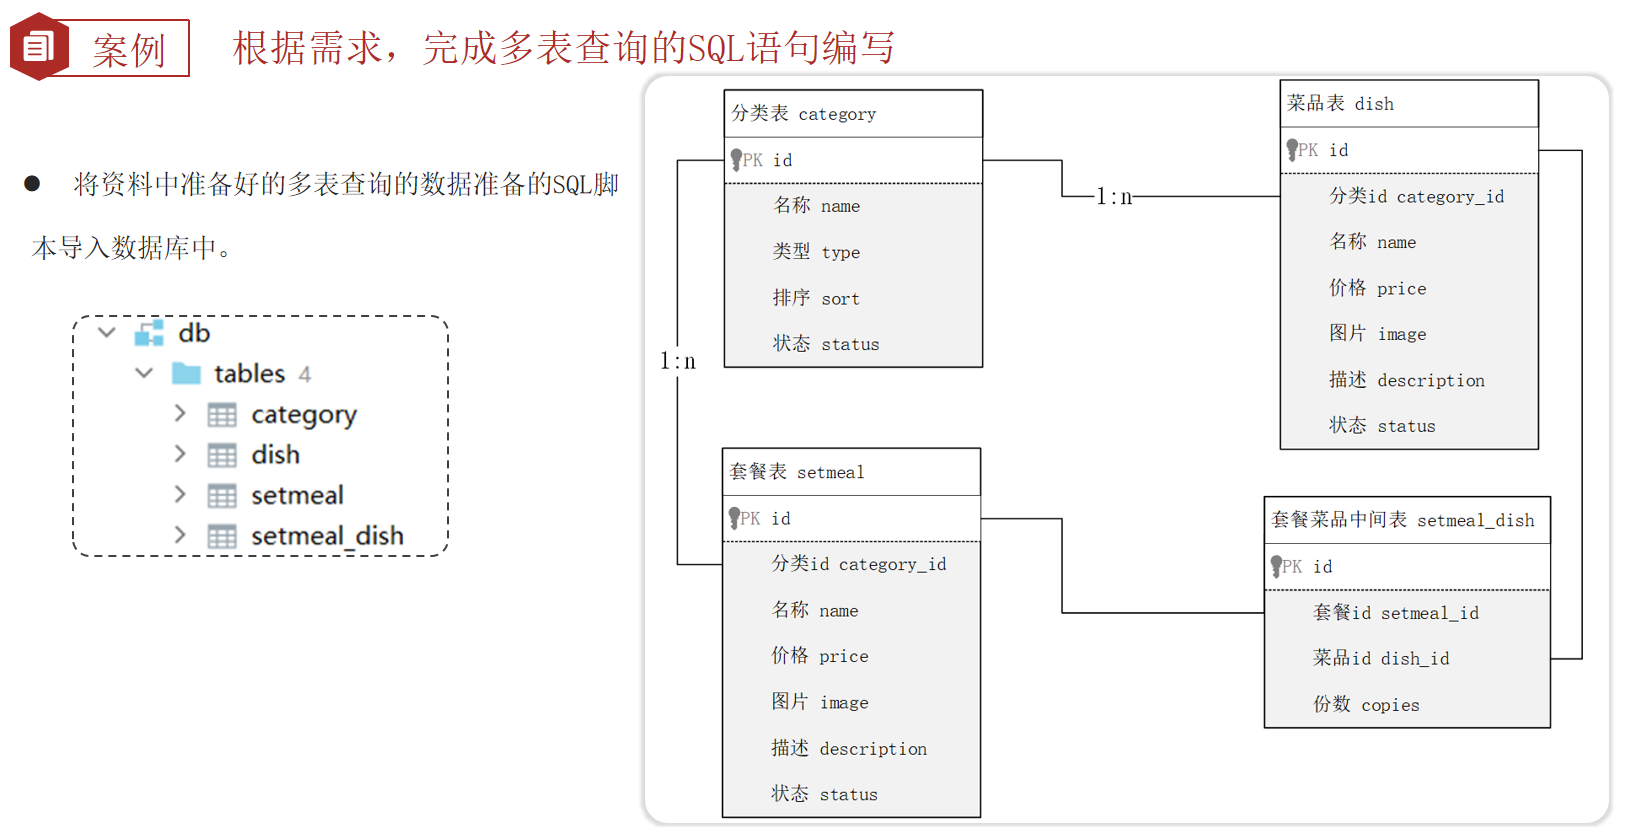
1 | |
需求:
1 | |
事务
事务是一组操作的集合,它是一个不可分割的工作单位。事务会把所有的操作作为一个整体一起向系统提交或撤销操作请求,即这些操作 要么同时成功,要么同时失败。
注意:默认MySQL的事务是自动提交的,也就是说,当执行一条DML语句,MySQL会立即隐式的提交事务。
事务的控制
- 开启事务:
start transaction;或begin; - 提交事务:
commit; - 回滚事务:
rollback;
1 | |
事务的四大特性(ACID)
- 原子性(Atomicity):事务是不可分割的最小单元,要么全部成功,要么全部失败。
- 一致性(Consistency):事务完成时,必须使所有的数据都保持一致状态。
- 隔离性(Isolation):数据库系统提供的隔离机制,保证事务在不受外部并发操作影响的独立环境下运行。
- 持久性(Durability):事务一旦提交或回滚,它对数据库中的数据的改变就是永久的。
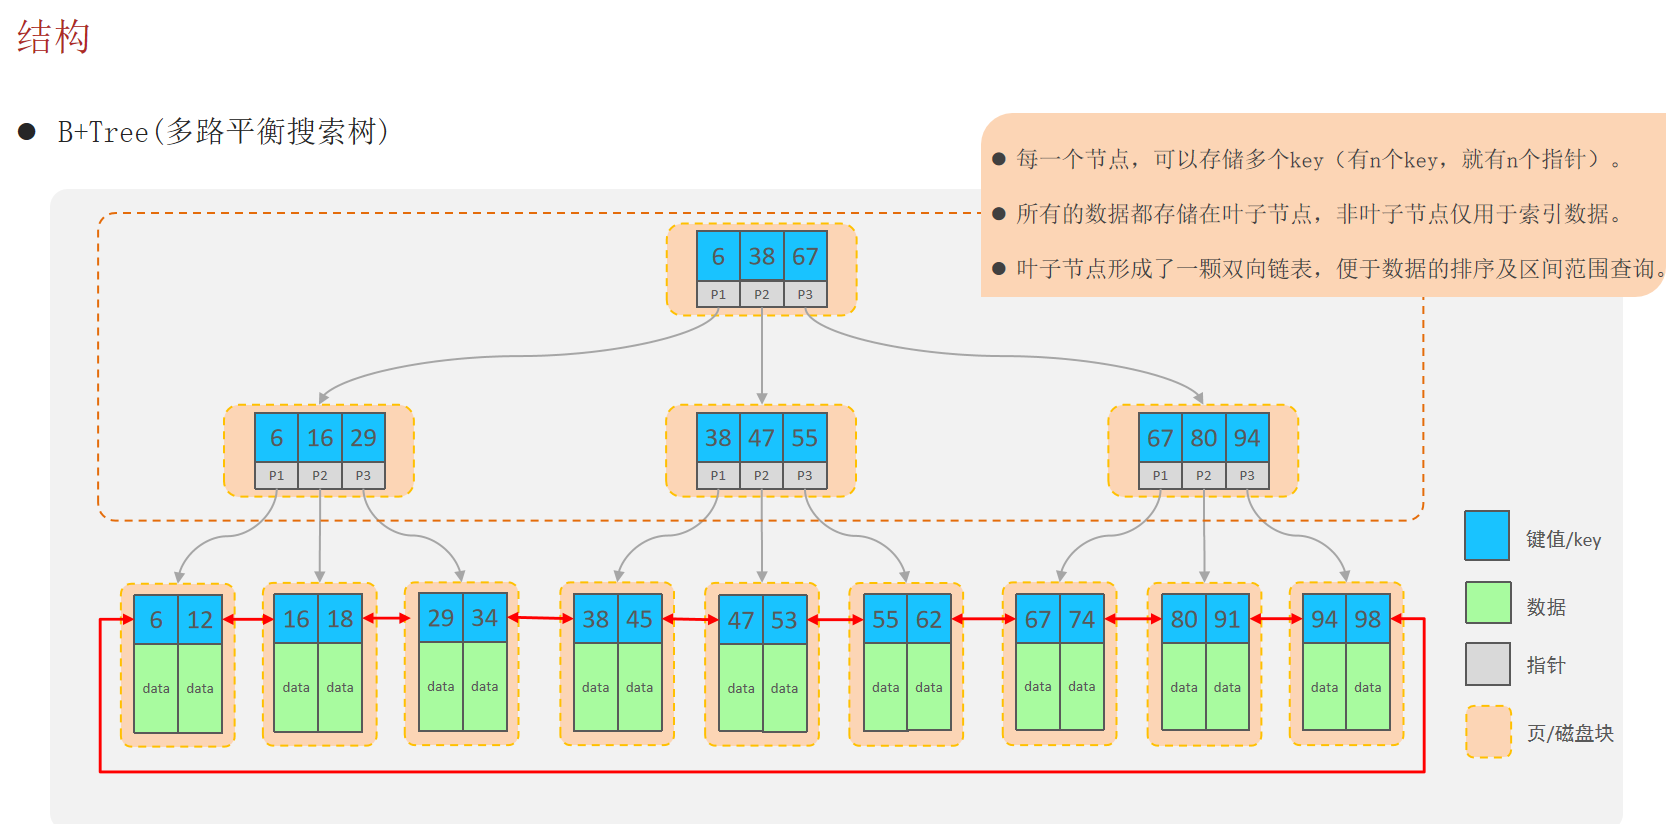
索引
索引(index)是帮助数据库高效获取数据的数据结构 。
优点:
- 提高数据查询的效率,降低数据库的
IO成本。 - 通过索引列对数据进行排序,降低数据排序的成本,降低
CPU消耗。
缺点:
- 索引会占用存储空间。
- 索引大大提高了查询效率,同时却也降低了
insert、update、delete的效率。
索引的结构
MySQL数据库支持的索引结构有很多,如:Hash索引、B+Tree索引、Full-Text索引等。我们平常所说的索引,如果没有特别指明,都是指默认的B+Tree结构组织的索引。
索引的语法
- 创建索引:
create [ unique ] index 索引名 on 表名 (字段名,... ) ; - 查看索引:
show index from 表名; - 删除索引:
drop index 索引名 on 表名;
注意:
- 主键字段,在建表时,会自动创建主键索引。
- 添加唯一约束
unique时,数据库实际上会添加唯一索引。
1 | |
Mybatis
MyBatis是一款优秀的持久层框架,用于简化JDBC的开发。
MyBatis本是Apache的一个开源项目iBatis,2010年这个项目由apache迁移到了google code,并且改名为MyBatis 。2013年11月迁移到Github。
官网:https://mybatis.org/mybatis-3/zh/index.html(现在无法访问)
The MyBatis Blog(现在可以访问)
MyBatis中文网:MyBatis中文网
Mybatis入门
Mybatis快速入门程序
案例:使用Mybatis查询所有用户数据
1.创建springboot工程,引入Mybatis的相关依赖:MyBatis Framework和MySQL Driver。
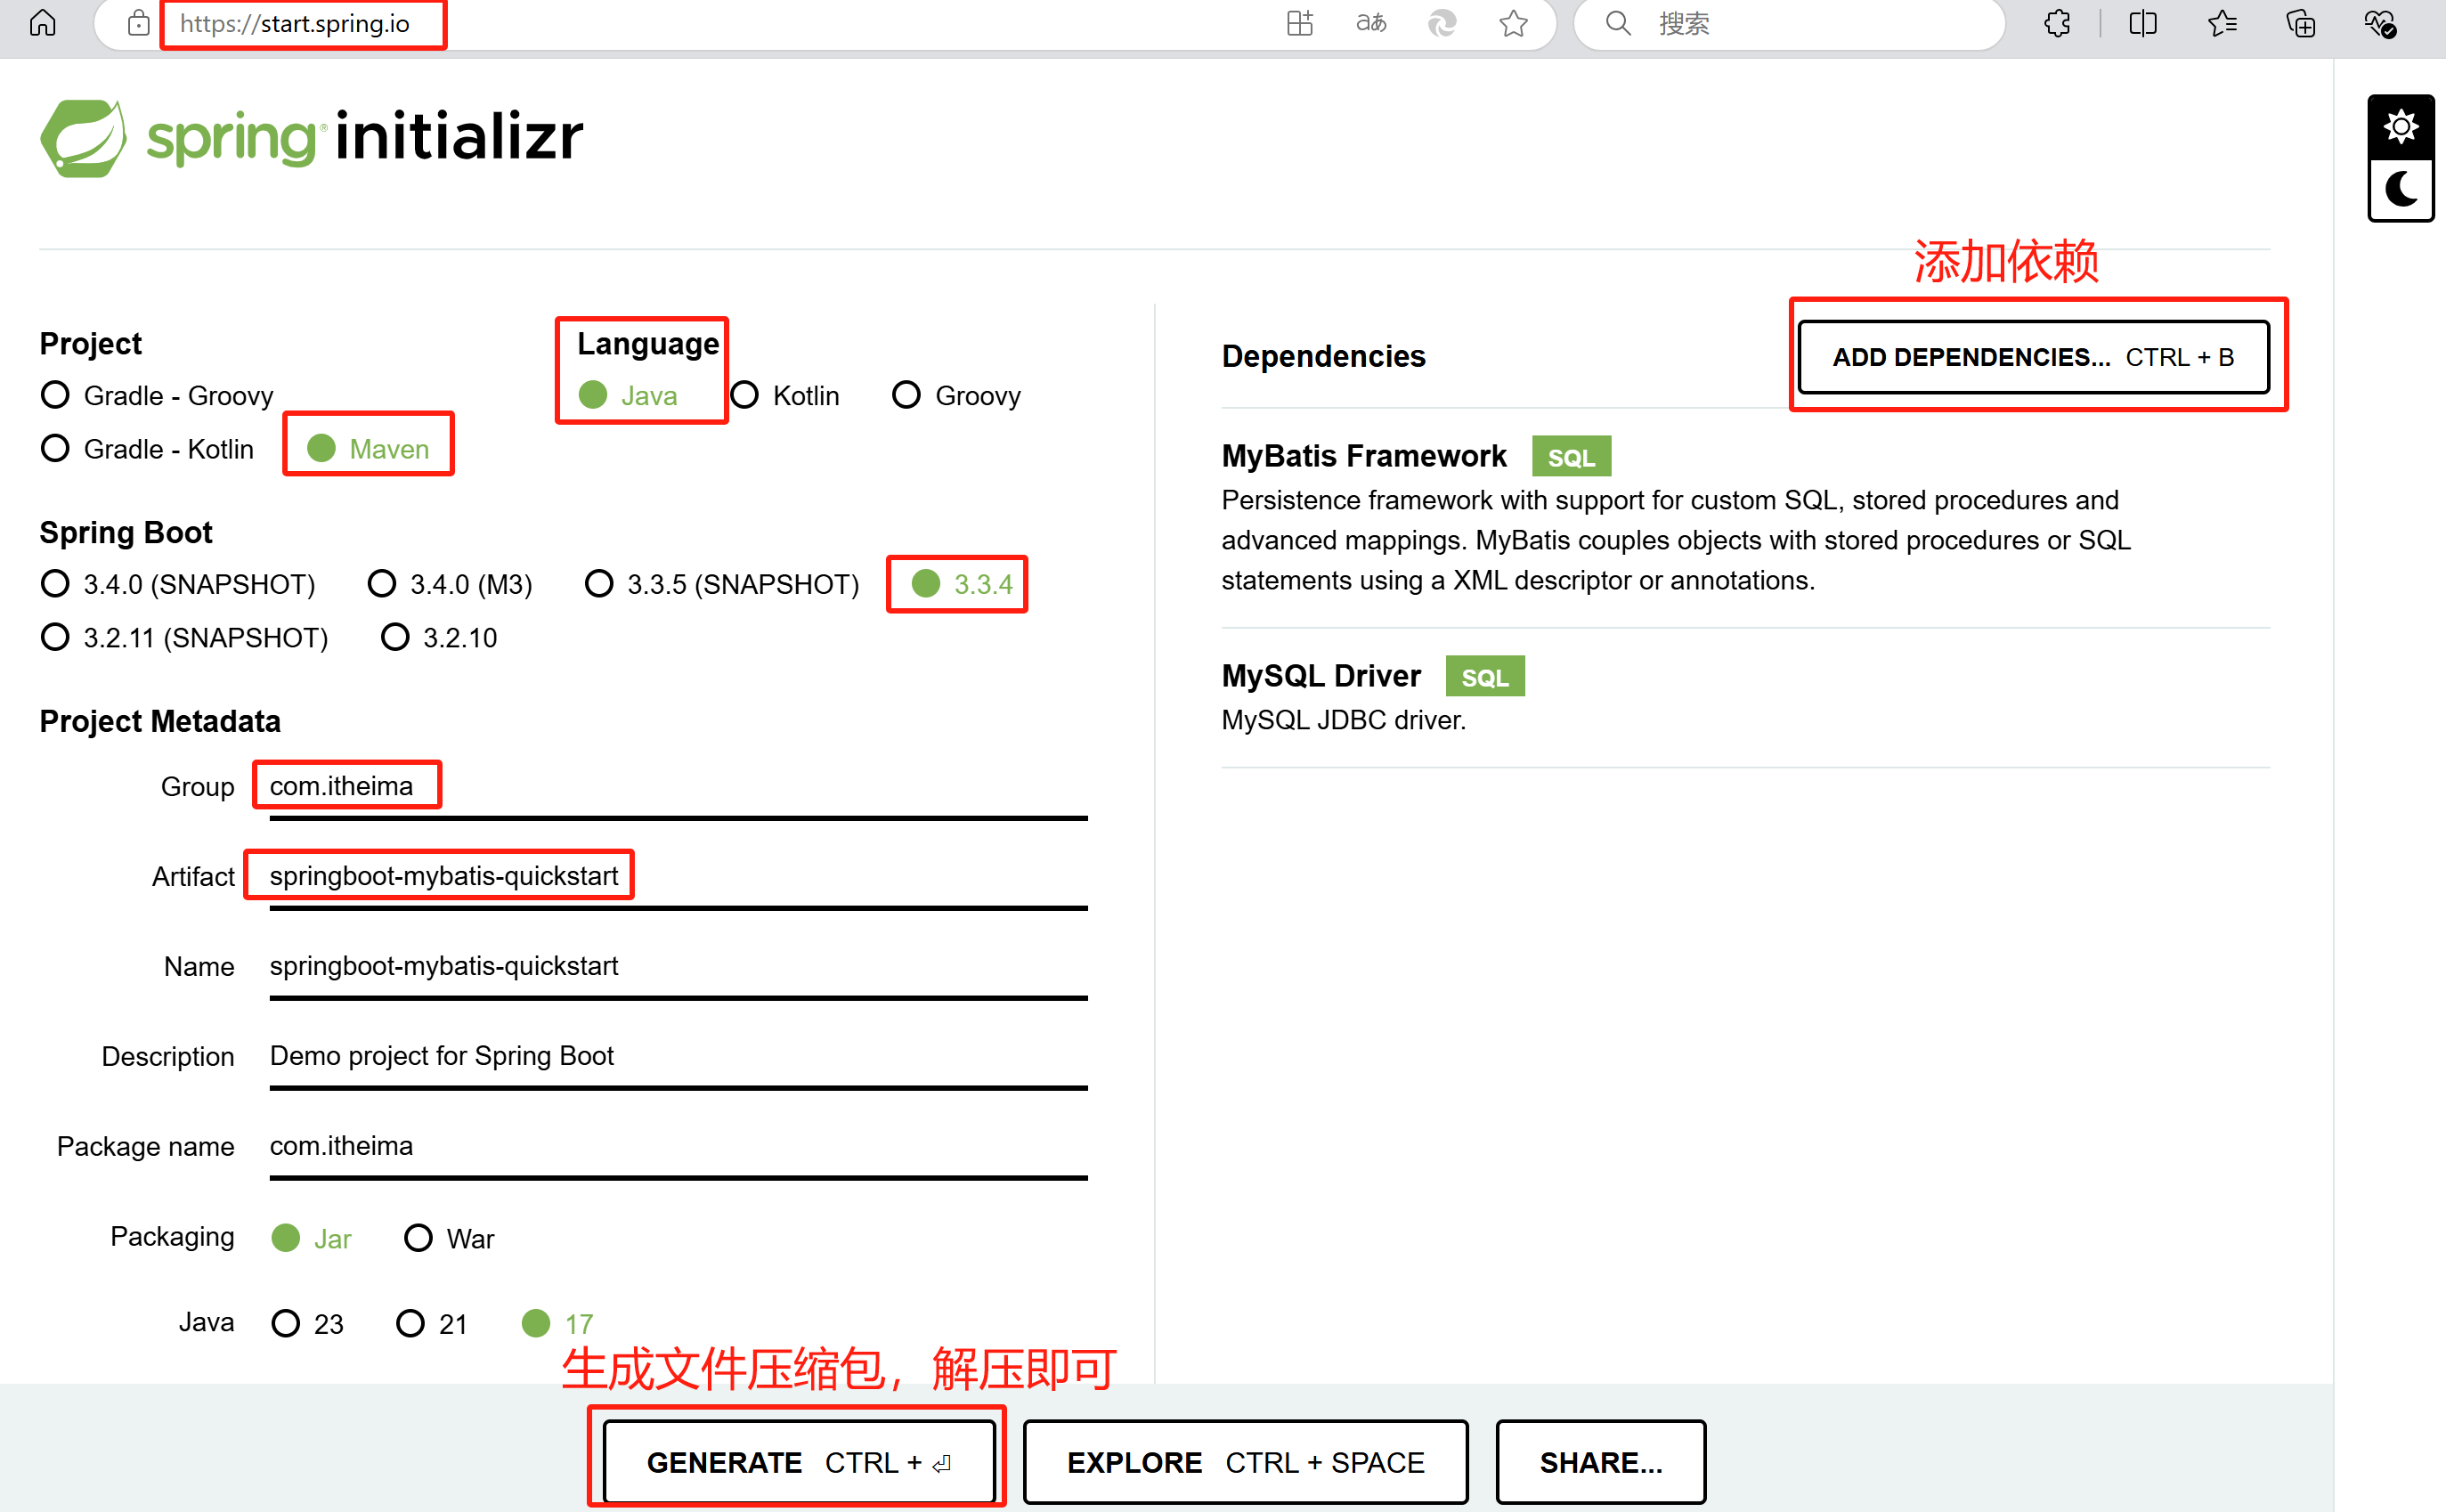
2.创建数据库mybatis,创建数据库表user。
1 | |
3.在com.itheima.pojo包下创建实体类User。
1 | |
4.配置Mybatis(数据库连接信息)
在src->main->resources->application.properties文件中,配置数据库连接信息。
1 | |
设置Properties文件编码:Idea 设置编码UTF-8 Idea中 .properties 配置文件中文乱码-CSDN博客
5.编写SQL语句(注解或XML)
在com.itheima.mapper包下创建接口UserMapper。
1 | |
6.单元测试
在src->test->java->com->itheima->SpringbootMybatisQuickstartApplicationTests.java文件下,进行测试。
1 | |
配置SQL提示
默认在Mybatis中编写SQL语句是不识别的。可以做如下配置:
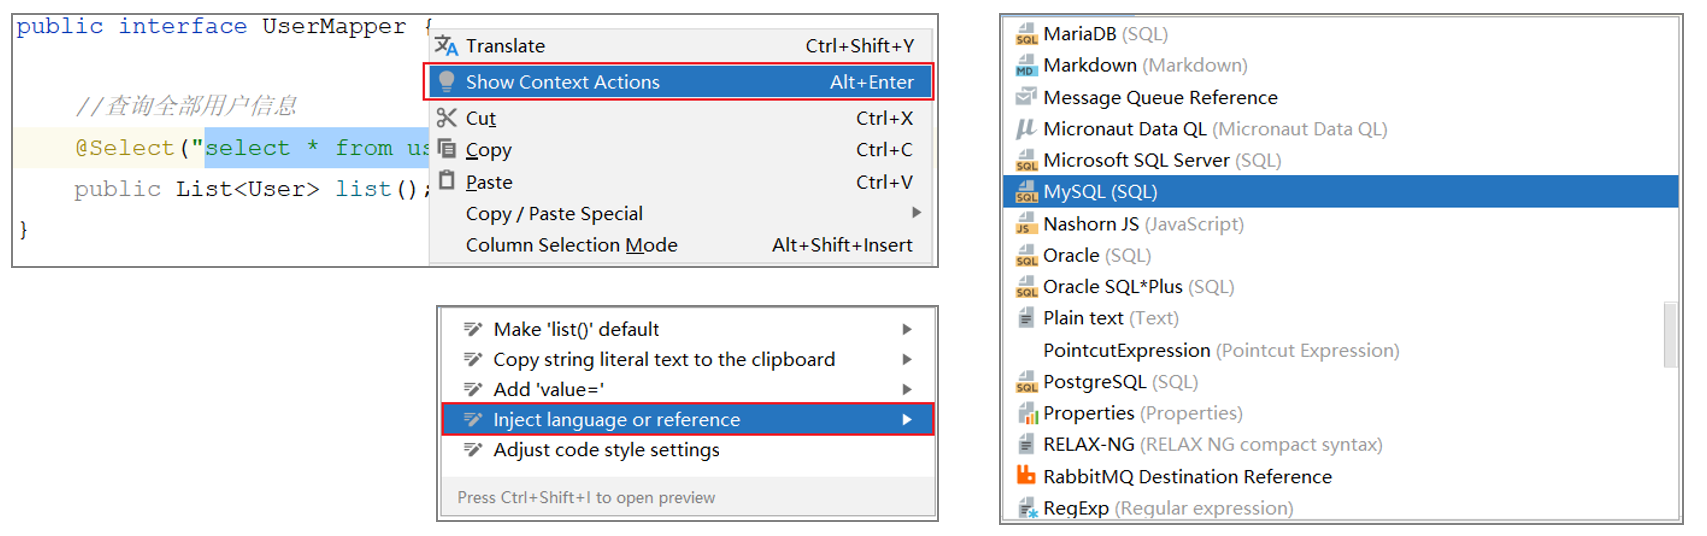
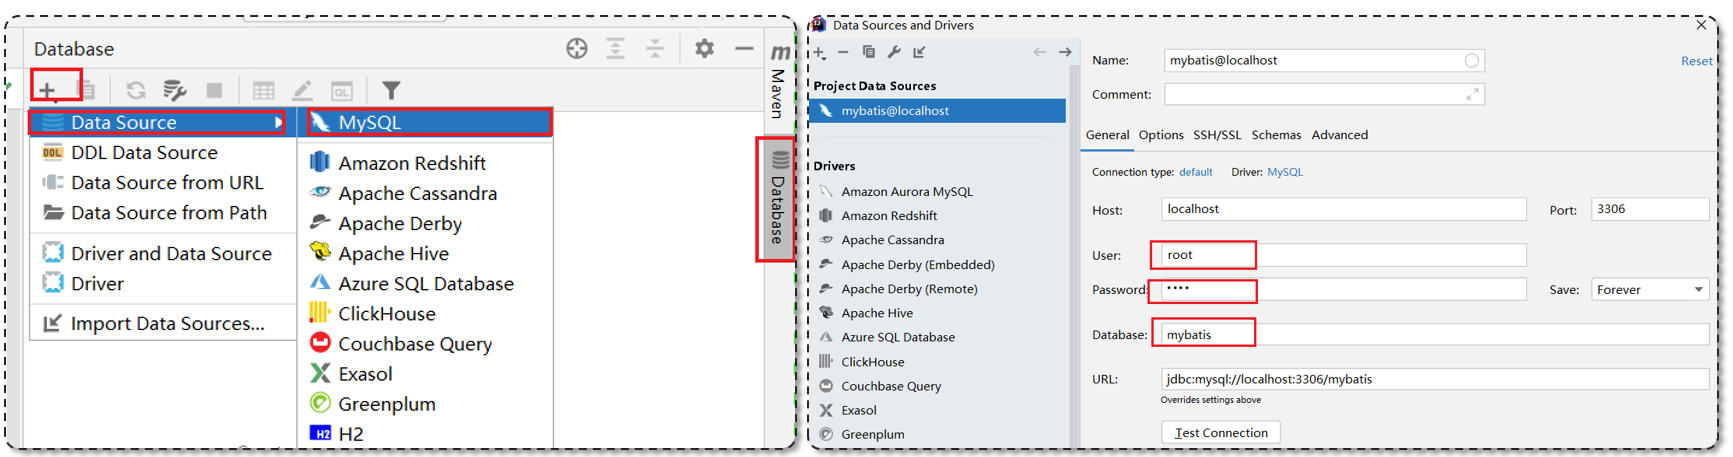
如果IDEA不提示表的信息, 是因为IDEA和数据库没有建立连接,不识别表信息。
解决方式:在IDEA中配置MySQL数据库连接。
JDBC
JDBC: ( Java DataBase Connectivity ),就是使用Java语言操作关系型数据库的一套API。
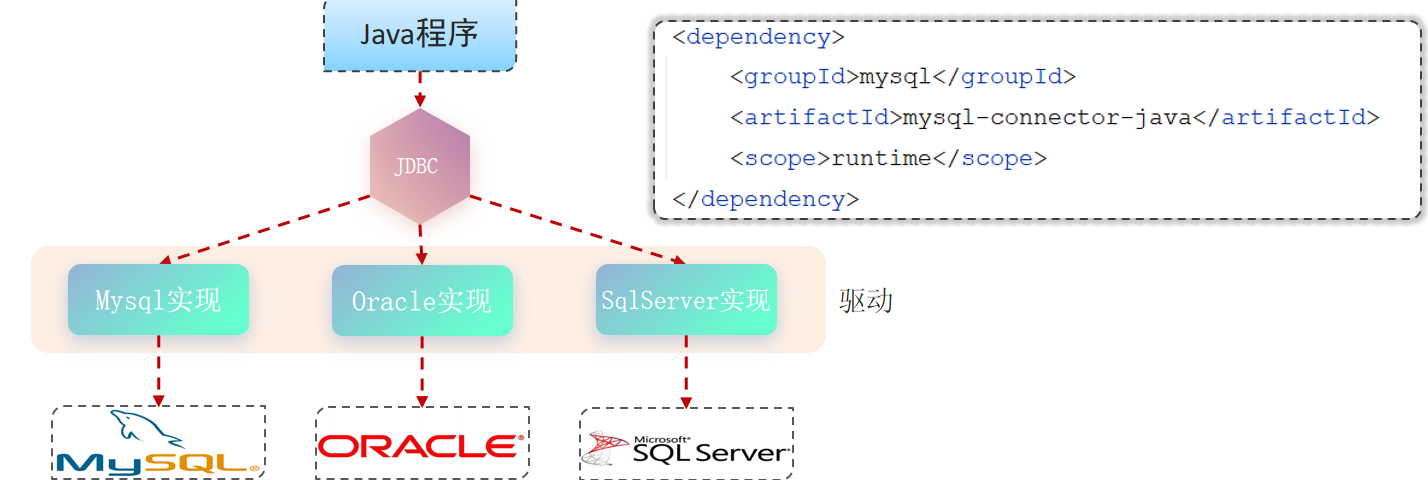
sun公司官方定义的一套操作所有关系型数据库的规范,即接口。- 各个数据库厂商去实现这套接口,提供数据库驱动
jar包。 - 程序员使用这套接口(
JDBC)编程,真正执行的代码是驱动jar包中的实现类。
1 | |
数据库连接池
- 数据库连接池是个容器,负责分配、管理数据库连接(
Connection)。 - 它允许应用程序重复使用一个现有的数据库连接,而不是再重新建立一个。
- 释放空闲时间超过最大空闲时间的连接,来避免因为没有释放连接而引起的数据库连接遗漏。
优势:资源重用,提升系统响应速度,避免数据库连接遗漏。
标准接口:DataSource
官方(
sun)提供的数据库连接池接口,由第三方组织实现此接口。功能:获取连接。
Connection getConnection() throws SQLException;常见产品:
C3P0,DBCP,Druid,Hikari(SpringBoot默认)。Druid(德鲁伊)连接池是阿里巴巴开源的数据库连接池项目。
SpringBoot默认使用Hikari:(测试控制台显示)
1 | |
切换Druid数据库连接池:
方法一:
在pom.xml文件中添加依赖:
1 | |
在src->main->resources->application.properties文件中添加:
1 | |
方法二:(我的使用这个会报错,暂时还没解决)
1 | |
Lombok
Lombok是一个实用的Java类库,能通过注解的形式自动生成构造器、getter/setter、equals、hashcode、toString等方法,并可以自动化生成日志变量。
使用Lombok时,还需要安装一个Lombok的插件(IDEA自带)。在pom.xml文件添加依赖:
1 | |
| 注解 | 作用 |
|---|---|
| @Getter/@Setter | 为所有的属性提供get/set方法 |
| @ToString | 会给类自动生成易阅读的 toString 方法 |
| @EqualsAndHashCode | 根据类所拥有的非静态字段自动重写 equals 方法和 hashCode 方法 |
| @Data | 提供了更综合的生成代码功能(@Getter + @Setter + @ToString + @EqualsAndHashCode) |
| @NoArgsConstructor | 为实体类生成无参的构造器方法 |
| @AllArgsConstructor | 为实体类生成除了static修饰的字段之外带有各参数的构造器方法。 |
1 | |
Lombok会在编译时,自动生成对应的Java代码。在target->classes->com->itheima->pojo->User.class文件夹下,可以查看编译后的文件,Lombok已经自动生成相应的方法。
Mybatis基础操作
准备工作
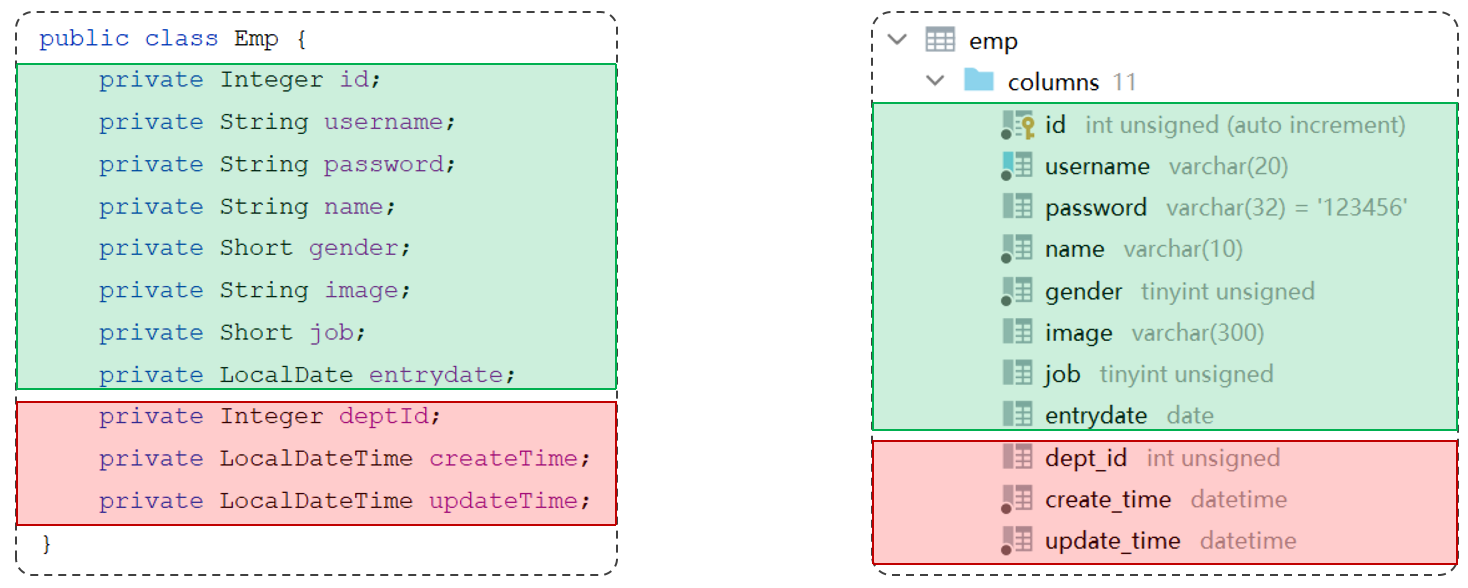
1.准备数据库表emp。
1 | |
2.创建一个新的springboot工程,选择引入对应的起步依赖(mybatis、mysql驱动、lombok)。
3.application.properties中引入数据库连接信息。
1 | |
4.创建对应的实体类Emp(实体类属性采用驼峰命名)。
1 | |
5.准备Mapper接口EmpMapper。
1 | |
删除
根据主键删除
1 | |
注意:如果mapper接口方法形参只有一个普通类型的参数,#{…}里面的属性名可以随便写,如:#{id}、#{value}。
1 | |
输出日志:
1 | |
参数占位符
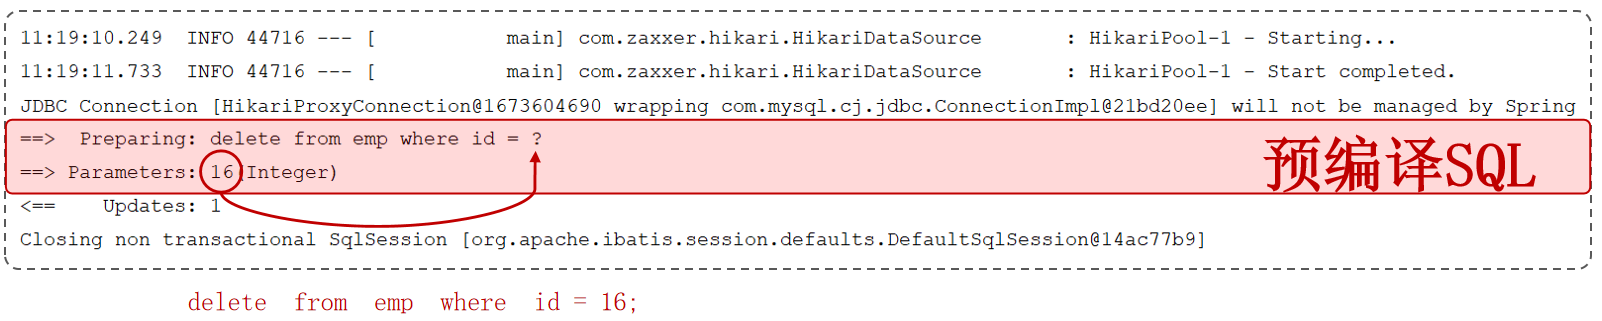
#{…}:执行SQL时,会将#{…}替换为?,生成预编译SQL,会自动设置参数值。使用时机:参数传递,都使用#{…}。${…}:拼接SQL。直接将参数拼接在SQL语句中,存在SQL注入问题。使用时机:对表名、列表进行动态设置时使用。
日志输出
在application.properties中,打开mybatis的日志,并指定输出到控制台。
1 | |
SQL注入
SQL注入是通过操作输入的数据来修改事先定义好的SQL语句,以达到执行代码对服务器进行攻击的方法。
1 | |
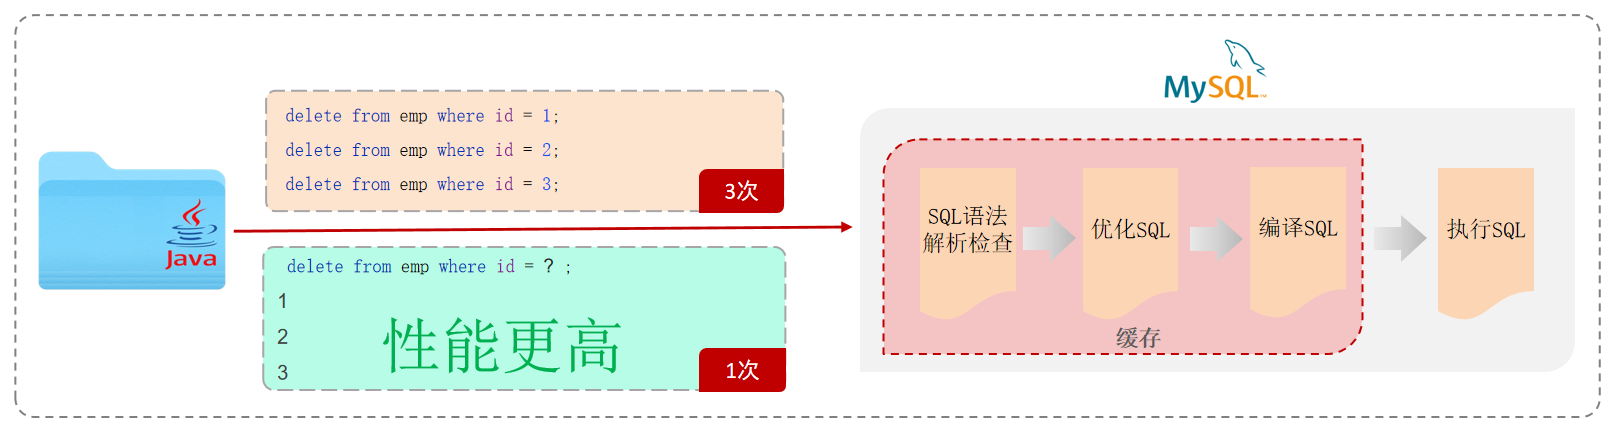
预编译SQL
预编译SQL性能更高,更安全(防止SQL注入)。
增加
1 | |
1 | |
输出日志:
1 | |
增加(主键返回)
在数据添加成功后,需要获取插入数据库数据的主键。
1 | |
1 | |
输出日志:
1 | |
更新
1 | |
1 | |
输出日志:
1 | |
查询
1 | |
1 | |
输出日志:
1 | |
注意:deptId=null, createTime=null, updateTime=null,这三个字段的值没有封装进Emp对象中。
数据封装
实体类属性名和数据库表查询返回的字段名一致,Mybatis会自动封装。
实体类属性名和数据库表查询返回的字段名不一致,不能自动封装。
解决方法:
1.起别名:在SQL语句中,对不一样的列名起别名,别名和实体类属性名一样。
1 | |
2.手动结果映射:通过@Results及@Result进行手动结果映射。
1 | |
3.开启驼峰命名:如果字段名与属性名符合驼峰命名规则,Mybatis会自动通过驼峰命名规则映射。
1 | |
输出日志:
1 | |
条件查询
#{…}无法出现在引号之内,因为#{…}要被?所替代,所以'%#{name}%'编译后会变成'%?%'。
解决方法:
1.将'%#{name}%'修改成'%${name}%'。但是使用${}存在性能低、不安全、SQL注入问题。
1 | |
1 | |
输出日志:
1 | |
2.使用concat字符串拼接函数concat。
1 | |
输出日志:
1 | |
参数名说明
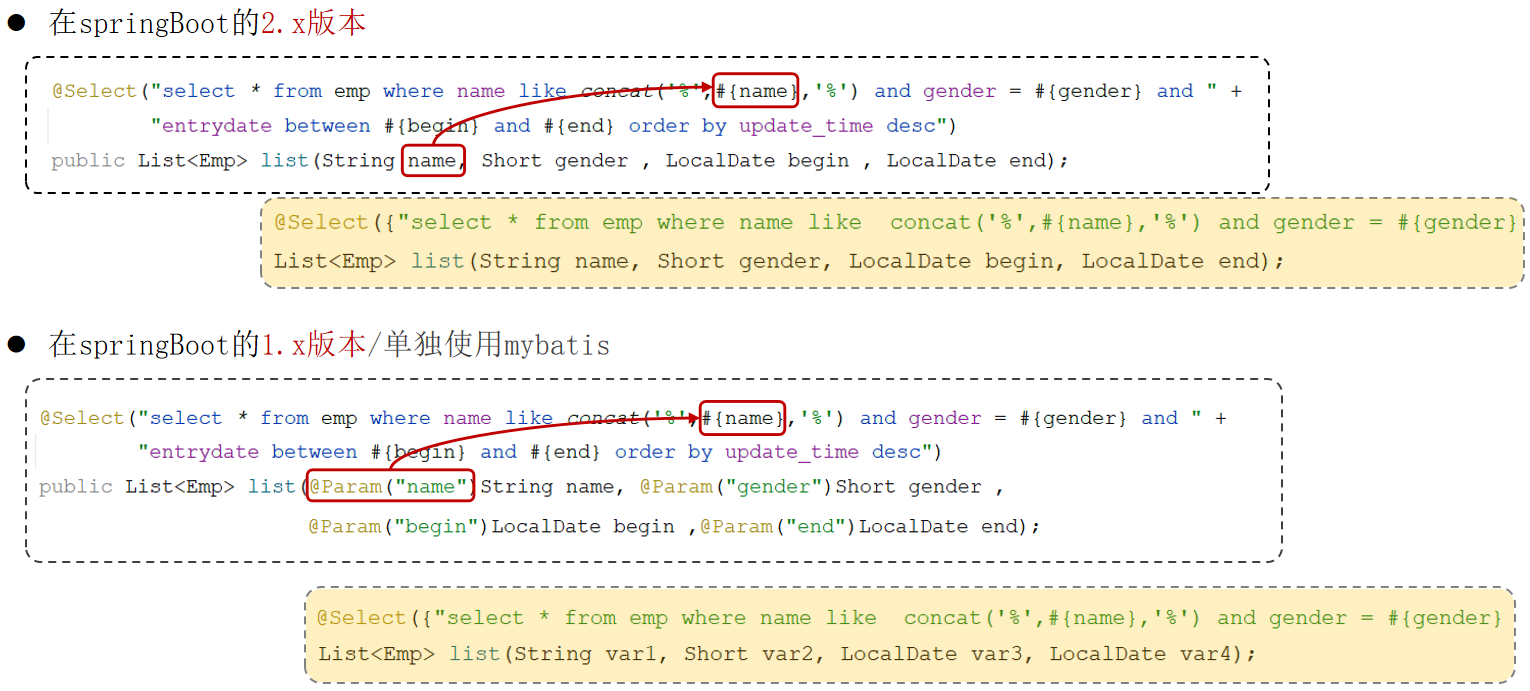
XML映射文件
规范
XML映射文件的名称与Mapper接口名称一致,并且将XML映射文件和Mapper接口放置在相同包下(同包同名)。XML映射文件的namespace属性为Mapper接口全限定名一致。XML映射文件中SQL语句的id与Mapper接口中的方法名一致,并保持返回类型一致。
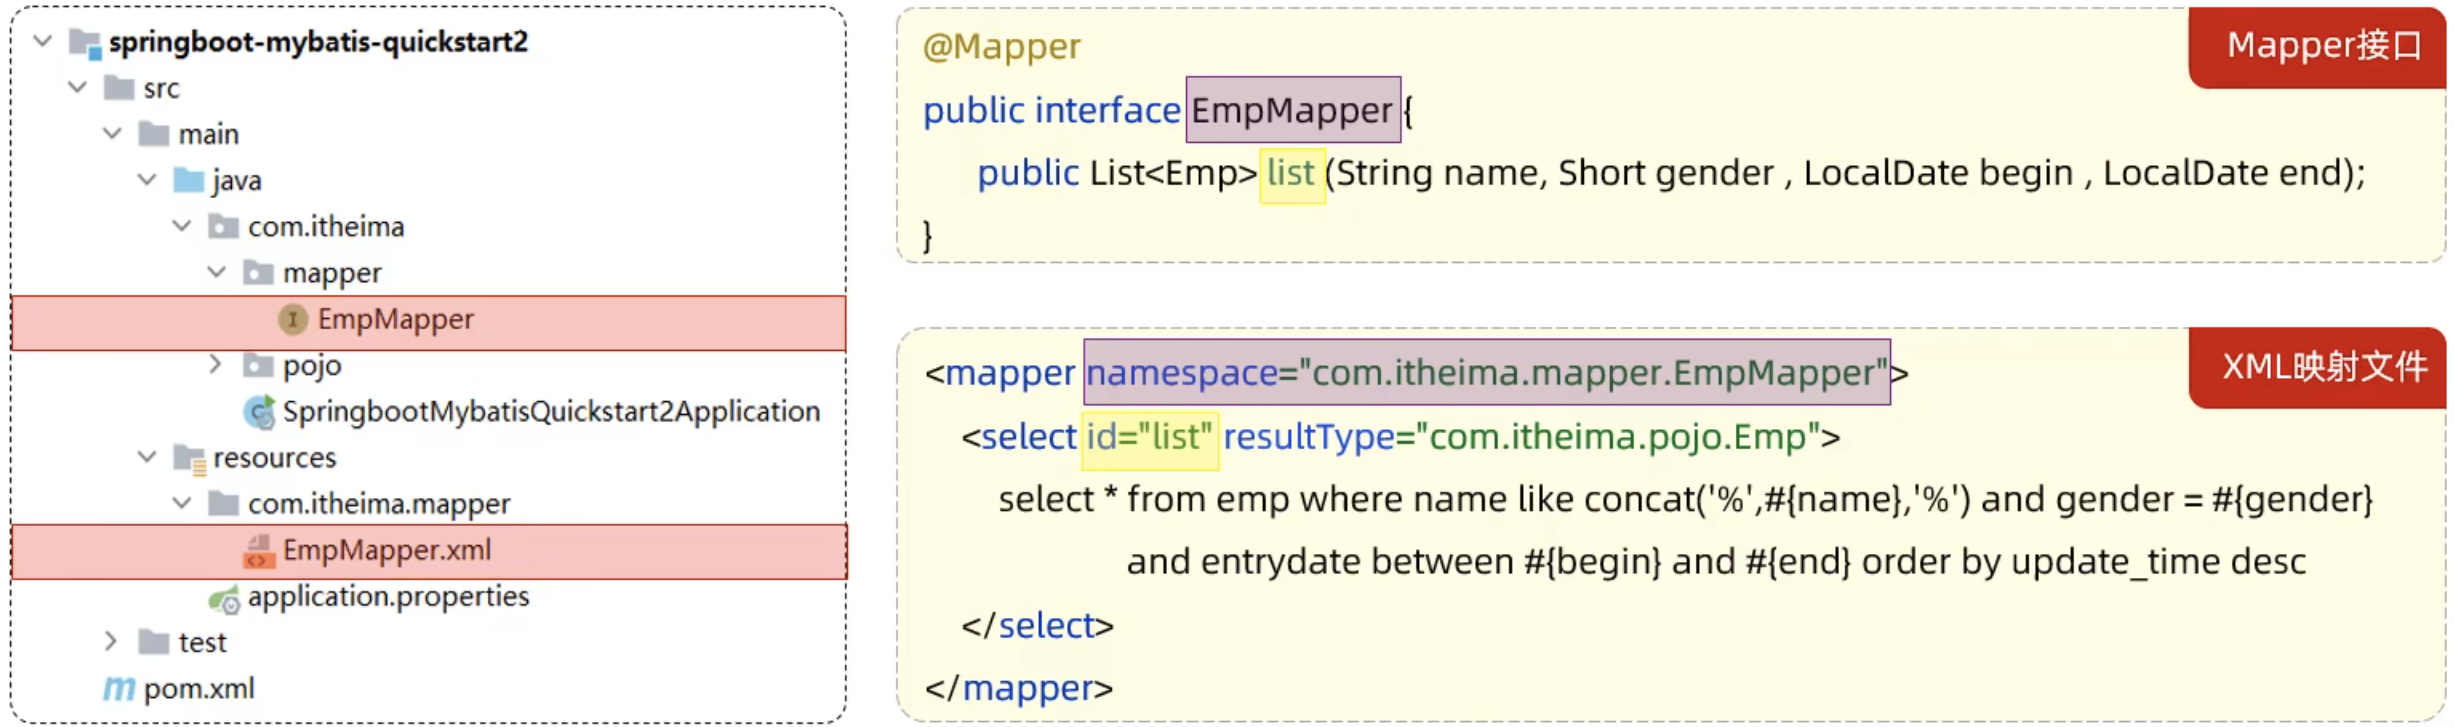
1.在下resources文件夹下新建一样的包com/itheima/mapper,在该包下新建同名的XML文件EmpMapper.xml。
1 | |
2.在java文件夹下的包com/itheima/mappe中的EmpMapper.java文件编写查询方法。
1 | |
3.测试方法不变。
1 | |
注意:使用XML映射文件本质是通过相同的包,接口名和方法名,在XML文件中找到对应的SQL语句去执行该操作。
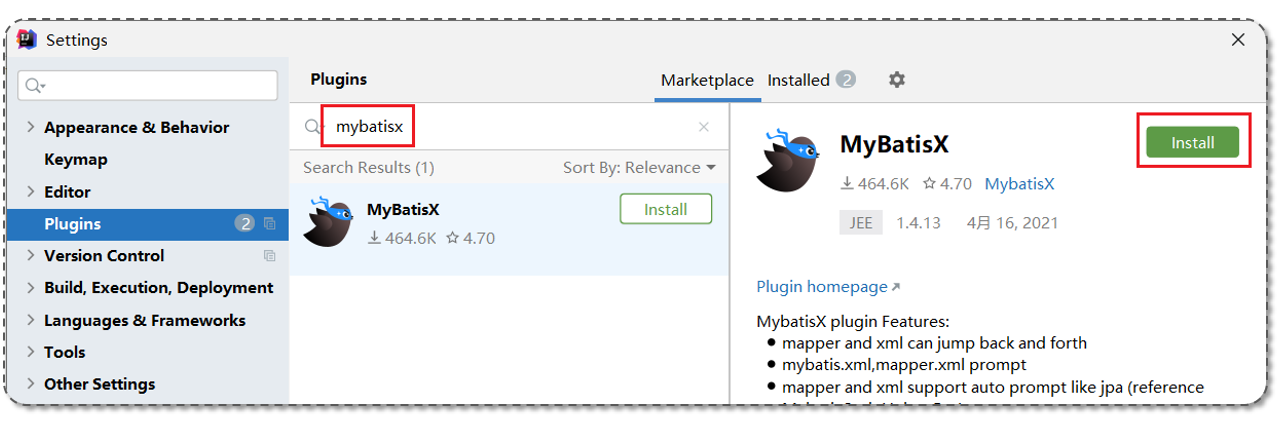
MybatisX
MybatisX是一款基于IDEA的快速开发Mybatis的插件,为效率而生。
安装:
使用Mybatis的注解,主要是来完成一些简单的增删改查功能。如果需要实现复杂的SQL功能,建议使用XML来配置映射语句。
官方说明:https://mybatis.net.cn/getting-started.html
Mybatis动态SQL
动态SQL
随着用户的输入或外部条件的变化而变化的SQL语句,称为动态SQL。
<if>
<if>:用于判断条件是否成立。使用test属性进行条件判断,如果条件为true,则拼接SQL。
<where>:where元素只会在子元素有内容的情况下才插入where子句。而且会自动去除子句的开头的AND或OR。
1 | |
1 | |
1 | |
案例
案例说明:动态更新员工信息,如果更新时传递有值,则更新;如果更新时没有传递值,则不更新。
<set>:动态地在行首插入SET关键字,并会删掉额外的逗号。(用在update语句中)
1 | |
1 | |
1 | |
<foreach>
属性:
collection:集合名称。item:集合遍历出来的元素/项。separator:每一次遍历使用的分隔符。open:遍历开始前拼接的片段。close:遍历结束后拼接的片段。
1 | |
1 | |
1 | |
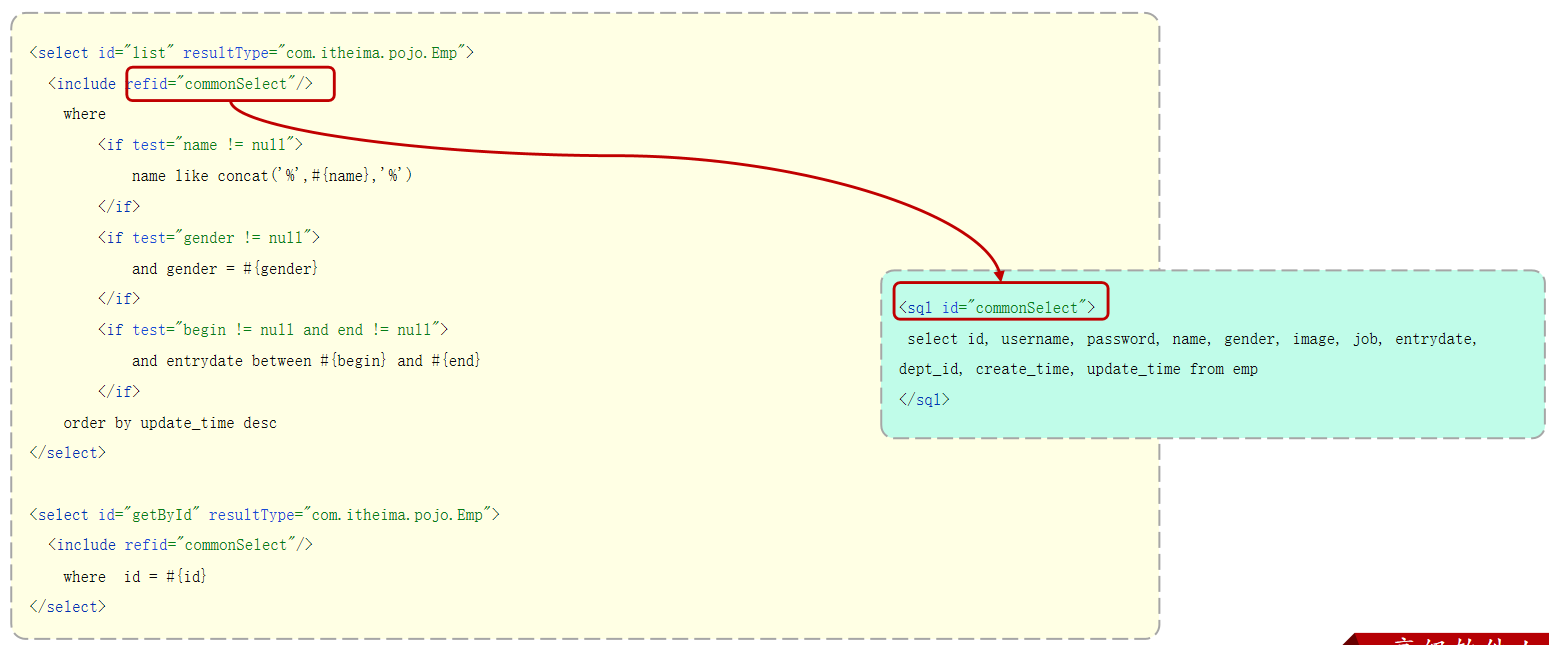
<sql>和<include>
<sql>:定义可重用的SQL片段。id指定唯一标识。
<include>:通过属性refid,指定包含的SQL片段。
1 | |